

Unsingle Rib Adjustment Instructions Owner's Manual Supplement
Unsingle Rib Adjustment Instructions Owner's Manual Supplement

WARNING: ALWAYS KEEP THE MUZZLE POINTED IN A SAFE DIRECTION. BEFORE STARTING ADJUSTMENT OR DISASSEMBLY PROCEDURES, PLACE THE “SAFETY” IN THE ON SAFE POSITION, OPEN THE ACTION AND VISUALLY INSPECT THE CHAMBER(S) TO BE ABSOLUTELY CERTAIN THE FIREARM IS COMPLETELY UNLOADED. FAILURE TO FOLLOW THIS WARNING COULD RESULT IN SERIOUS INJURY OR DEATH.
PLEASE READ AND UNDERSTAND ALL INSTRUCTIONS AND WARNINGS IN THE OWNER’S MANUAL SUPPLIED WITH YOUR SHOTGUN AND THOSE FOUND IN THIS SUPPLEMENT BEFORE USING YOUR NEW SHOTGUN. FAILURE TO FOLLOW THESE INSTRUCTIONS, OR FAILURE TO FOLLOW ANY SAFETY WARNING, MAY RESULT IN INJURY OR DEATH TO YOURSELF OR OTHERS, OR MAY CAUSE DAMAGE TO YOUR FIREARM.
If your shotgun owner’s manual is missing, contact the Browning customer service department immediately at (800) 333-3288 for a free copy, or download one online at browning.com.
WARNING: DISCHARGING FIREARMS IN POORLY VENTILATED AREAS, CLEANING FIREARMS OR HANDLING AMMUNITION MAY RESULT IN EXPOSURE TO LEAD AND OTHER SUBSTANCES KNOWN TO CAUSE BIRTH DEFECTS, REPRODUCTIVE HARM AND OTHER SERIOUS PHYSICAL INJURY. HAVE ADEQUATE VENTILATION AT ALL TIMES. WASH HANDS THOROUGHLY AFTER EXPOSURE.
WARNING: WEAR EYE PROTECTION WHEN DISASSEMBLING AND CLEANING YOUR SHOTGUN TO PREVENT SPRINGS, SPRING-LOADED PARTS, SOLVENTS OR OTHER AGENTS FROM CONTACTING YOUR EYES, RESULTING IN INJURY.
Browning Unsingle Shotgun Rib
Browning Unsingle Shotgun Rib
Some Browning shotguns offer an adjustable rib that allows you to fine-tune the angle of the rib for point of impact and sight picture. This perfect bead alignment promotes consistent head position and eye-to-rib alignment, resulting in improved shooting performance and higher scores. The shotgun shown in the photographs are of a Browning Cynergy, the adjustments on your Unsingle shotgun will be similar.
WARNING: BEFORE ATTEMPTING TO ADJUST THE RIB ON A BROWNING UNSINGLE SHOTGUN, PLACE THE “SAFETY” IN THE ON SAFE POSITION. OPEN THE ACTION AND MAKE CERTAIN YOUR SHOTGUN IS COMPLETELY UNLOADED. KEEP THE MUZZLE POINTED IN A SAFE DIRECTION. FAILURE TO FOLLOW THESE WARNINGS COULD RESULT IN SERIOUS INJURY OR DEATH.

NOTICE: THE UPPER CHAMBER OF THE MONOBLOCK IS PLUGGED FOR SAFETY REASONS TO PREVENT INSERTION OF A SHELL INTO THAT CHAMBER.
Adjusting the Rib
Adjusting the Rib
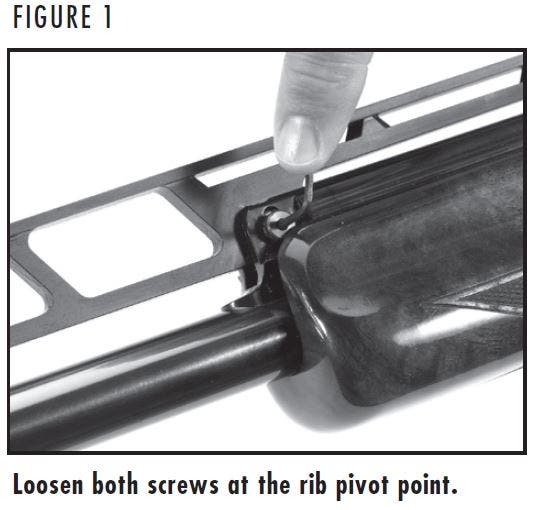
1. Use a 7/64" Allen wrench to loosen both the screws at the rib pivot point, located at the junction of the rib and the barrel assembly just above the front of the forearm (Figure 1). Only loosen the screws enough to allow movement, as completely removing the two screws could cause the loss of small parts contained in the rib pivot point assembly.
NOTICE: FAILURE TO LOOSEN BOTH OF THESE SCREWS BEFORE ANY FURTHER ADJUSTMENT CREATES A CONDITION IN WHICH THE RIB IS NOT ALLOWED TO PIVOT OR MOVE VERTICALLY AND CAN RESULT IN BENDING THE RIB.
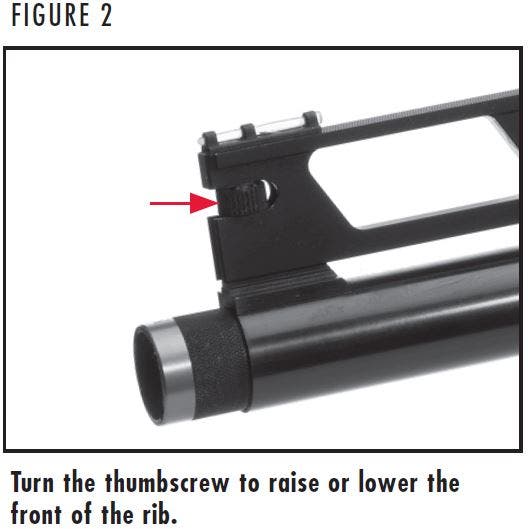
2. The point of impact adjustment is on the front end of the rib and is adjusted by a spring detent thumbscrew located between the rib and the barrel near the muzzle (Figure 2). Turn the thumbscrew clockwise to lower the front of the rib. Turn the thumbscrew counterclockwise to raise the front of the rib.
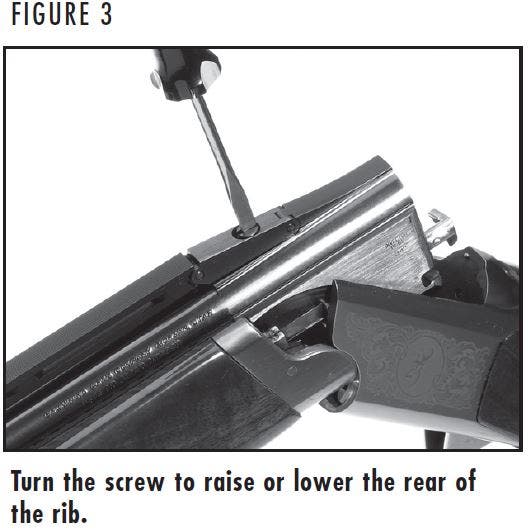
3. The sight picture is adjusted with the rear adjustment screw located on the monoblock just above the chamber area (Figure 3). It is a spring detent screw, giving audible and tactile clicks as it is adjusted. Using a suitable screwdriver, turn the screw. Clockwise rotation will lower the rear of the rib and counterclockwise will raise the rear of the rib.
4. By trial and error you can adjust the overall height and vertical angle of the rib to create the desired alignment that works best for your style of shooting.
5. When you have arrived at the desired rib position, use a 7/64" Allen wrench to tighten both the screws at the rib pivot point, located at the junction of the rib and the barrel assembly just above the front of the forearm (Figure 1). Do not overtighten the screws.
NOTICE: DO NOT FIRE THE SHOTGUN WITH LOOSE OR MISSING RIB PIVOT SCREWS.
6. If further adjustment of the rib is necessary, follow all of the above steps each time the rib is adjusted.