

Operation and care of
Superposed Shotguns, Continental Superposed, and Express Rifles
Superposed Shotguns, Continental Superposed, and Express Rifles
Thank you for choosing a Browning Superposed shotgun.
Thank you for choosing a Browning Superposed shotgun.
Your Browning Superposed shotgun represents a piece of a rich history of quality firearms design and manufacture. The Superposed was John M. Browning's last invention. The result of the master gunmaker's brilliance combined with the demand for excellence of Belgium's master gunsmiths is readily seen in this high-quality firearm.
In its manufacture, we have endeavored to incorporate the very finest in materials and craftsmanship, and with reasonable care, this gun will provide many years of pleasure and dependable service. If you have any observations to make regarding its performance or appearance, we hope you will contact us immediately.
Thank you.
You Are Responsible for Firearms Safety
As a gun owner, you accept a set of responsibilities of the most demanding nature. How seriously you carry out these responsibilities can be the difference between life and death. Mistakes made with guns are final and cannot be paid for with money or regret.
There is no excuse for careless or abusive handling of any firearm. At all times handle your firearm with intense respect for its force, power and potential danger.
PLEASE READ AND UNDERSTAND ALL OF THE CAUTIONS, THE PROPER HANDLING PROCEDURES AND INSTRUCTION OUTLINED ON THIS PAGE BEFORE USING YOUR NEW FIREARM.
PLEASE READ AND PRACTICE THE FOLLOWING CAUTIONS:
CAUTION
1 - ALWAYS KEEP THE MUZZLE OF YOUR FIREARM POINTED IN A SAFE DIRECTION even though you are certain the shotgun is unloaded and '' on safe.'' Never point any firearm at anything you do not intend to shoot. Be extremely alert and aware of all persons and property within range of your ammunition.
2 - NEVER RELY TOTALLY ON YOUR SHOTGUN'S "SAFETY" DEVICE.
Always assume that your gun can be fired at any time, even with all safety mechanisms engaged. The word "safety" describes a gun's mechanical devices that are designed to place your gun in a SAFER status. No guarantee can be made that the gun will not fire even if the "safety" is in the "on safe" position. See "Operation of the Safety" later in this manual for instructions on operation of this gun's "safety."
LIKE ANY MECHANICAL DEVICE, A "SAFETY" CAN SOMETIMES FAIL; IT CAN BE JARRED OR INADVERTENTLY MANIPULATED INTO AN UNSAFE CONDITION.
Mechanical "safeties" merely aid safe gun handling and are no excuse for pointing your shotgun's muzzle in an unsafe direction. While it is a good idea to "test" your gun's mechanical "safeties" periodically for proper function.
NEVER TEST THE ORIENTATION OR FUNCTION OF THE SAFETY WHILE YOUR SHOTGUN IS LOADED OR POINTED IN AN UNSAFE DIRECTION.
Safe gun handling does not stop with your gun's mechanical "safety" devices - it starts there. Always treat this shotgun with the respect due a loaded, ready-to-fire firearm.
3 - WHENEVER YOU HANDLE A FIREARM, OR HAND IT TO SOMEONE, MAKE SURE IT IS COMPLETELY UNLOADED. Always open the action immediately, and visually check the chamber. Make certain that they do not inadvertently contain any ammunition. Always keep the chamber empty and "safety" in the "on safe" position unless shooting is imminent.
4 - DO NOT TRANSPORT ANY LOADED FIREARM.
Keep all firearms unloaded during transport, whether stored in a holster, gun case, scabbard or other container.
5 - HUNTING FROM ELEVATED SURFACES SUCH AS TREE STANDS IS DANGEROUS, Doing so may increase the risk of handling a firearm. The following rules should always be observed by you and those you hunt with: Always make certain that the stand being used is safe and stable. Always make certain that your firearm is unloaded when it is being taken up and down from the stand. Always, make certain that your firearm is not dropped from the stand, or dropped while it is being taken up or down from the stand. Remember, a loaded firearm, may discharge when dropped, even with the safety in the "on safe" position.
6 - BEWARE OF BARREL OBSTRUCTIONS, FOR THE SAFETY OF BOTH YOUR GUN AND YOURSELF. Mud, snow, and an infinite variety of other objects may inadvertently lodge in a barrel bore. It takes only one small obstruction to cause dangerously increased pressures that can ruin (swell or rupture) the finest shotgun barrels.
BEFORE CHECKING FOR A BARREL OBSTRUCTION, BE CERTAIN NO LIVE ROUND IS IN THE CHAMBER. PLACE THE "SAFETY" IN THE "ON SAFE'' POSITION
After assuring yourself that the firearm is completely unloaded, again, open the breech or action, and look through the barrels to be sure they are clear of any obstruction. If an obstruction is seen, no matter how small it may be, clean the bore with a cleaning rod and patch as described later in this manual. Before the first firing, clean both bores with a cleaning rod and patch, and wipe away any anti-rust compounds in the action / chamber areas.
7 - ALWAYS UNLOAD YOUR SHOTGUN WHEN NOT IN USE.
As a safety precaution, it is preferable to disassemble your gun for storage. Your responsibilities do not end when your firearm is unattended. Store your firearm and ammunition separately and well beyond the reach of children. Take all safeguards to ensure your shotgun does not become available to untrained, inexperienced or unwelcome hands.
8 - USE THE PROPER AMMUNITION. The barrel and action of all Browning fireams have been made with substantial safety margins over the pressures developed by established American commercial loads. Nevertheless, Browning assumes no liability for incidents which occur through the use of cartridges of nonstandard dimensions which develop pressures in excess of commercially available ammunition which has been loaded in accordance with standards established by the Sporting Arms and Ammunition Manufacturers' Institute (SAAMI)
9 - BE ALERT TO THE SIGNS OF AMMUNITION MALFUNCTION. If you detect an off sound or light recoil when a shell is fired, DO NOT LOAD ANOTHER SHELL INTO THE CHAMBER. Open the action and remove all shells from the chamber. With the action open, glance down the barrel to make sure that an obstruction does not remain in the barrel. If there is an obstruction, completely clear the barrel before loading and firing again. Failure to follow these instructions can cause extensive damage to your gun and possible serious injury to yourself and others.
10 - MAKE SURE OF ADEQUATE VENTILATION IN THE AREA THAT YOU DISCHARGE A FIREARM. WASH HANDS THOROUGHLY AFTER EXPOSURE TO AMMUNITION OR CLEANING A FIREARM.
Lead exposure can be obtained from discharging firearms in poorly ventilated areas, cleaning firearms or handling ammunition. Lead is a substance that has been known to cause birth defects, reproductive harm and other serious injury.
11 - NEVER INSERT A SHELL OF THE INCORRECT GAUGE IN ANY SHOTGUN.
The gauge of your shotgun is marked on the side of the barrel. Store all shells of different gauges in completely separate and well-marked containers. Never store shells of mixed gauges in a common container or in your pockets.
EXAMINE EVERY SHELL YOU PUT IN YOUR GUN.
The most certain way to bulge or rupture a barrel is to drop a smaller gauge shell into a larger gauge chan1ber. Your gun will misfire (with the chamber appearing to be empty). It is then possible to load another shell behind the lodged shell. If the gun is fired, the result can cause extensive damage to your gun and possibly serious injury to yourself or others.
12 - USE SHELLS OF THE CORRECT LENGTH.
Do not use 3 1/2" shotgun shells in a shotgun or barrel with a 2 3/ 4" chamber or 3" chamber. Do not use 3" shells in a shotgun chambered for 2 3/4" shells. Doing so can result in a buildup of dangerously high pressures that may damage your gun and possibly cause serious injury to yourself or others.
The size of the chamber is inscribed, along with the gauge, on the side of the barrel.
13 - DO NOT SNAP THE FIRING PIN ON AN EMPTY CHAMBER - THE CHAMBER MAY NOT BE EMPTY! Treat every gun, with the respect due a loaded gun, even though you are certain the gun is unloaded.
14 - KEEP YOUR FINGERS AWAY FROM THE TRIGGER WHILE UNLOADING AND LOADING, UNTIL YOU ARE READY TO SHOOT.
15 - BE SURE OF YOUR TARGET AND BACKSTOP - Particularly during low light periods. Know the range of your ammunition. Never shoot at water or hard objects.
16 - ALWAYS UNLOAD THE CHAMBER AND MAGAZINE BEFORE CROSSING A FENCE, CLIMBING A TREE, JUMPING A DITCH OR NEGOTIATING OTHER OBSTACLES. Never place your loaded shotgun on or against a fence, tree, car, or other similar object.
17 - WEAR EYE AND EAR PROTECTION WHEN SHOOTING. Unprotected, repeated exposure to gunfire can cause hearing damage. Wear ear protectors (shooting ear plugs or muffs) to guard against such damage. Wear shooting glasses to protect your eyes from flying particles. Allow proper distance (eye relief) between the scope and your eye when firing a scoped rifle or shotgun. Always keep a safe distance between the muzzle of your firearm and any persons nearby, as muzzle blast, debris and ejecting shells could inflict serious injury. Also, wear eye protection when disassembling and cleaning your shotgun to prevent the possibility of springs, spring-tensioned parts, solvents or other agents from contacting your eyes.
18 - DROPPING A LOADED GUN CAN CAUSE AN ACCIDENTAL DISCHARGE even with the "safety" in the "on safe" position. Be extremely careful while hunting or during any shooting activity, to avoid dropping any firearm.
19 - IF YOUR SHOTGUN FAILS TO FIRE, KEEP THE MUZZLE POINTED IN A SAFE DIRECTION.
Hold this position for a minimum of 30 seconds. Carefully open the action and remove the cartridge. If the primer is indented, the cartridge should be disposed of in a way that cannot cause harm. If the primer is not indented, your firearm should be examined by a qualified gunsmith and the cause of the malfunction should be corrected before further use.
20 - BE DEFENSIVE AND ON GUARD AGAINST UNSAFE GUN HANDLING AROUND YOU AND OTHERS.
Don't be timid when it comes to gun safety. If you observe other shooters violating any of these safety precautions, politely suggest safer handling practices.
21 - BE CERTAIN YOUR SHOTGUN IS UNLOADED BEFORE CLEANING
Because so many gun accidents occur, when a firearm is being cleaned, special and extreme care should be taken to be sure your gun is unloaded before disassembly, cleaning and reassembly. Keep ammunition away from the cleaning location. Never test the mechanical function of any firearm with live ammunition.
22 - TEACH AND SUPERVISE FIREARMS SAFETY TO ALL MEMBERS OF YOUR FAMILY-ESPECIALLY TO CHILDREN AND NONSHOOTERS.
Closely supervise newcomers to the shooting sports. Encourage enrollment in hunting / shooting safety courses.
23 - NEVER DRINK ALCOHOLIC BEVERAGES OR TAKE ANY TYPE OF DRUGS BEFORE OR DURING SHOOTING.
Your vision and judgment could be dangerously impaired, making your gun handling unsafe to you and to others.
24 - PERFORM PERIODIC MAINTENANCE - AVOID UNAUTHORIZED SERVICING!
Your new firearm is a mechanical device which will not last forever, and as such, is subject to wear and requires periodic inspection, adjustment, and service. Browning firearms should be serviced by a Browning Recommended Service Center or by Browning's service facility in Arnold, Missouri. Browning cannot assume any responsibility for injuries suffered or caused by unauthorized servicing, alterations or modifications of Browning firearms.
25 - READ AND HEED ALL WARNINGS IN THIS INSTRUCTION BOOK, ON AMMUNITION BOXES AND WITH ALL ACCESSORIES THAT YOU INSTALL ON YOUR FIREARM.
It is your responsibility to secure the most up-to-date information on the safe handling procedures of your Browning gun. Browning assumes no liability for incidents which occur when unsafe or improper gun accessories or ammunition combinations are used.
26 - BROWNING RESERVES THE RIGHT TO REFUSE SERVICE ON FIREARMS THAT HAVE BEEN ALTERED, ADDED TO OR SUBSTANTIALLY CHANGED.
Removal of metal from barrel(s), or modifications of the firing mechanism and / or operating parts may lead to Browning's refusal of service on such firearms. Browning will charge the owner for parts and labor to return the firearm to original Browning specifications.
DO NOT, UNDER ANY CIRCUMSTANCES, ALTER THE TRIGGER, SAFETY OR PARTS OF THE FIRING MECHANISM OF THIS OR ANY OTHER FIREARM. FAILURE TO OBEY THIS WARNING MAY RESULT IN INJURY OR DEATH TO YOURSELF OR OTHERS.
BE CAREFUL!
BE CAREFUL!
Browning Superposed Shotguns, Continental Superposed, and Express Rifles
Browning Superposed Shotguns, Continental Superposed, and Express Rifles
Nomenclature
Nomenclature
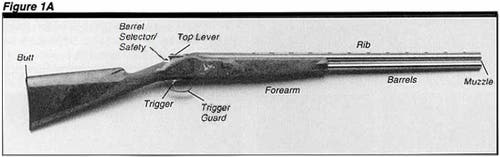
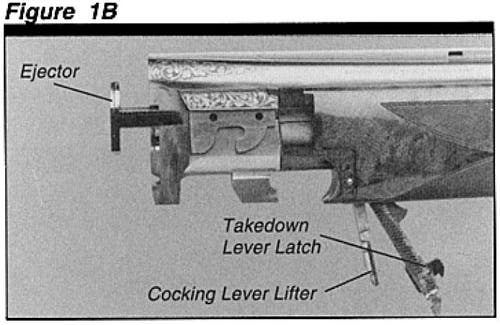
In conventional gun terminology the position and movement of gun parts are described as they occur with the gun horizontal and in normal firing position; i.e., the muzzle is forward or in front; the buttstock is rearward or to the rear; the trigger is downward or underneath; the sights are upward or on top. For more detailed terminology, see Figures 1A and 1B. Note: While this manual primarily discusses Superposed B-25 and B-125 shotguns, assembly, disassembly, and general operational instructions also apply to Browning Express Rifles.
AMMUNITION
AMMUNITION
The gauge and maximum acceptable shell length are inscribed on the right side of the upper barrel. NEVER USE A LOAD THAT EXCEEDS THESE SPECIFICATIONS. Magnum shells may be used so long as the cartridge length does not exceed the length inscribed on the barrel. Do not use 3" or 3 1/2" shells in a barrel with a 2 3/4" chan1ber, or 3 1/2" shells in a barrel with a 3" chamber.
The Superposed shotgun must be used only with the gauge of ammunition inscribed on the upper barrel. The barrels and breech of this shotgun have been made with large safety margins over the pressures developed by established commercial loads. Nevertheless, Browning can assume no responsibility for incidents which occur through the use of cartridges of non-standard dimension or those developing pressures in excess of SAAMI (Sporting Arms and Ammunition Manufacturers Institute) established standards. Always read the ammunition label and any enclosures with your ammunition to assure that the ammunition is appropriate or that there is no restriction for its use with your firearm.
DO NOT SHOOT STEEL SHOT IN YOUR SUPERPOSED 8-25.
We do not recommend that steel shot be used in a Browning Superposed B-25 shotgun. Browning chose not to increase wall thickness of the barrels to accommodate steel shot loads. It is our opinion that most owners of a Browning Superposed B-25 prefer that existing weights and handling qualities of this fine shotgun not be altered.
The kind of damage likely to occur if steel shot is used in a Browning Superposed B-25 shotgun is cosmetic. In not all, but a number of instances, after from 100 to 500 rounds, a very slight ring will develop about 1 1/2" to 3" rearward of the muzzle. Usually, this ring is not easily discernible and probably less than .005 of an inch above the plane of the barrel (about the thickness of two sheets of paper). After the ring reaches this dimension, it generally stabilizes and does not become measurably larger after several thousand additional rounds have been fired. From our tests on many different shotguns, we could determine no adverse effect on the performance of a load because of this very slight ring, either in pattern or shot velocity.
Note: The correct caliber designation of your Express rifle is clearly inscribed on the left side of the upper rifle barrel.
Operation of the Safety
Operation of the Safety
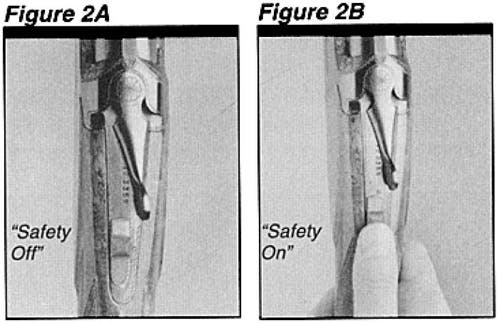
The complete action (both barrels) is put "on safe" by drawing the selector rearward. In this position, you will notice the "S" appears directly in front of the selector. The above applies whether the selector is set for "O" (over barrel) or "U" (under barrel) to fire first. (See Figures 2A and 2B.)
Assembly
Assembly
Our concern for the protection of your Superposed has been paramount from manufacture to its delivery to you. You will notice a light application of anti-rust compound on the barrels and breech area of your Superposed. It is important that you clean this rust-preventative compound from all metal parts, paying close attention to the barrel interior and breech area, before using your Superposed.
Browning Oil is especially suited to remove this compound and give your new gun its first lubrication; however, any quality gun oil may be used.
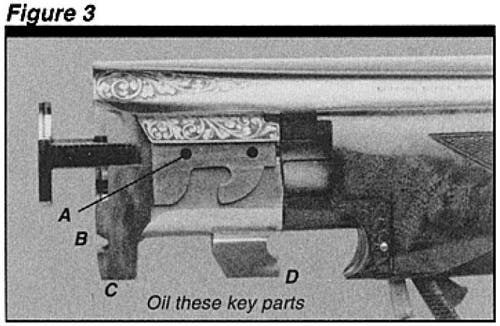
There are several key areas that should be lubricated (see figures 3 and 4). Apply one or two drops of oil at points A through H. After thorough cleaning and lubrication, assemble your Superposed using the following instructions:

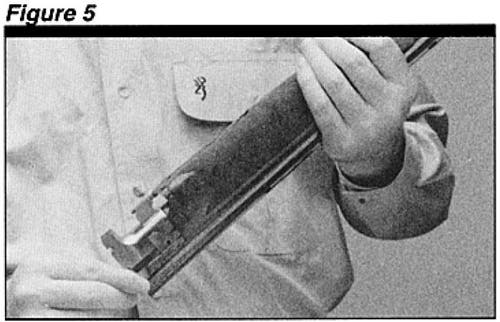
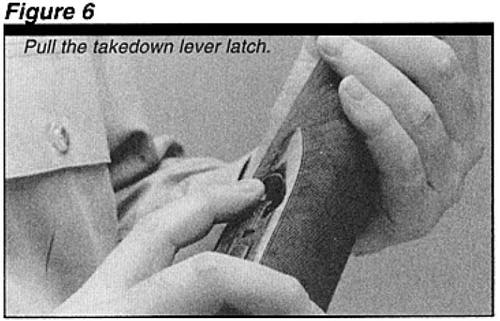
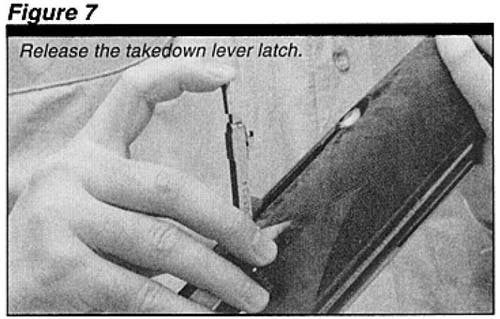
1 - Take the barrel / forearm section of the shotgun in your left hand with the front of the barrels angling upward and to your left at a 45 degree angle. Hold the barrel / forearm section upsidedown so the takedown lever latch faces upward (See Figure 5). Using the thumb or forefinger of your right hand, pull the takedown lever latch to the rear and release it from its recess (see Figures 6 and 7).
1 - Before reinstalling the trigger group, make sure that the breech bolt is fully forward and engaged in the locked position.
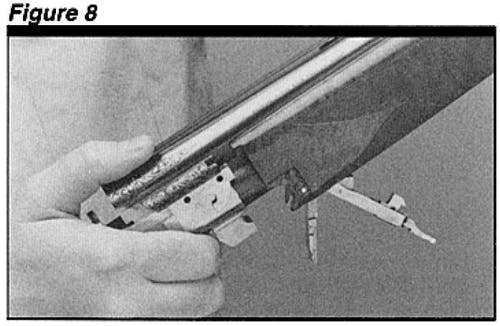
2 - Tum the barrel / forearm section over so the latch hangs downward and grip the barrels with your right hand at the breech end. Slide the forearm forward about 1/2" until it stops solidly. This movement will cause the cocking lever lifter to drop downward next to the takedown lever latch (See Figure 8)
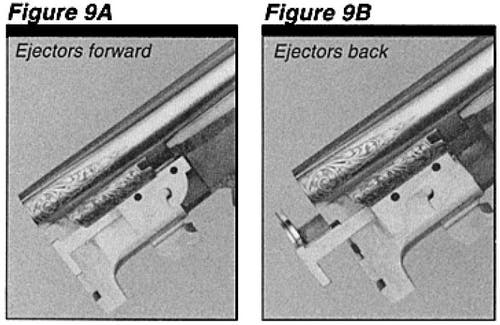
3 - To attach the barrel / forearm section to the action be sure the ejectors are slid FORWARD in their rails and are positioned against the breech and not extended backward away from the breech (compare figures 9A and 9B).
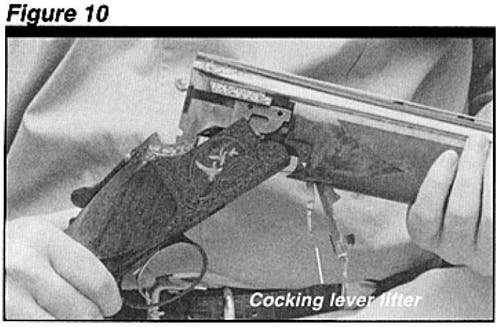
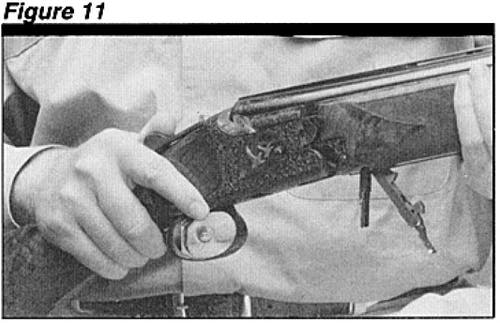
4 - Hook the hinge pin at the front of the action into the semi-circular recess immediately below the serial number (See Figure 10). Then, while applying pressure against the hinge pin, slowly swing the action / stock portion of the gun upward using the hinge pin as the axis. At the same time, use the thumb of your right hand to push the operating lever, to the right, away from you and close the action completely (See Figure 11). Release the operating lever and it should snap back to its central position.
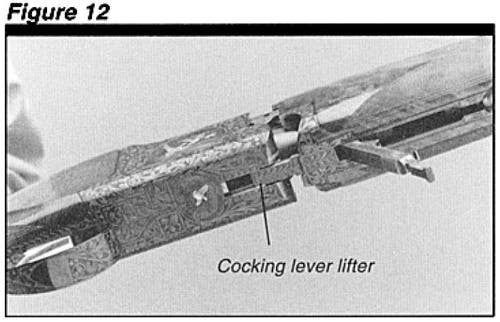
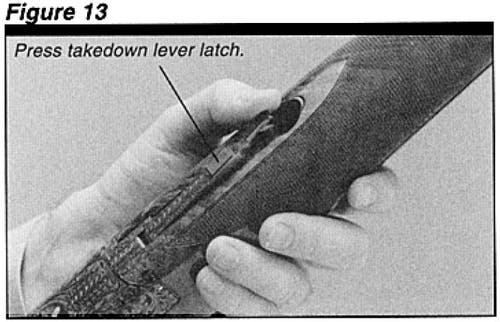
5 - To complete the assembly, place the butt of the gun against the upper leg. Swing the cocking lever lifter down in position to slide into the corresponding recess in the action (See Figure 12) and draw the forearm back as far as it will go until its semi-circular cut-out meets the mating semi-circular portion of the action. Pivot the takedown lever forward and down into its recess in the forearm and snap the latch in place.
NOTE: If the takedown lever latch fails to click into place, firmly press the grooved tab area on the takedown lever latch until the entire assembly seats firmly in the forearm recess (See Figure 13).
CAUTION: In assembling your Superposed shotgun, do not use undue force in closing the action on the barrels. If the action and barrels have not been properly aligned, undue force will only cause them to grind together and score or mar the finely fitted surfaces.
Instructions for Operation
Instructions for Operation
Highly skilled techniques of hand adjusting, filing, and polishing have been used to accomplish the hairline fitting of metal parts on this gun. We consider such methods necessary to prevent the development of looseness even after long use. You may consider your new gun to be slightly stiff. This very close fitting is your assurance of endurance.
TOP LEVER -
The top lever operates the locking bolt. This bolt is very closely handfitted to its barrel lugs. Provision is made for the gradual wear of locking surfaces by allowing a slight excess of metal. These careful fitting methods keep the breech of the gun tight for many years.
Upon closing your gun, let the top lever snap into position -- do not retard its action "with your thumb. If closed in this manner, the top lever spring will return the locking mechanism to operating position. It is not necessary that the top lever return to a completely central position; in fact, it usually will not do so in a new gun.
Many experienced shooters cultivate the habit of lightly pushing the top lever to the left after the gun is closed. It is rarely necessary but does serve as a quick, convenient method of assuring yourself that foreign matter has not interfered with the complete closure of the breech.
Keep the polished breech surfaces clean and lightly oiled.
SINGLE SELECTIVE TRIGGER, COMBINATION SELECTOR -
After firing one barrel, it is not necessary to move the selector to fire the second barrel. After one barrel has been fired, your fully automatic trigger shifts into position to fire the second barrel when the trigger is pulled for the second shot. Only one barrel will be fired with each pull of the trigger.
BE CERTAIN YOU FULLY RELEASE THE TRIGGER BETWEEN SHOTS. If the trigger is not permitted to return to its fully forward position, the firing mechanism will not re-engage and the subsequent pull will fail to fire the gun. Proper execution of this maneuver is necessary with any single-trigger gun. Failure to release the trigger ordinarily occurs with excessive excitement and overly rapid firing.
THE SELECTIVE-SAFETY -
The selective safety permits you to select which of the two barrels is to be fired first. When moved to the right, a "U" shows at the left side of the selector. This indicates that the under-barrel will be fired with the first pull, and that the second pull (without further movement of the selector) will fire the over-barrel. The advantage is obvious if two different shot shell loads are placed in the gun, or if your gun has barrels of different choke. If the selector is set to the right to fire the under-barrel first (as above), a shift for the purpose of firing the over-barrel first may be accomplished with the following simple maneuver: With the right thumb pull the selector rearward, push to the left, then push forward exposing the "O" to the right. This simple coordinated movement follows the line of a block letter U: Reanvard, then right or left as the case may be., then forward.
The barrel selector and safety are incorporated in the same mechanism. Push the button forward to take the gun "off safe" and to select the barrel you prefer for the first shot - to the right and forward for the under barrel and to the left and forward for the over or top barrel.
After firing the first barrel, the trigger mechanism automatically readies the second barrel for the next shot. Pull back the button with the thumb when you want to return to an "on safe" position. The "Safety" operates manually and does not go "on safe" automatically when the breech is open.
AUTOMATIC EJECTORS -
Your Superposed shotgun's ejectors are fully automatic. They throw fired shells completely out of the gun upon opening the action. Unfired shells remain in the chamber or chambers upon opening but are conveniently lifted above the level of the chan1bers so that, on occasion for unloading, they can be lifted out easily by hand.
Choke Markings for Conventionally Choked Superposed Shotguns
Choke Markings for Conventionally Choked Superposed Shotguns
Neat, clearly defined marks indicate the choke in each barrel of your Superposed shotgun. You will find these marks at the rear end of the respective barrels, on the left-side surfaces of the polished breech. The coding is as follows:
* Full Choke
** Modified
*** S Skeet
* Improved modified
** Improved Cylinder
*** Cylinder
lnvector Interchangeable Choke System for Superposed B-125 Shotguns
lnvector Interchangeable Choke System for Superposed B-125 Shotguns
All current 12 and 20 gauge B-125 shotgun barrels have been threaded to accept the Browning Invector Interchangeable Choke System. You may confirm this by looking at the rear end of the respective barrels, on the left-side surfaces of the polished breech. The word INVECTOR denotes that the barrel is threaded. The degree of choke in the tube is indicated twice on each choke tube: Inscribed on the side of the tube, and indicated with a "notch" code on the top rim of the tube. All lnvector choke tubes are made with tempered steel and are fully compatible with all FACTORY AMMUNITION (loaded in compliance with SAAMI specifications) including Magnum lead and steel shot loads and rifled slug loads.
20 AND 12 GAUGE INVECTOR -
This is essentially the same proven system as used on nearly all other Browning shotguns. It is a regular Invector tube that has been designed for use in 20 and most 12 gauge barrels. They are steel and lead shot compatible. Browning's universal tube wrench is used to remove and install these tubes.
Your Superposed shotgun may be equipped with either the Standard Invector Choke Tube System or the Invector Plus System for back-bored barrels.
CAUTION: INVECTOR PLUS TUBES ARE FOR USE IN BROWNING SHOTGUNS WITH BACK-BORED BARRELS ONLY, AND ARE NOT INTERCHANGEABLE WITH STANDARD INVECTOR CHOKE TUBES. DO NOT USE INVECTOR PLUS TUBES IN BARRELS THREADED FOR STANDARD INVECTOR TUBES. DO NOT USE STANDARD INVECTOR TUBES IN BARRELS THREADED FOR INVECTOR PLUS TUBES. FAILURE TO FOLLOW THESE WARNINGS MAY CAUSE DAMAGE TO YOUR GUN AND CAUSE INJURY TO YOURSELF AND OTHERS.
DO NOT FIRE A SUPERPOSED B-125 SHOTGUN WITHOUT HAVING AN INVECTOR CHOKE TUBE INSTALLED. PERMANENT DAMAGE MAY RESULT TO THE THREADS.
DO NOT USE BROWNING INVECTOR CHOKE TUBES IN ANY SHOTGUN BARRELS NOT SUPPLIED BY BROWNING. ALSO, DO NOT USE ANY OTHER CHOKING DEVICE IN ANY SHOTGUN BARRELS SUPPLIED BY BROWNING. USE ONLY THE APPROPRIATE GAUGE AND TYPE OF CHOKE TUBES MARKED INVECTOR OR INVECTOR PLUS, DEPENDING ON YOUR SHOTGUN.
CAUTION: WHENEVER HANDLING ANY SHOTGUN FOR THE PURPOSE OF REMOVING OR INSTALLING A CHOKING DEVICE, MAKE ABSOLUTELY CERTAIN THE GUN IS FULLY UNLOADED, AND THE ACTION IS OPEN! NEVER ATTEMPT TO REMOVE OR INSTALL A SHOTGUN CHOKING DEVICE ON A LOADED FIREARM!
TUBE REMOVAL -
1. UNLOAD YOUR SUPERPOSED FULLY. INSPECT THE CHAMBERS TO MAKE SURE THEY DO NOT CONTAIN ANY SHELLS.
2. Place the "safety" in the "on safe" position and open the action.
3. Use the Invector wrench to loosen the tube, turning it counterclockwise. Finger-twist the tube the rest of the way out of the barrel.
TUBE INSTALLATION -
1. UNLOAD YOUR SUPERPOSED FULLY. INSPECT THE CHAMBERS TO MAKE SURE THEY DO NOT CONTAIN ANY SHELLS.
2. Place the "safety" in the "on safe" position and open the action.
3. Before installing a tube, check the internal choke tube threads in the muzzle, as well as the threads on the Invector choke tube to be sure they are clean. Lightly oil the threads with an oil like Browning Oil.
4. Using your fingers, screw the appropriate tube into the muzzle end of the barrel, tapered end first, notched end outward. When it becomes finger-tight, use the lnvector choke tube wrench to firmly seat the tube.
THE INVECTOR CHOKE TUBE SHOULD BE PERIODICALLY CHECKED TO ASSURE THAT IT IS TIGHT AND FIRMLY SEATED. BEFORE CHECKING, FOLLOW ALL THE SAFETY GUIDELINES OUTLINED ABOVE.
Replacement and additional tubes and wrenches are available from your Browning dealer, or by calling or writing:
Browning Consumer Department
One Browning Place, Morgan,
Utah 84050-9326.
801-876-2711.
Canadian customers please call or write:
Browning Canada Sports Ltd./Ltee,
5617 Chemin St-Franfois,
St-Laurent, Quebec H4S 1W6.
(514) 333-7261
INVECTOR CHOKE TUBE CODE -
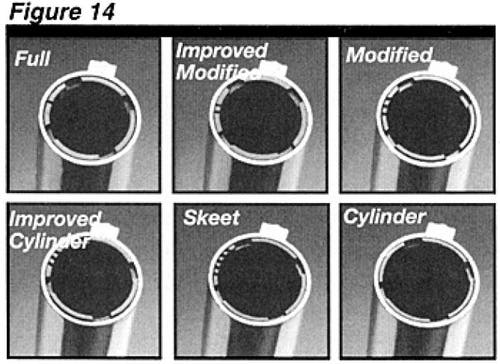
To identify individual Invector tubes, refer to the abbreviated indications on the side of the tube, or use the identification mark(s) located on the top rirn of each tube. (See Figure 14.)
INVECTOR TUBE SELECTION -
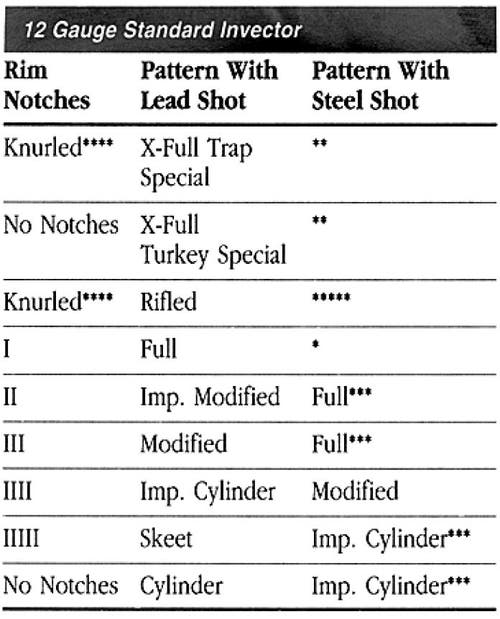
To help you choose the correct choke tube for each hunting situation, all Browning Invector choke tubes are inscribed on the side with the patterns they produce with both lead and steel shot. Each Invector tube also has notches in the top rim of the tube. These notches are a code to allow you to determine the choke designation while the tube is installed. Rim notches refer specifically to lead shot. You will need to use the chart below to cross-reference from lead to steel, and determine the appropriate tubes for your ammunition and hunting / shooting situation.
Several tubes are supplied with your Browning shotgun. The tubes listed are also available as accessories. Remember, Invector-Plus and Standard lnvector tubes are not interchangeable. Invector Plus tubes are for Browning guns with back-bored barrels only. Before removing / installing tubes, or reading the rim notch code, make sure your shotgun is fully unloaded.


Cleaning Suggestions
Cleaning Suggestions
The Superposed shotgun will function better and more reliably over a longer period of time if it is properly maintained and kept clean.
BEFORE PERFORMING ANY CLEANING PROCEDURES, ALWAYS MAKE CERTAIN THERE ARE NO SHELLS IN THE CHAMBERS.
You should clean your Superposed after every day of shooting, and more often if it becomes excessively dirty. A minimum cleaning includes wiping down the action and oiling key parts. Most regular maintenance will also include cleaning the barrels.
A light cleaning means oiling and wiping down. It can be accomplished with the barrels still attached. A full cleaning requires that you remove the barrels and forearm. To clean your firearm, follow the general outline below:
CLEANING PROCEDURES -
BE CERTAIN YOUR GUN'S CHAMBERS ARE UNLOADED. ALWAYS WEAR PROTECTIVE SAFETY GLASSES DURING ALL ASSEMBLY, DISASSEMBLY AND CLEANING PROCEDURES. KEEP AMMUNITION AWAY FROM THE CLEANING AREA. DO NOT TEST THE FUNCTION OF YOUR FIREARM WITH LIVE AMMUNITION.
1. Remove the barrel / forearm section from the receiver as explained previously.
2. Using a shotgun cleaning rod with a tip and a lightly oiled patch large enough for a snug fit in the bores, insert the rod in the breech end of the barrels and run back and forth several times in each barrel.
3. Inspect the bores from both ends for leading and plastic residue. Plastic residue is often left in the bores from the shot cups in modern shotshells. Leading and plastic residue will appear as longitudinal streaks and are usually more predominant near the muzzles and just forward of 1he chambers. A normal amount of either is common and is not serious. If leading or plastic residue seems excessive you can remove it by brushing the bores with a brass brush. Soak the brush or spray the bore with a powder solvent first. Scrub until clean. To prevent bristles from breaking off, push the brush fully through each time before pulling it back through.
4. After all leading residues have been removed run a clean dry patch through 1he bores. Follow this with a final lightly oiled patch.
5. Wipe all metal surfaces - the receiver, forearm and barrels - with a clean rag. Then lightly oil your gun at the points described under "Assembly." Regular, light oiling is extremely important to the durability and reliable operation of your shotgun.
6. Remember, the broad, polished, finely fined surfaces of the receiver and forearm mechanisms (the barrel lugs, the hinge pin and forearm bracket) must always have a thin film of oil. Use a quality oil like Browning Oil for this purpose.
7. Inspect the barrels and chambers. MAKE CERTAIN THAT NO PATCHES HAVE BEEN INADVERTENTLY LEFT IN THEM. Remove any that remain.
8. Wipe all wood surfaces with Browning Oil or a quality furniture polish, but not both.
OTHER CLEANING SUGGESTIONS -
- Never pour large quantities of oil into the receiver or other parts. It can drain down to the wood and soften it - and cause permanent damage and loosening of the stock.
- It is very important that the chambers of your shotgun be cleaned thoroughly and promptly after shooting plastic shotshells. DO NOT LEAVE DISCHARGED (EMPTY) SHELLS IN THE CHAMBERS FOR ANY LENGTH OF TIME. The chemical composition of many plastic shells contains moisture which can "sweat" out of the shell and onto the chamber surface, and possibly cause corrosion and rust.
NEVER ATTEMPT TO TAKE YOUR SUPERPOSED APART FURTHER THAN EXPLAINED IN THIS MANUAL.
This is a specialized, finely fitted mechanism. You may permanently mar it by attempting to disassemble the inner mechanism assemblies. If further disassembly for service or cleaning is required, take your gun to a Browning recommended Service Center or a competent gunsmith, or send it to our Arnold, Missouri Service Facility as explained under "Service or Repair."
SERVICE OR REPAIR
SERVICE OR REPAIR
If your firearm should require service or repairs, we suggest you first contact a local recommended Browning Firearms Service Center. Contact your Browning sporting goods dealer or call our Service Department for the address of the Service Center nearest you. Otherwise, you may send your firearm directly to our own Service department. For technical questions about your firearm or service call our Service Department.
Browning Service Department
3005 Arnold Tenbrook Road
Arnold, Missouri 63010-9406
Phone: 1-800-322-4626
Canadian Customers call or write:
Browning Canada Sports Ltd. / Ltee,
5617 Chemin St-Francois
St-Laurent, Quebec H4S 1W6
Phone: (514) 333-7261
When returning your firearm for servicing, you must do the following:
- Be sure it is completely unloaded.
- Package it securely in a cardboard container.
- Enclose a letter with your firearm that clearly describes the trouble experienced and the repairs or alterations desired.
- If convenient, send a copy of the letter to us separately
- Never return ammunition with your firearm. It is against postal and most commerce regulations.
If you have any questions about this manual or about any other Browning products, call or write our Consumer Information Department:
Browning Consumer Information
Morgan, Utah 84050
Phone: (801) 876-2711
BROWNING CANNOT ASSUME ANY RESPONSIBILITY FOR INJURIES SUFFERED OR CAUSED BY UNAUTHORIZED SERVICING, ALTERATIONS OR MODIFICATIONS OF BROWNING FIREARMS.
Read and heed all warnings in your owner’s manual, on ammunition boxes and with all accessories that you install on your firearm. It is your responsibility to secure the most up-to-date information on the safe handling procedures for your Browning gun. Browning assumes no liability for incidents which occur when unsafe or improper gun accessories or ammunition combinations are used.
Do not, under any circumstance, alter the trigger, safety or parts of the firing mechanism of this or any other firearm. Failure to obey this warning may result in injury or death to yourself or others.