

Operation and care of
Browning BAR (Pre-1993) Semi-Auto Rifle
Browning BAR (Pre-1993) Semi-Auto Rifle
We are pleased that you have chosen a Browning BAR Rifle.
We are pleased that you have chosen a Browning BAR Rifle.
In its manufacture, we have endeavored to incorporate the very finest in materials and craftsmanship, and with just reasonable care, this gun should provide you with many years of pleasure and dependable service. Please feel free to write us immediately if you have any observations regarding its performance and operation.
Also please take a moment to complete and mail in the brief attached marketing survey card found on our back cover. It helps us considerably in our constant effort to provide you with better service.
Thank you.
You Are Responsible for Firearms Safety
Please let us remind you that, as a gun owner, you accept a set of responsibilities of the most demanding nature. Firearms are, and should always be considered as, dangerous products and should be handled accordingly.
Please read and understand all of the cautions, warnings, notices, proper handling procedures and instructions outlined in this owner’s manual before using your new firearm.
1 - ALWAYS KEEP THE MUZZLE OF YOUR FIREARM POINTED IN A SAFE DIRECTION EVEN THOUGH YOU ARE CERTAIN IT IS UNLOADED. Never point any firearm at anything you do not intend to shoot. Be extremely alert and aware of all persons and property within the range of your ammunition.
2 - DO NOT RELY TOTALLY ON YOUR FIREARM’S MECHANICAL ''SAFETY’’ DEVICES. AS AN ADDITIONAL SAFETY MEASURE ALWAYS ASSUME THAT A GUN CAN BE FIRED WITH A SAFETY ON. The word, “safety,” describes a gun's blocking or disengaging mechanism for the trigger, sear, hammer and / or firing pin. Although mechanical devices place your gun in a SAFER status, no guarantee can be made that the gun will not fire even if the “safety” is in the “on safe” position. Safe gun handling does not stop with your gun’s mechanical “safety” devices. It starts there. Always treat your firearm with respect due a loaded, ready-to-fire gun.
3 - WHENEVER YOU HANDLE ANY FIREARM, OR HAND IT TO SOMEONE, ALWAYS OPEN THE ACTION IMMEDIATELY, AND VISUALLY CHECK THE FIREARM'S CHAMBER TO MAKE CERTAIN THAT THE FIREARM IS COMPLETELY UNLOADED. Make certain the firearm does not inadvertently contain any ammunition. Remember, merely removing the magazine does not mean the chamber is unloaded. Always keep the chamber empty and the “safety” in the on safe position unless shooting is imminent.
4 - DO NOT TRANSPORT YOUR FIREARM LOADED, WHETHER IN A SCABBARD, GUN CASE, OR OTHER CONTAINER.
5 - HUNTING FROM ELEVATED SURFACES SUCH AS TREESTANDS IS DANGEROUS. Doing so may increase the risk of mishandling a firearm. The following rules should always be observed by you and those you hunt with: Always make certain that the stand being used is safe and stable. Always make certain that your firearm is unloaded when it is being taken up and down from the stand. Always make certain that your firearm is not dropped from the stand, or dropped while it is being taken up or down from the stand. Remember, a loaded firearm may discharge when dropped, even with the “safety” in the on safe position.
6 - BEWARE BARREL OBSTRUCTIONS. Mud, snow and an infinite variety of other objects may inadvertently lodge in a barrel bore. It only takes a small obstruction to cause dangerously increased pressures that can damage your firearm and cause serious injury to yourself and others.
BEFORE CHECKING FOR A BARREL OBSTRUCTION, BE CERTAIN NO LIVE ROUND IS IN THE CHAMBER AND THAT THE MAGAZINE AND FEED MECHANISMS ARE COMPLETELY EMPTY. PUT THE SAFETY IN THE “ON SAFE” POSITION. (See page 19 for instructions on unloading). After assuring yourself that the firearm is completely empty, again, open the action and look through the barrel to be sure it is clear of any obstruction. If an obstruction is seen, no matter how small it may be, clean the bore with a cleaning rod and patch as described in “Cleaning Suggestions” later on this page.
7 - ALWAYS UNLOAD YOUR GUN WHEN NOT IN USE. Your responsibilities do not end when your firearm is unattended. Store your gun and ammunition separately and well beyond the reach of children. Take all safeguards to insure your gun does not become available to untrained, inexperienced, or unwelcomed hands.
8 - USE THE PROPER AMMUNITION. The barrel and action of this firearm have been made with substantial safety margins beyond the pressures developed by established American commercial loads. Nevertheless, Browning can assume no liability for incidents that occur through the use of cartridges of nonstandard dimensions or which develop pressures in excess of commercially available ammunition which have been loaded in accordance with standards established by the Sporting Arms and Ammunition Manufacturers’ Institute (SAAMI). BE ALERT TO THE SIGNS OF AMMUNITION MALFUNCTION. IF YOU DETECT AN OFF SOUND OR LIGHT RECOIL WHEN A CARTRIDGE IS FIRED, DO NOT LOAD ANOTHER CARTRIDGE INTO THE CHAMBER. Open the action and remove all cartridges from the magazine, chamber and action areas. Glance down the barrel to make sure that a bullet or other obstruction does not remain in the barrel. Completely empty the barrel before loading and firing again.
9 - EXAMINE EVERY CARTRIDGE YOU PUT IN YOUR FIREARM.
Browning cannot assume any responsibility for the use of unsafe or improper firearm and ammunition combinations or damage or injury caused by damaged ammunition. It is your responsibility to read and heed all warnings including those that appear in the instruction manual and on ammunition boxes and to secure the most up-to-date information on the safe handling procedures for your Browning gun.
10 - DO NOT SNAP THE FIRING PIN ON AN EMPTY CHAMBER, THE CHAMBER MAY NOT BE EMPTY!
Treat every firearm with the respect due a loaded firearm, even though you are certain the firearm is unloaded.
11 - KEEP YOUR FINGERS AWAY FROM THE TRIGGER WHILE LOADING AND UNLOADING UNTIL SHOOTING IS IMMINENT.
12 - BE SURE OF YOUR TARGET AND BACKSTOP, PARTICULARLY DURING LOW LIGHT PERIODS. Know the range of your ammunition. Never shoot at water or hard objects.
13 - DROPPING A LOADED GUN MAY CAUSE AN ACCIDENTAL DISCHARGES EVEN WITH THE SAFETY IN THE “ON SAFE” POSITION. Although safety mechanisms are designed to make a gun safer, the owner or user should be extremely careful while hunting or during any shooting activity, to avoid dropping a loaded firearm.
14 - ALWAYS UNLOAD YOUR FIREARM'S CHAMBER BEFORE CROSSING A FENCE, CLIMBING A TREE, JUMPING A DITCH OR NEGOTIATING OTHER OBSTACLES. Refer to the unloading section of this instruction book for instructions on the unloading of your firearm. Never place any firearm on or against a fence, tree, car, or other similar object.
15 - IF YOUR GUN FAILS TO FIRE, KEEP THE MUZZLE POINTED IN A SAFE DIRECTION. Hold this position for a minimum of 30 seconds. Never assume that failure to fire means that the gun is empty or unloaded. Carefully open the action and remove the cartridge. If the primer or rim is indented, the cartridge should be disposed of in a way that cannot cause harm. If the primer or rim is not indented, your firearm should be examined by a qualified gunsmith and the cause of the malfunction should be corrected before further use.
16 - WEAR EYE AND EAR PROTECTION WHEN SHOOTING. Unprotected, repeated exposure to gunfire can cause hearing damage. Wear ear protectors (shooting ear plugs or muffs) to guard against such damage. Wear shooting glasses to protect your eyes from flying particles. Also, wear eye protection when disassembling and cleaning your shotgun to prevent the possibility of springs, spring-tensioned parts, solvents or other agents from contacting your eyes.
17 - BE DEFENSIVE AND ON GUARD AGAINST UNSAFE GUN HANDLING AROUND YOU AND OTHERS. Don't be timid when it comes to gun safety. If you observe other shooters violating any of these safety precautions, politely suggest safer handling practices.
18 - EDUCATE AND SUPERVISE FIREARMS SAFETY TO ALL MEMBERS OF YOUR FAMILY, especially to children and non- shooters. Closely supervise newcomers to the shooting sports. Encourage enrollment in hunting/shooting safety courses.
19 - NEVER DRINK ALCOHOLIC BEVERAGES OR TAKE ANY TYPE OF DRUGS BEFORE OR DURING SHOOTING. Your vision, motor skills, and judgment could be dangerously impaired, making your gun handling unsafe to you and to others.
20 - READ AND HEED ALL WARNINGS IN THIS OWNER'S MANUAL, ON AMMUNITION BOXES, AND WITH ALL ACCESSORIES THAT YOU INSTALL ON YOUR FIREARM. It is your responsibility to secure the most up-to-date information on the safe handling procedures of your Browning firearm. Browning assumes no liability for incidents that occur when unsafe or improper firearm accessories or ammunition combinations are used.
21 - PRACTICE PERIODIC MAINTENANCE, AVOID UNAUTHORIZED SERVICING. Your firearm is a mechanical device that will not last forever, and as such, is subject to wear and requires periodic inspection, adjustment and service. Browning firearms should be serviced by a Browning Recommended Service Center or by our Service Facility in Arnold, Missouri. We cannot assume any responsibility for injuries suffered or caused by unauthorized servicing, alterations or modifications of Browning firearms.
IT CAN BE VERY DANGEROUS TO ALTER THE TRIGGER, SAFETY OR OTHER FIRING MECHANISM OF ANY FIREARM.
BE CAREFUL!
BE CAREFUL!
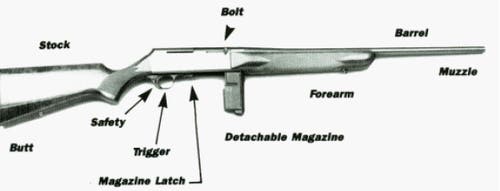
Browning BAR Semi-Automatic High-Power Rifle Nomenclature
Browning BAR Semi-Automatic High-Power Rifle Nomenclature
In conventional gun terminology the position and movement of gun parts are described as they occur with the gun horizontal and in normal firing position; i.e., the muzzle is forward or in front; the buttstock is rearward or to the rear; the trigger is downward or underneath; the sights are upward or on top.
Figure 1
Figure 1
GENERAL OPERATION PROCEDURE
GENERAL OPERATION PROCEDURE
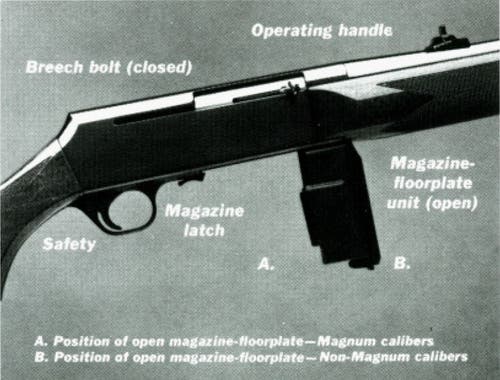
Your new Browning is a gas operated, semi- automatic repeating rifle. With cartridges in the magazine and the chamber and the safety in the OFF SAFE or FIRE position, the rifle will fire a single round with each successive pull of the trigger until the magazine and chamber are empty. When the last round has been fired, the bolt will be held in its rearward, or open, position by the magazine follower. To close the bolt, pull slightly to the rear on the operating handle and at the same time unlatch the floor plate, allowing the magazine-floorplate unit to swing downward and forward. Then release the operating handle and allow the bolt to move forward to the closed position under its spring pressure. During this operation, exercise care that your fingers do not enter the ejection port in the receiver.
OPERATION OF THE "SAFETY"
OPERATION OF THE "SAFETY"
CAUTION: THE “SAFETY** SHOULD BE KEPT IN ITS “ON SAFE” POSITION AT ALL TIMES EXCEPT WHEN ACTUALLY FIRING THE RIFLE.
The crossbolt type safety is conveniently located on the trigger guard just rearward of the trigger. (See Figure 2) This is an ideal location for easy manipulation of the large safety head with the index finger of either hand.
With the safety pushed completely to the right the rifle is ON SAFE and rearward movement of the trigger is completely blocked.
With safety pushed completely to the left the rifle is OFF SAFE and ready to fire. In this FIRE or OFF SAFE position a band of RED is visible on the safety where it projects beyond the left face of the trigger guard.
Whenever a cartridge is chambered the rifle should be ON SAFE until it is ready to be fired. Note: If a left hand safety is installed these directions are reversed; i.e. the safety is pushed to the left to place the rifle ON SAFE and to the right to place the rifle OFF SAFE.
LOADING THE RIFLE
LOADING THE RIFLE
CAUTION: Keep your fingers clear of the ejection port at all times when the bolt is locked open. The bolt will close with considerable force, if you should depress the magazine follower.
The Browning semi-automatic high power rifle utilizes a unique detachable box magazine. The capacity of the magazine is four rounds (three rounds for Magnum calibers). Another cartridge may be carried in the chamber, providing a total rifle capacity of five rounds (four rounds for Magnum calibers.)
To ready the rifle for loading, first insure that the cross-bolt safety is in the ON SAFE position.
Next, hold the rifle in a natural position with the barrel safely pointing at the ground. If the bolt is in its closed position, use either hand to hold the rifle at the forearm. Then, pull rearward on the magazine latch with the index finger of the opposite hand, allowing the hinged floorplate- magazine unit to swing downward.
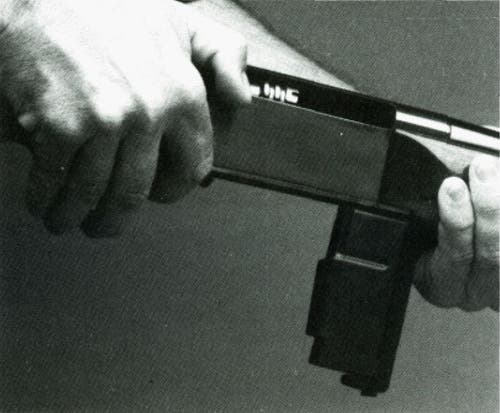
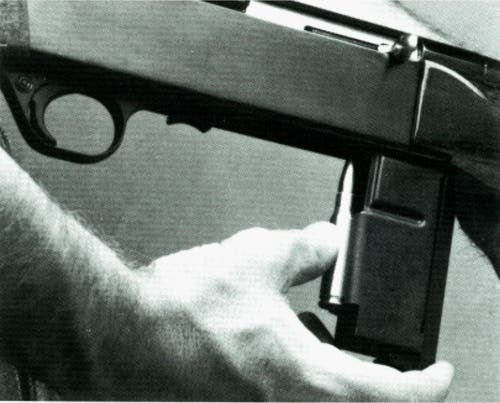
In the event the bolt is in its open position, a slightly different technique may be used to swing the magazine open and close the bolt at approximately the same time. Again, the first step is to insure that the safety is in its ON SAFE position. Next, hold the rifle with the muzzle pointed in a safe direction, with the left hand at forearm, as described before. Then, hook the thumb of the right hand over the operating handle and pull it slightly rearward while at the same time releasing the magazine latch with the right index finger. (See Figure 3) The hinged magazine-floorplate unit will swing downward.
At this point, allow the bolt to move forward to its closed position.
A left handed shooter may hold the rifle as described above with his right hand at the forearm and the left thumb over the top of the receiver, hooking the operating handle and pulling it slightly to the rear, while the left index finger releases the magazine latch. Or, he may find it more convenient to grip the rifle around the rear part of the receiver with his left hand, with his left index finger on the magazine latch, in order to support the rifle in its downward pointing position. Additional support may be gained by gripping the buttstock between the left elbow and the shooter’s left side. The right hand may then be used to pull the operating handle rearward, while the index finger of the left hand releases the magazine latch.
If it is desired to load a round into the chamber prior to loading the magazine, the following steps should be taken. First, be sure the cross bolt safety is in the ON SAFE position. Hold the gun on its side with the barrel pointing safely downward with either hand at the rear of the forearm, as described earlier. With the rifle held in this position the ejection port in the receiver should be facing up. Next, with the magazine floorplate closed and the bolt locked open, insert one round into the ejection port, allowing it to drop completely into the chamber. Then proceed to close the bolt and open the magazine for loading as described in the preceding paragraph. However, when loading the chamber, the bolt should be allowed to slam closed from its open position. If the bolt is not allowed to close in this manner, there is the possibility that it will not close completely, in which event the rifle will not fire. If this should ever happen, merely push the operating handle completely forward with the thumb or heel of your hand.
Many sportsmen prefer to hunt with an empty chamber until in the presence of game. In this situation, quietness in chambering a cartridge is sometimes of prime importance. To accomplish this, cycle the action slowly and quietly, keeping the operating handle controlled at all times until the bolt comes to rest against the chamber and cartridge head. Then push the operating handle completely forward, as described above.
It is both convenient and fast to load the magazine while it is attached to the floorplate in the open position. However, some may prefer to load the magazine after detaching it from the floorplate. Both methods will be described.
LOADING THE MAGAZINE WITH MAGAZINE ATTACHED TO FLOORPLATE
Always be sure the gun is ON SAFE, and the muzzle is pointed in a safe direction, since there may be occasions when you will want to load or replenish the magazine while a round is chambered. Next, hold the rifle in a safe barrel down position, using either hand on the forearm. Each cartridge should then be carefully inserted into the magazine against the pressure of the spring loaded follower, until it is retained by the metal rims of the magazine body. Care should be exercised in positioning each cartridge so that its base is to the rear of the magazine. If the nose of a cartridge protrudes beyond the end of the magazine, it could cause feeding problems or interfere with the closing of the magazine floorplate. (See Figure 4)
LOADING THE MAGAZINE WITH MAGAZINE DETACHED FROM THE FLOORPLATE
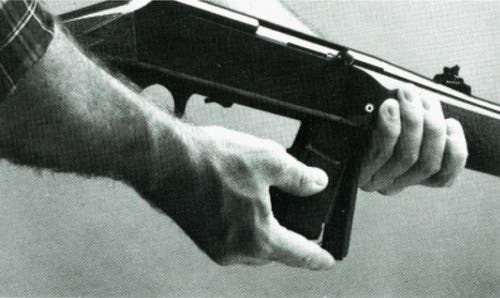
Once again, place the rifle ON SAFE and be sure the muzzle is pointed in a safe direction. With the magazine-floorplate unit open the magazine may be detached by merely pulling it away from the hinged floorplate. To do so, grasp the sides of the magazine toward its rear with the thumb and middle finger of either hand. Then, pull the magazine away from the floorplate while at the same time bearing against the projecting rear of the floorplate with the index finger. (See Figure 5)
The rifle may be supported in its barrel down position during this procedure with the opposite hand at the forearm. Once the magazine is detached it may be loaded with cartridges as described earlier. To reattach, insert the small lip on the front face of the magazine into the matching groove in the forward end of the floorplate. Then snap the rear of the magazine firmly into place. Extra magazines may be carried loaded for rapid replacement of an empty magazine, using this same procedure.
After loading the magazine, it is swung upward into place until retained by the magazine latch. If a round has not already been placed into the chamber, a round may be chambered by drawing the bolt fully rearward and allowing it to freely return to its cleared position.
Once a round has been chambered, the magazine-floorplate unit may again be opened at any time desired for refilling to capacity.
UNLOADING THE RIFLE
UNLOADING THE RIFLE
With the rifle ON SAFE and pointed in a safe downward direction release the magazine- floorplate to its open position. Grasp the bolt operating handle and move it smartly to the rear, thereby extracting and ejecting any live round in the chamber. The magazine may then be detached and either kept loaded or the cartridges may be stripped from it with the thumb of either hand. As is always good safety practice, visually inspect the chamber to be absolutely sure a round is not still present. Once this is determined the bolt may be allowed to close.
To unload the magazine merely push forward on the base of each round until it clears the retaining rims. The last step is to close the floorplate either without the magazine or with an empty magazine in place.
Browning BAR Semi-Automatic High Power Rifle
Browning BAR Semi-Automatic High Power Rifle
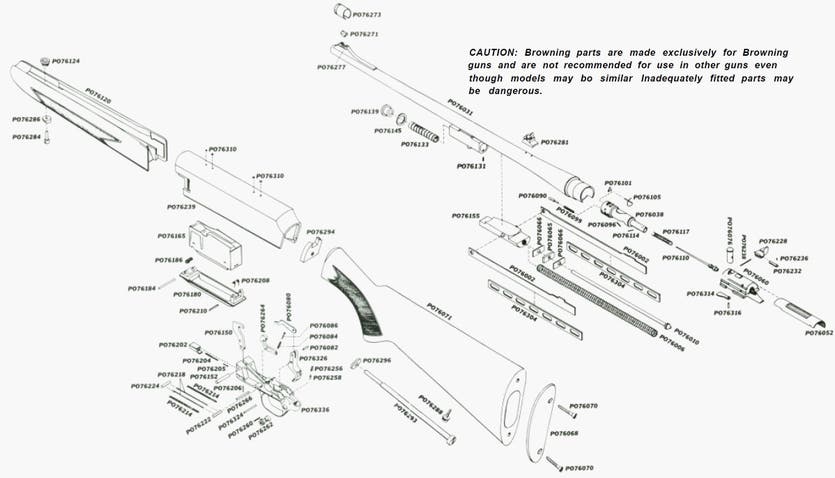
Schematic is provlded for parts identification only and should not be used as a guide to assemble guns.
IMPORTANT: When ordering parts, list part number, part name, caliber, model and serial number.
CAUTION: Browning parts are made exclusively for Browning guns and are not recommended for use in other guns even though models may bo similar Inadequately fitted parts may be dangerous.


SIGHTING IN THE RIFLE
SIGHTING IN THE RIFLE
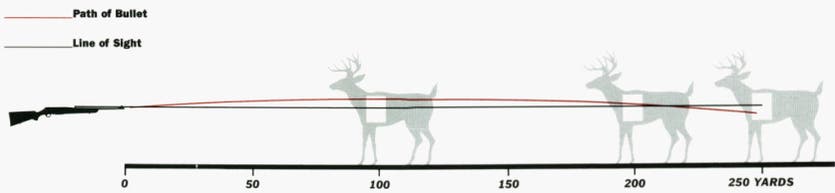
The BAR is available with or without open sights. This section describes the BAR with installed open sights. Since the path of the bullet follows a slight arc from the muzzle of the rifle over the 200 yards distance, the point of impact will be slightly high at any intermediate distance between these two points. This deviation is listed in the following table for the calibers in which the rifle is presently made.
This table shows that even though there is some difference between where the bullet will strike at 100 yards and the point of aim, the deviation is not sufficient to put it out of the killing area if the rifle has been aimed correctly. Furthermore, with the rifle zeroed at 200 yards, the bullet will not drop sufficiently to exclude an effective shot over an additional distance of approximately 50 yards. (See Figure 6) A zero at 200 yards, therefore, represents an optimum compromise sight setting for any distance up to 250 yards, since the bullet will not deviate sufficiently from the point of aim to miss the vital areas of big game animals found in North America.
It is always advisable for the shooter to sight in his rifle himself, using the particular cartridge of his choice over the distance at which he desires to shoot. Please remember that an absolutely precise zero for the rifle would require a different sight setting for each cartridge, each bullet type and weight, for each range and wind condition encountered and also, most probably for each individual shooter.
To sight in the rifle for such a specific set of conditions, the following procedure is recommended:
1. Select a shooting area providing the required distance. It is preferable, of course, to use a regular rifle range where safety conditions are assured. If no range is available, be sure that the place you have chosen provides an adequate backstop to ensure that the bullet will be absorbed safely. The shooting direction should also be selected to eliminate any effect of cross-wind.
2. Place a target at the desired distance from the shooting point which will clearly show the impact of the bullet from a known point of aim. For this purpose a regular bullseye paper target is most suited.
3. Shoot three or four shots at the target from a prone or sitting position using a rest under the forearm (not the barrel) and supporting the elbows to maintain the rifle in the steadiest manner possible. Unsteadiness in holding the rifle on target will have a considerably greater effect on the results than either rifle or cartridge.
Shoot carefully and deliberately, trying as much as possible to align the sights exactly the same way each time. It is also advisable to shoot a first shot through the barrel before the sighting shots if the barrel is clean and oiled, as the combustion of the oil may change the ballistics of the bullet slightly.
4. If sight correction is required, the rear sight or the telescopic sight must be adjusted accordingly. Some BAR's are fitted with open sights consisting of a hooded front sight and a fully adjustable rear sight as well as being drilled and tapped to accept scope mounts. Other BAR's are drilled and tapped only to accept mounts for telescopic sights. To adjust the BAR’s open rear sight proceed as follows: Always unload your rifle before making any alignment to the sights.
5. If horizontal or windage correction is desired, slightly loosen the screw immediately in front of the rear sight notch. (This windage screw is set in a bright metal collar; the screw next to it is the vertical adjustment screw. Refer to Figure 7.) Slide the rear sight blade in the direction you wish the bullet impact to move. The base containing the rear sight blade is precisely calibrated for referencing. Each calibration mark represents approximately 4 inches of movement of the point of impact at 100 yards.
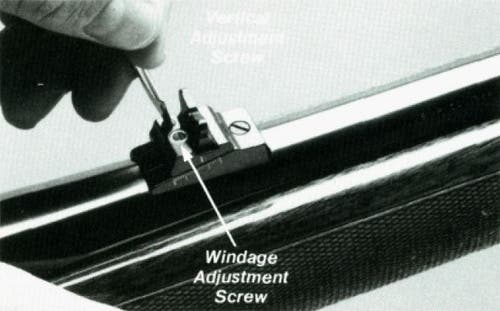
6. If vertical correction is desired, loosen the vertical adjustment screw and slide the rear sight assembly along the inclined ramp of the sight base. Again calibration marks on the sight will reference movement, and similarly, each calibration mark represents approximately 4 inches at 100 yards.
Just remember this simple rule in making rear sight adjustments. Always move your rear sight in the same direction you want the point of bullet impact to move. If you want the point of bullet impact to move to the left, move the rear sight setting to the left. If you want to raise the point of impact, raise your rear sight setting.
7. To adjust a telescopic sight on your BAR rifle, the same general procedure, outlined above, may be followed to sight in the rifle, except the adjustment of the telescopic sight should be made according to the instructions supplied by the maker of the sighting instrument used.
8. To obtain the 200 yard zero preferred by many experienced hunters on a 100 YARDS RANGE refer to the table in Figure 6. Merely adjust the sights in the manner prescribed above so that at the 100 yards range, the center of impact of your bullet group is located at the distance ABOVE your point of aim shown in the chart for the particular cartridge employed. When this is achieved, the bullet will strike the point of aim at 200 yards within ordinary limits of dispersion for such ammunition at that distance.
TRIGGER
TRIGGER
The trigger mechanism has been adjusted at the factory to provide a short crisp pull, yet one consistent with safety. The trigger is a single stage design with the weight of pull holding closely to 4 pounds. It is recommended that no attempt be made to change the weight of pull of the trigger.
CLEANING SUGGESTIONS
CLEANING SUGGESTIONS
The Correct Procedure for Cleaning Your Rifle Follows:
The Correct Procedure for Cleaning Your Rifle Follows:
1. BE CERTAIN THE RIFLE IS UNLOADED AND THE SAFETY IS IN THE ON SAFE POSITION.
2. Pull the bolt fully rearward with the operating handle. It will be held in this open position when the magazine is empty and in place.
3. Using a rifle cleaning rod with tip and patch large enough for snug fit in bore, insert rod and patch in barrel from the muzzle end and run back and forth several times. Caution should be exercised to insure that the cleaning rod or handle does not strike the crown of the muzzle, as damage to this area can adversely affect the accuracy of the rifle.
4. Inspect the chamber and bore for powder fouling. A normal amount of powder residue can be expected and is not serious. It can usually be removed by repeating Step Number 3, using a patch saturated with nitro-solvent. If or when fouling should become heavy, it can be removed with a brass bore brush. Dip the brush in nitro solvent and scrub the chamber and bore until the fouling is removed. To prevent brass bristles from breaking off, the brush should be pushed completely through the bore before being withdrawn.
5. After fouling has been removed, the bore should be wiped dry and then a slightly oiled patch run through it for preservation. Browning Gun Oil is recommended.
6. The bolt and interior of the receiver should be wiped off with a clean rag. This is best done with the magazine floorplate open and the bolt in its closed position; and also with the magazine floorplate open and the bolt held to the rear by hand.
Any dried oil in these areas and on the magazine follower should be removed. Follow this cleaning by applying a very light film of oil on the affected parts. Do not, however, pour large quantities of oil into the action. An excess of oil will run into the wood and cause it to soften or warp.
7. Wipe all exposed metal surfaces with an oiled cloth, making sure to wipe gun clean of all finger marks where moisture will accumulate. Ordinary good judgment will, of course, indicate that the metal of the gun should receive a light film of oil any time the gun has been exposed to adverse weather or handling.
8. CLEANING INSTRUCTIONS: To insure proper functioning of your BAR it should be periodically inspected and cleaned. Any time when sluggish or incomplete operation of the action is experienced while using commercial ammunition, the action should be cleaned. Generally, once a season is adequate, preferably at the end of the season.
DISASSEMBLY
DISASSEMBLY
1. BE CERTAIN THE RIFLE IS UNLOADED.
With the rifle in the “On Safe” position and pointed in a safe downward direction, release the magazine floorplate to its open position. Grasp the bolt operating handle and move it smartly to the rear, thereby extracting and ejecting any live round in the chamber. Detach the magazine clip from the hinged floorplate. Always visually inspect the chamber to make sure there are no rounds present. (See page 19 for instructions on removing and unloading the magazine).
2. Remove forearm: Loosen and remove the forearm swivel eyelet with small wrench by turning in a counter-clockwise direction. Care should be taken to prevent scratching the forearm. Grasp the forward end of the forearm and pull away from the barrel carefully until firm resistance is felt. Then slide the forearm forward and off. (The forearm must be pulled away from the barrel so that the forearm will clear the bottom of the gas cylinder as the forearm is moved forward.) Note: The forearm cannot be removed unless the bolt is locked open.
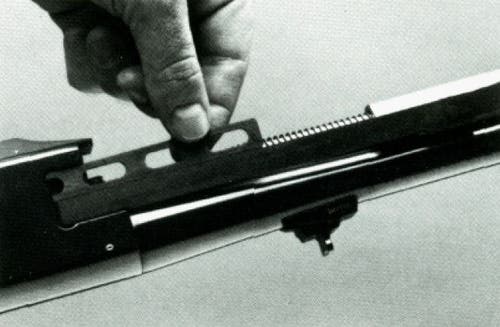
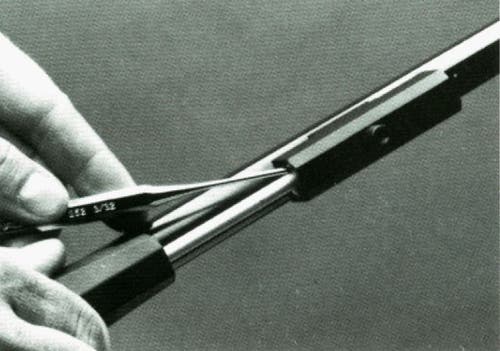
3. Remove action bars and support rails: Close the bolt and pull the support rails forward and remove completely from their slots in the interior of the receiver. (See Figure 8) The action bars are removed by pulling their forward end away from the round connecting stud on the inertia piece, lowering and pulling forward out of the receiver. (See Figure 9).
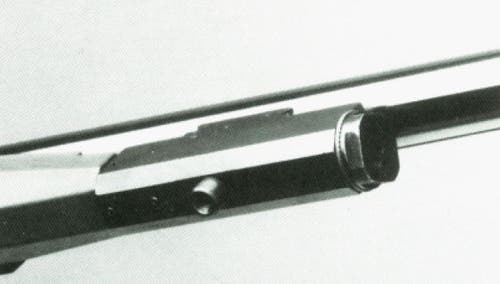
4. Remove gas regulator from the forward end of the gas cylinder: Turn in a counter- clockwise direction. (See Figure 10) Use a 5/8' wrench for this operation. (Note: The gas regulator will be very securely tightened in the gas cylinder, and care must be taken to firmly engage wrench used for removal.).
5. Remove the gas piston: The inertia block should be pulled back toward the receiver until rear face of the gas piston can be pushed forward out of the gas cylinder with a small drive punch. (See Figure 11)
(Note: An extremely dirty gas cylinder and gas piston may require forcefully moving the gas piston forward with a hammer and drive punch, and extreme care must be used to avoid scoring parts. If the gas piston will not move with moderate force, place a couple of drops of nitro-solvent around the gas piston, wait about 15 minutes, and then try to push the piston out with the drive punch. If the piston still will not move, put more nitrosolvent on the piston and allow it to set overnight before attempting to remove the piston.
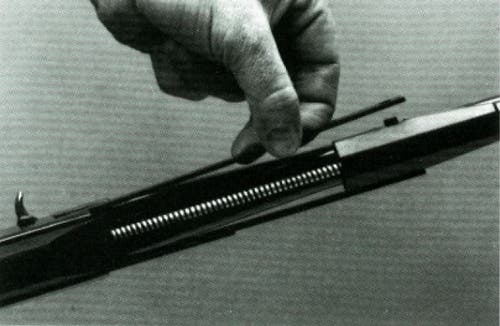
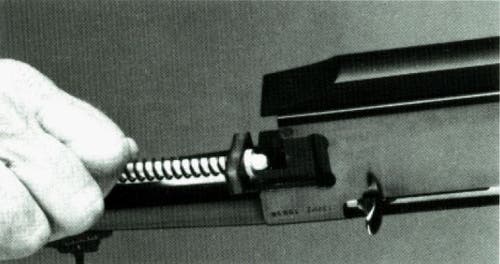
6. Remove the inertia block, action springs, and action spring guide: Tightly grip by hand the rear portion of the action and action spring guide and pull forward toward gas cylinder until the action spring guide is clear of its recess in the receiver. The rear end of the action spring guide can then be moved to one side of the receiver and then rearward to remove the action spring, action spring guide, and inertia block. (See Figure 12)
The gas cylinder can now be examined for accumulations of residue. Residues in the gas cylinder and on the gas piston should be thoroughly removed with a good quality powder solvent or bore cleaner. If residues are heavy, they can be removed by scrubbing the gas cylinder with a 20 gauge shotgun bronze wire bore brush and a good solvent.
The gas piston, gas cylinder, and other parts covered by the forearm should be wiped with a very lightly oiled cloth after cleaning. The gas cylinder interior and the gas piston SHOULD NOT BE OILED beyond this.
REASSEMBLY
REASSEMBLY
Reassembly is just the reverse of steps for disassembly. The action spring, action spring guide, and inertia block are replaced first. The gas piston is next inserted into the front of the gas cylinder and pushed rearward over the end of the action spring guide. Care must be taken to insure that the small guide pin at the rear of the gas cylinder is engaged in the lengthwise groove on the rear portion of the gas piston. To be sure that the gas piston is properly aligned in the gas cylinder, the gas piston should be able to be pushed partially out of the rear end of the gas cylinder when the inertia block is pulled away from the gas cylinder.
The gas regulator is now assembled into the front of the gas cylinder. The gas regulator must be very securely tightened using the slot wrench provided.
The action bars and support rails are next replaced. The projecting section of each action bar is carefully placed in its corresponding slot in the bolt before the hole in its forward end is placed over the stud on the inertia piece. It may be necessary to pull the inertia piece slightly rearward to engage the action bars. The support rails are next installed.
The bolt is locked into its open position and the reassembly of the forearm is just the reverse of steps “1” through “2” above. Be very careful in reassembly of the forearm, since it can be broken if forced into position incorrectly.
The wood surfaces can be wiped with Browning Gun Oil or polished with any quality furniture wax.
SERVICE OR REPAIR
SERVICE OR REPAIR
If your firearm should require service or repairs, we suggest you first contact a local recommended Browning Firearms Service Center.
To locate a service center visit browning.com, contact our Customer Service Department or your Browning firearms dealer for the address of the Service Center nearest you. Otherwise, you may send your firearm directly to our Service Department in Arnold, Missouri.
Parts listings, Firearm Service Center lists, service procedures, service/repair form and general product information are also found on the internet at: browning.com. For technical questions about your firearm or service, contact:
United States customers contact:
Browning Firearm Status and Technical Service
3005 Arnold Tenbrook Rd
Arnold, MO 63010-9406
Phone: (800) 322-4626
Canadian customers contact:
Browning Canada Sports Ltd/Ltée
5583 Chemin St-François
St-Laurent, Quebec H4S 1W6
Phone: (514) 333-7261
When returning your firearm for servicing, you must do the following:
1. Be sure it is completely unloaded.
2. Remove the scope or other optics.
3. Package it securely in a cardboard container.
4. Enclose the service/repair form available at browning.com or a letter that clearly describes the trouble experienced, the ammunition used and the repairs desired. Also include your name, email address (if possible) and a daytime phone number where you can be reached.
5. If convenient, send a copy of the service/repair form or letter to us separately.
6. Never return ammunition with your firearm. It is against postal and most commerce regulations.
You Are Responsible For Firearms Safety
You Are Responsible For Firearms Safety
As a gun owner, you accept a set of demanding responsibilities. How seriously you take these responsibilities can be the difference between life and death. Failure to follow any of these instructions can cause extensive damage to your gun and/or possible serious injury or death to yourself and others. There is no excuse for careless or abusive handling of any firearm. At all times handle any firearm with intense respect for its power and potential danger.
PLEASE READ AND UNDERSTAND ALL OF THE CAUTIONS, PROPER HANDLING PROCEDURES AND INSTRUCTIONS OUTLINED IN THE OWNER’S MANUAL BEFORE USING YOUR NEW FIREARM.
1 - ALWAYS KEEP THE MUZZLE OF YOUR RIFLE POINTED IN A SAFE DIRECTION, even though you are certain that the rifle is unloaded. Never point any firearm at anything you do not intend to shoot. Be extremely alert and aware of all persons and property within the range of your ammunition.
2 - NEVER RELY TOTALLY ON YOUR FIREARM’S MECHANICAL “SAFETY” DEVICE. The word “safety” describes a gun’s blocking or disengaging mechanism for the trigger, sear, hammer and/or firing pin. Although mechanical devices place the rifle in a SAFER status, no guarantee can be made that the gun will not fire even if the “safety” is on the “on safe” position.
LIKE ANY MECHANICAL DEVICE, A “SAFETY” CAN SOMETIMES FAIL; IT CAN BE JARRED OR INADVERTENTLY MANIPULATED INTO AN UNSAFE CONDITION.
Mechanical “safeties” merely aid safe gun handling and are no excuse for pointing your guns muzzle in an unsafe direction. While it is a good idea to “test” your guns mechanical “safeties” periodically for proper function, NEVER TEST IT WHILE YOUR GUN IS LOADED OR POINTED IN AN UNSAFE DIRECTION.
Safe gun handling does not stop with your guns mechanical “safety” devices – it starts there. Always treat this rifle with the respect due a loaded, ready-to-fire firearm.
3 - WHENEVER YOU HANDLE A FIREARM, OR HAND IT TO SOMEONE, ALWAYS OPEN THE ACTION IMMEDIATELY, VISUALLY CHECK YOUR RIFLE'S CHAMBER, FEED MECHANISM AND MAGAZINE.
Make certain they do not inadvertently contain any ammunition. Always keep the chamber empty and "safety" in the "on safe" position unless shooting is imminent.
4 - DO NOT TRANSPORT YOUR RIFLE LOADED, WHETHER IN A SCABBARD, GUN CASE, OR OTHER CONTAINER.
5 - HUNTING FROM ELEVATED SURFACES SUCH AS TREE STANDS IS DANGEROUS, and may increase the risk of handling a firearm. The following rules should always be observed by you and those you hunt with: Always make certain that the stand being used is safe and stable. Always make certain that your firearm is unloaded when it is being taken up to and down from the stand. Always make certain that your firearm is not dropped from the stand, or dropped while it is being taken up to or down from the stand. Remember, a loaded firearm may discharge when dropped, even with the safety in the "on safe" position.
6 - BEWARE OF BARREL OBSTRUCTIONS, for the safety of both your gun and yourself. Mud, snow, and an infinite variety of other obstructions may inadvertently lodge in a barrel bore. It takes only one small obstruction to cause dangerously increased pressures that can ruin (swell or rupture) the finest rifle barrels.
BEFORE CHECKING FOR A BARREL OBSTRUCTION, BE CERTAIN NO LIVE ROUND IS IN THE CHAMBER AND THAT THE MAGAZINE IS REMOVED AND FEED MECHANISMS ARE COMPLETELY EMPTY. PLACE THE "SAFETY" IN THE "ON SAFE" POSITION.
Look through the barrel to be sure it is clear of any obstruction. If an obstruction is seen, no matter how small it may be, clean the bore with a cleaning rod and patch as described in "Cleaning and Maintenance Suggestions." Before the first firing, clean the bore with a cleaning rod and patch, and wipe away any anti-rust compound in the action / chamber areas.
7 - ALWAYS UNLOAD YOUR RIFLE WHEN NOT IN USE. REFER TO "UNLOADING THE RIFLE" FOR AN EXPLANATION OF HOW TO UNLOAD YOUR RIFLE PROPERLY.
As a safety precaution, it is preferable to disassemble your gun for storage. Store your gun and ammunition separately -- well beyond the reach of children. Take all safeguards to ensure your rifle does not become available to untrained, inexperienced or unwelcome hands.
8 - USE THE PROPER AMMUNITION.
The barrel and action of this rifle have been made with substantial safety margins over the pressures developed by established American commercial loads. Nevertheless, Browning assumes no liability for incidents which occur through the use of cartridges of nonstandard dimensions which develop pressures in excess of commercially available ammunition with standards established by the Sporting Arms and Ammunitions Manufacturers' Institute (SAAMI).
BE ALERT TO THE SIGNS OF AMMUNITION MALFUNCTION.
If you detect an off sound or light recoil when a cartridge s fired, DO NOT LOAD ANOTHER CARTRIDGE INTO THE CHAMBER. Open the action and remove all cartridges from the magazine, chamber and action areas. With the action open, glance down the barrel to make sure that an obstruction does not remain in the barrel. If there is an obstruction, completely clear the barrel before loading and firing again. Failure to follow these instructions can cause extensive damage to your gun and possible serious injury to yourself and others.
MAKE SURE OF ADEQUATE VENTILATION IN THE AREA THAT YOU DISCHARGE A FIREARM. WASH HANDS THOROUGHLY AFTER EXPOSURE TO AMMUNITION OR CLEANING A FIREARM.
Lead exposure can be obtained from discharging firearms in poorly ventilated areas, cleaning firearms or handling ammunition. Lead is a substance that has been known to cause birth defects, reproductive harm and other serious injury.
9 - DO NOT SNAP THE FIRING PIN ON AN EMPTY CHAMBER -- THE CHAMBER MAY NOT BE EMPTY!
Treat every gun with the respect due a loaded gun, even though you are certain the gun is unloaded.
10 - KEEP FINGERS AWAY FROM THE TRIGGER WHILE UNLOADING, LOADING, UNTIL YOU ARE READY TO SHOOT.
11 - BE SURE OF YOUR TARGET AND BACKSTOP.
Particularly during low light periods. Know the range of your ammunition. Never shoot at water or hard object.
12 - ALWAYS UNLOAD YOUR RIFLE'S CHAMBER BEFORE CROSSING A FENCE, CLIMBING A TREE, JUMPING A DITCH OR NEGOTIATING OTHER OBSTACLES.
Refer to "Unloading The Rifle" for instructions on the unloading of your rifle. Never place your loaded rifle on or against a fence, tree, car or other similar object.
13 - WEAR EYE AND EAR PROTECTION WHEN SHOOTING.
Unprotected, repeated exposure to gunfire can cause hearing damage. Wear ear protectors (shooting ear plugs or muffs) to guard against such damage. Wear shooting glasses to protect your eyes from flying particles. Allow proper distance (eye relief) between the scope and your eye when firing a scoped rifle or shotgun. Always keep a safe distance between the muzzle of your firearm and any persons nearby, as muzzle blast, debris and ejecting shells could inflict serious injury. Also, wear eye protection when disassembling and cleaning your shotgun to prevent the possibility of springs, spring-tensioned parts, solvent or other agents from contacting your eyes.
14 - DROPPING A LOADED GUN CAN CAUSE AN ACCIDENTAL DISCHARGE even with the "safety" in the "on safe" position. Be extremely careful while hunting or during any shooting activity, to avoid dropping any firearm.
15 - IF YOUR RIFLE FAILS TO FIRE, KEEP THE MUZZLE POINTED IN A SAFE DIRECTION. Hold this position for a minimum of 30 seconds. Carefully open the action and remove the cartridge. If the primer is indented, the cartridge should be disposed of in a way that cannot cause harm. If the primer is not indented, your firearm should be examined by a qualified gunsmith and the cause of the malfunction should be corrected before further use.
16 - BE DEFENSIVE AND ON GUARD AGAINST UNSAFE GUN HANDLING AROUND YOU AND OTHERS.
Don't be timid when it comes to gun safety. If you observe other shooters violating any of these safety precautions, politely suggest safer handling practices.
17 - BE CERTAIN YOUR RIFLE IS UNLOADED BEFORE CLEANING. Because so many gun accidents occur when a firearm is being cleaned, special and extreme care should be taken to be sure your gun is unloaded before disassembly, cleaning and reassembly. Keep ammunition away from the cleaning location. Never test the mechanical function of any firearm with live ammunition.
18 - TEACH AND SUPERVISE FIREARMS SAFETY TO ALL MEMBERS OF YOUR FAMILY --ESPECIALLY TO CHILDREN AND NONSHOOTERS.
Closely supervise newcomers to the shooting sports. Encourage enrolling in
hunting/shooting safety courses.
19 - NEVER DRINK ALCOHOLIC BEVERAGES OR TAKE ANY TYPE OF DRUGS BEFORE OR DURING SHOOTING.
Your vision and judgment could be dangerously impaired, making your gun handling unsafe to you and to others.
20 - READ AND HEED ALL WARNINGS in this instruction book, on ammunition boxes and with all accessories that you install on your firearm. It is your responsibility to secure the most up-to-date information on the safe handling procedures of your Browning gun. Browning assumes no liability for incidents which occur when unsafe or improper gun accessories or ammunition combinations are used.
21 - PERIODIC MAINTENANCE -- AVOID UNAUTHORIZED SERVICING.
Your rifle is a mechanical device which will not last forever, and as such, is subject to wear and requires periodic inspection, adjustment and service. Browning firearms should be serviced by a Browning Recommended Service Center or by Browning's service facility in Arnold, Missouri. Browning cannot assume any responsibility for injuries suffered or caused by unauthorized servicing, alterations or modifications of Browning firearms.
22 - BROWNING RESERVES THE RIGHT TO REFUSE SERVICE ON FIREARMS THAT HAVE BEEN ALTERED, ADDED TO OR SUBSTANTIALLY CHANGED.
Removal of metal from barrel(s), or modification of the firing mechanism and/or operating parts may lead to Browning's refusal of service on such firearms. Browning will charge the owner parts and labor to return the firearm to original Browning specifications.
DO NOT, UNDER ANY CIRCUMSTANCES, ALTER THE TRIGGER, SAFETY OR PARTS OF THE FIRING MECHANISM OF THIS OR ANY OTHER FIREARM. FAILURE TO OBEY THIS WARNING MAY RESULT IN INJURY OR DEATH TO YOURSELF OR OTHERS.