

Operation and care of
Browning B80 and B80Plus Semi-Automatic Shotgun
Browning B80 and B80Plus Semi-Automatic Shotgun
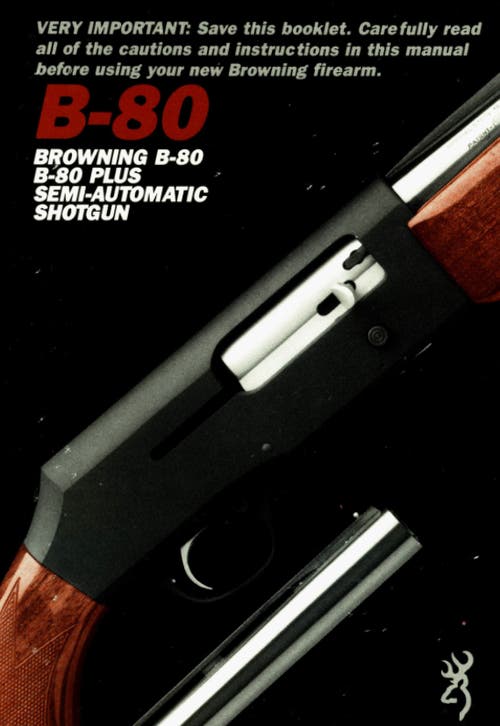
We are pleased that you have chosen a Browning B-80 Semi-Automatic shotgun.
We are pleased that you have chosen a Browning B-80 Semi-Automatic shotgun.
It is certainly a gun that you can be proud of. It incorporates Browning’s traditional quality and craftsmanship, and is made using the finest materials and manufacturing methods.
With a reasonable amount of care, your B-80 should give you many years of dependable, enjoyable service. Please feel free to write us immediately if you have any important observations regarding its performance and operation.
Also, please take a moment to complete the attached market survey card found on the back cover. It helps us considerably in our constant effort to provide you with better service.
Thank you.
You Are Responsible for Firearms Safety
As a gun owner, you accept a set of demanding responsibilities. How seriously you take these responsibilities can be the difference between life and death. Mistakes made with guns are final and cannot be paid for with money or regret.
There is no excuse for careless or abusive handling of any firearm. At all times handle this shotgun with intense respect for its power and potential danger.
PLEASE READ AND UNDERSTAND ALL OF THE CAUTIONS, PROPER HANDLING PROCEDURES AND INSTRUCTIONS OUTLINED IN THIS BOOKLET BEFORE USING YOUR NEW FIREARM.
1-ALWAYS KEEP THE MUZZLE OF YOUR SHOTGUN POINTED IN A SAFE DIRECTION even though you are certain the shotgun is unloaded. Never point any firearm at anything you do not intend to shoot. Be extremely alert and aware of all persons and property within the range of your ammunition.
2-NEVER TRUST YOUR SHOTGUN’S MECHANICAL “SAFETY” DEVICE. The word, “safety,” describes a gun’s trigger block mechanism, sear block mechanism, hammer block mechanism or firing pin block mechanism. These mechanical devices are designed to place your gun in a SAFER status. No guarantee can be made that the gun will not fire even if the “safety” is in the “on safe” position. The B-80 has a ‘cross bolt’ “safety” which blocks the gun’s trigger. See this manual for instructions on operation of this gun’s “safety.”
Like any mechanical device, a safety can sometimes fail; it can be jarred or inadvertently manipulated into an unsafe condition. Mechanical “safeties” merely aid safe gun handling and are no excuse for pointing your shotgun’s muzzle in an unsafe direction.
While it is a good idea to “test” your shotgun’s mechanical “safety” periodically for proper function, NEVER TEST IT WHILE YOUR SHOTGUN IS WADED OR POINTED IN AN UNSAFE DIRECTION.
Safe gun handling does not stop with your gun’s mechanical “safety” device — it starts there. Always treat this shotgun with the respect due a loaded, ready-to-fire firearm.
3-ALWAYS VISUALLY CHECK YOUR SHOTGUN'S CHAMBER AND MAGAZINE to be certain that they do not inadvertently contain any ammunition. Open the action, invert the shotgun and inspect the magazine and chamber. Be sure no live round is in the chamber, feed mechanism or magazine. Keep the "safety" in the "on safe" position.
4-WHENEVER YOU HANDLE A FIREARM, OR HAND IT TO SOMEONE, ALWAYS OPEN THE ACTION IMMEDIATELY, and visually check the chamber, receiver and magazine to be certain they do not contain any ammunition.
5-DO NOT TRANSPORT YOUR SHOTGUN LOADED, WHETHER IN A SCABBARD, GUN CASE, OR OTHER CONTAINER.
6-BEWARE OF BARREL OBSTRUCTIONS— for the safety of both your gun and yourself. Mud, snow and an infinite variety of other objects may inadvertently lodge in a barrel bore. It takes only one small obstruction to ruin (swell or rupture) the finest of shotgun barrels.
Before you load your firearm, open the action. BE CERTAIN NO LIVE ROUND IS IN THE CHAMBER. Then look through the barrel to be sure it is clear of any obstruction. It takes only a small obstruction to dangerously increase pressures. Before the first firing, clean the bore with a cleaning rod and patch, and wipe away any anti-rust compounds in the action/ chamber areas. See “Cleaning Suggestions”.
7-ALWAYS UNLOAD YOUR SHOTGUN WHEN NOT IN USE. REFER TO PAGE 30 OF THIS INSTRUCTION BOOKLET EXPLAINING THE UNLOADING OF YOUR SHOTGUN. As a safety precaution it is preferable to disassemble your gun for storage. Store your gun and ammunition separately, beyond the reach of children. Take all safeguards to ensure your gun does not become available to untrained, inexperienced, or unwelcome hands.
8-USE THE PROPER AMMUNITION. The barrel and action of this shotgun have been made with substantial safety margins over the pressures developed by established American commercial loads. Nevertheless, Browning assumes no liability for accidents which occur through the use of cartridges of non-standard dimensions or which develop pressures in excess of commercially available ammunition which has been loaded in accordance with standards established by SAAMI (Sporting Arms and Ammunition Manufacturers Institute).
9-DO NOT PUT A 20 GAUGE SHELL IN A 12 GAUGE GUN. Store all shells of different gauges in completely separate and well-marked containers. Do not store shells of mixed gauges in a common container or in your pockets. EXAMINE EVERY SHELL YOU PUT IN YOUR GUN!
The most certain way to bulge or rupture a barrel is to drop a 20 gauge shell into a 12 gauge chamber. The 20 gauge shell, unfortunately, will not fall completely through the barrel; its rim is caught by the front of a 12 gauge chamber. Your gun will misfire. It is then possible to load a 12 gauge shell behind the 20 gauge shell. If the 12 gauge shell is then fired, the result will be a so-called “12-20 burst” which can cause extensive damage to your gun and possible serious injury to you.
10-DO NOT USE 3” SHOTGUN SHELLS IN A BARREL WITH A 2 3/4” CHAMBER. THE SIZE OF THE CHAMBER IS INSCRIBED, ALONG WITH CHOKE DESIGNATIONS, ON THE SIDE OF THE BARREL.
11-DO NOT SNAP THE HAMMER ON AN EMPTY CHAMBER-THE CHAMBER MAY NOT BE EMPTY! Treat every gun with the respect due a loaded gun-even though you are certain the gun is unloaded.
12-KEEP YOUR FINGER AWAY FROM THE TRIGGER WHILE UNLOADING, LOADING OR UNTIL YOU ARE READY TO SHOOT.
13-BE SURE OF YOUR TARGET AND BACKSTOP, particularly during low light periods. Know the range of your ammunition. Never shoot at water or hard objects.
14-ALWAYS UNLOAD ANY GUN’S CHAMBER AND MAGAZINE BEFORE CROSSING A FENCE, CLIMBING A TREE, JUMPING A DITCH OR NEGOTIATING OTHER OBSTACLES.
Refer to the 'unloading' section of this instruction booklet for instructions on the unloading of your shotgun. Never lean a loaded gun against a fence, tree, car or other similar object.
15-WEAR EYE AND EAR PROTECTION WHEN SHOOTING. Unprotected, repeated exposure to gunfire can cause hearing damage. Wear hearing protectors to protect your ears from loud noise and shooting glasses to protect your eyes from flying particles. Also, wear eye protection when disassembling and cleaning your shotgun to prevent the possibility of springs, spring-tensioned parts, solvents or other agents from contacting your eyes.
16-DROPPING A LOADED GUN CAN CAUSE AN ACCIDENTAL DISCHARGE even with the “safety” in the “on safe” position. Be extremely careful, while hunting or during any shooting activity, to avoid dropping a loaded firearm.
17-IF YOUR GUN FAILS TO FIRE, KEEP THE MUZZLE POINTED IN A SAFE DIRECTION. Hold this position for a minimum of 30 seconds. Carefully open the action and remove the cartridge. If the primer is indented, the cartridge should be disposed of in a way that cannot cause harm. If the primer is not indented, your firearm should be examined by a qualified gunsmith and the cause of the malfunction should be corrected before further use.
18-BE DEFENSIVE. BE ON GUARD AGAINST UNSAFE GUN HANDLING AROUND YOU AND OTHERS. Don’t be timid when it comes to gun safety. If you observe other shooters violating any of these safety precautions, politely suggest safer handling practices.
19-BE CERTAIN YOUR GUN IS UNLOADED BEFORE CLEANING. Because so many gun accidents occur when a firearm is being cleaned, special and extreme care should be taken to be sure your gun is unloaded before disassembly, cleaning and reassembly. Keep ammunition away from the cleaning location. Never test the mechanical function of any firearm with live ammunition.
20-EDUCATE AND SUPERVISE FIREARMS SAFETY TO ALL MEMBERS OF YOUR FAMILY, especially to children and non-shooters. Closely supervise newcomers to the shooting sports. Encourage enrollment in hunting/shooting safety courses.
21-NEVER DRINK ALCOHOLIC BEVERAGES OR TAKE ANY TYPE OF DRUGS BEFORE OR DURING SHOOTING. Your vision and judgment could be dangerously impaired, making your gun handling unsafe to you or to others.
22-READ AND HEED ALL WARNINGS in the instruction booklet and on ammunition boxes. It is your responsibility to secure the most up-to-date information on the safe handling procedures for your Browning gun. Browning cannot assume any responsibility when unsafe or improper arms and ammunition combinations are used.
23-PERIODIC MAINTENANCE— UNAUTHORIZED SERVICING. Your gun is a mechanical device and is subject to wear and requires periodic inspection, adjustment, and service. Browning firearms should be serviced by a Browning Recommended Service Center or by Browning’s service facility in Arnold, Missouri. Browning cannot assume any responsibility for injuries suffered or caused by unauthorized servicing, alterations or modifications of Browning firearms. IT CAN BE VERY DANGEROUS TO ALTER THE TRIGGER OR OTHER FIRING MECHANISM PARTS OF ANY FIREARM.
BE CAREFUL!
BE CAREFUL!
Nomenclature
Nomenclature
In conventional gun terminology, the position and movement of shotgun parts are described as they occur with the shotgun horizontal and in normal firing position; i.e., the muzzle is forward or front; the butt stock is rearward or rear; the trigger is downward or underneath; the sight is upward or on top. For general parts nomenclature, refer to Figure 1. All figures and schematics will refer to all 12 and 20 gauge E80 Shotguns unless otherwise noted.
Figure 1
Figure 1
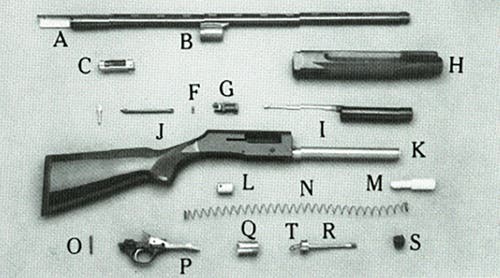
A. Barrel
B. Gas Cylinder & Barrel Guide
C. Breech Bolt
D. Operating Handle
E. Link
F. Link Pin
G. Bolt Slide
H. Forearm
I. Action Bar and Sleeve
J. Butt Stock
K. Magazine Tube
L. Magazine Spring Follower
M. Magazine Plug
N. Magazine Spring
O. Trigger Guard Retaining Pin
P. Trigger Housing
Q. Gas Piston
R. Magazine Spring Retainer & Forearm Cap Stud
S. Forearm Cap Assembly
T. Magazine Spring Retainer Lock Spring
Serial Number
Serial Number
The serial number of your B-80 shotgun can be found on the left side of the receiver.
The Browning B-80 is shown disassembled to the extent necessary in order to follow instructions contained in this book. (See Figure 1)
Ammunition
Ammunition
The B-80 was designed to function with all standard factory field loads and target loads. However, Browning can assume no responsibility for incidents which occur through the use of cartridges of non-standard dimension or those developing pressures in excess of SAAMI (Sporting Arms and Ammunition Manufacturer’s Institute) established standards.
CAUTION: DO NOT USE 3” SHOTGUN SHELLS IN A BARREL WITH A 2 3/4” CHAMBER. THE SIZE OF THE CHAMBER IS INSCRIBED, ALONG WITH CHOKE DESIGNATIONS, ON THE SIDE OF THE BARREL.
With the E80 Plus barrels are inscribed 3” and 2 3/4”. The E80 Plus barrel is designed to accept either sized shell.
General Operating Procedures
General Operating Procedures
This shotgun is gas-operated. A portion of the expanding powder gases is bled off through gas ports and used to operate the mechanism. During rearward travel, the bolt extracts and ejects the spent shell and cocks the hammer. During the forward travel the next cartridge is fed from the magazine in the chamber. This operation is semi-automatic; the trigger must be released and pulled for each successive shot. After the last cartridge has been fired, the bolt locks open. This facilitates fast reloading. To close the bolt, depress the cartridge stop / bolt release button which is located just below the ejection port on the right side of the receiver. (See Figure 2.)
Figure 2
Figure 2
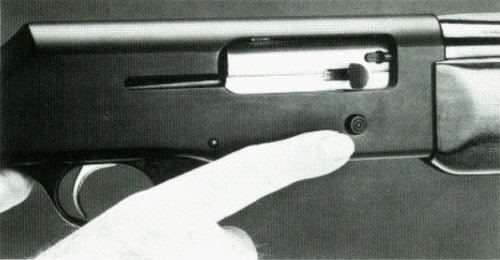
CAUTION: KEEP YOUR FINGERS CLEAR OF THE EJECTION PORT AS THE BOLT CLOSES.
If the bolt will not lock in the open position, press the carrier release which is located at the rear of the carrier just forward of the trigger guard as shown in Figure 3.
Figure 3
Figure 3
Initial Cleaning
Initial Cleaning
Before assembling the B-80, anti-rust compounds should be removed from all metal parts, paying close attention to the barrel interior and the breech area. The various exposed metal parts of your new B-80 have been coated with a rust preventative compound for protection. Browning Gun Oil is ideal for removing this compound and for giving your new gun its first lubrication; however, any quality gun oil may be used.
Recoil Adapters - Pre 1986 Guns
Recoil Adapters - Pre 1986 Guns
You may have to install a recoil adapter in your B80.
B-80’s manufactured prior to 1987 used recoil adapters only on 2 3/4” models as described below.
In 1987 the B-80 Plus was introduced. A B-80 Plus is identical if the barrel is inscribed 3” and 2 3/4”. All B-80 Plus models require a recoil adapter as described below.
You may have to install a recoil adapter in your pre ’87 12 gauge B-80. If you are going to use a 2 3/4” barrel, note the area where the magazine tube enters the receiver. If there is a thin spacer (recoil adapter) between the two forearm guide screws and the receiver, your B-80 shotgun is ready for a 2 3/4“ barrel and 2 3/4” loads. (See Figure 4.)
Figure 4
Figure 4
Replace the forearm and forearm cap assembly. If there has been no recoil adapter installed, and your individual gun will not function reliably with light target loads, you should proceed with the following:
Obtain a B-80 12 gauge recoil adapter (Part number PO13350) from your dealer, or from the Browning Parts Department in Arnold, Missouri. This adapter makes the B-80 one of the most versatile shotguns on the market; a shotgun that will shoot virtually every 2 3/4” 12 gauge load. Your dealer can install this adapter or, you may install it yourself by referring to this instruction booklet in the following manner:
1-Refer to the section “To Remove The Bolt Assembly”. After completing steps one through seven, you are ready to install the adapter.
2-Remove both forearm guide screws from the front of receiver, near the magazine tube. (See Figure 4.) Slide the recoil adapter over the magazine tube so that it conforms to the contour of the front of the receiver, and lines up with the screw holes.
3-Replace screws firmly, but do not overtighten. Refer to page 39 regarding reassembly of bolt assembly and trigger housing. When completed with step seven on page 42, your B-80 is ready to function with 2 3/4” light target loads. REMEMBER: When you plan on installing a 3” magnum barrel to shoot 3” shells, you should remove the recoil adapter.
As mentioned previously, the recoil adapter described above needs to be used only on those B-80s manufactured prior to late 1985.
How to Mount Your B-80 Barrel
How to Mount Your B-80 Barrel
1-Remove and set aside the forearm cap assembly which holds the forearm in position on the stock/receiver group. (See Figure 5.)
2-Slide forearm up and remove from the magazine tube. (See Figure 6.)
3-While holding your B-80 upright, note the position of the gas piston which is held in position by the forearm and forearm cap assembly. If you remove the gas piston, replace it so that it stands on its flanges atop the magazine tube.
Figure 5
Figure 5
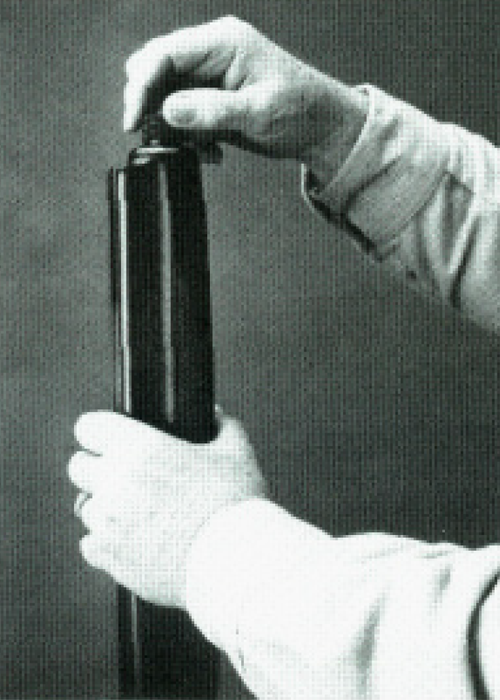
Figure 6
Figure 6
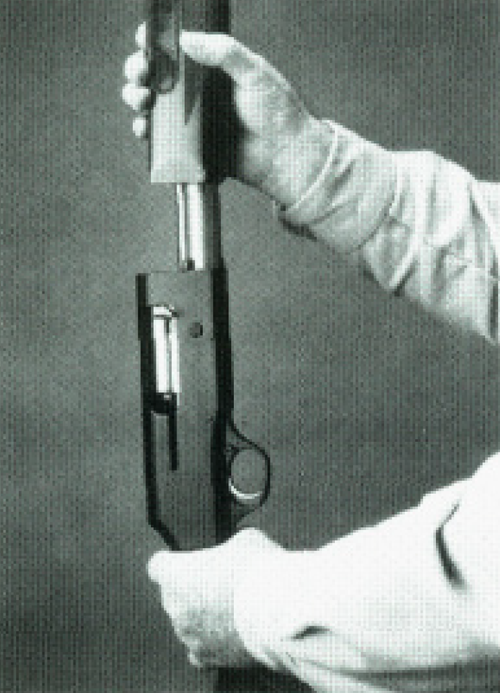
4-Depress carrier release.
5-Pull the bolt to the rear by means of the operating handle until the bolt locks in the open position.
6-Carefully insert the barrel into the receiver while aligning the barrel guide with the magazine spring retainer and forearm cap stud. (See Figure 7.)
Figure 7
Figure 7
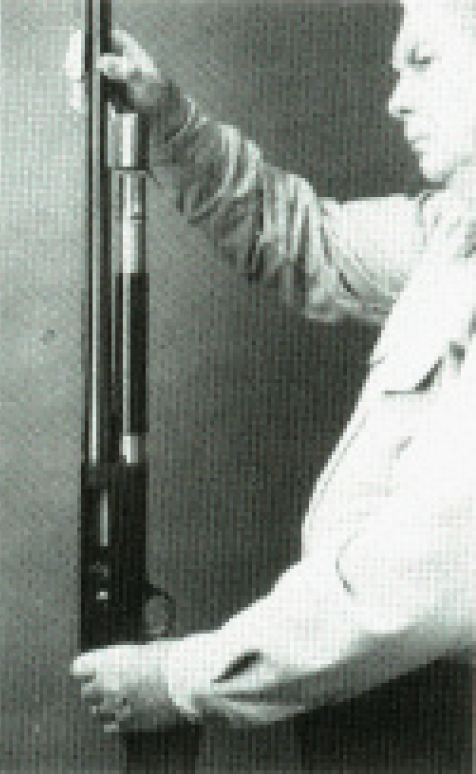
Figure 8
Figure 8
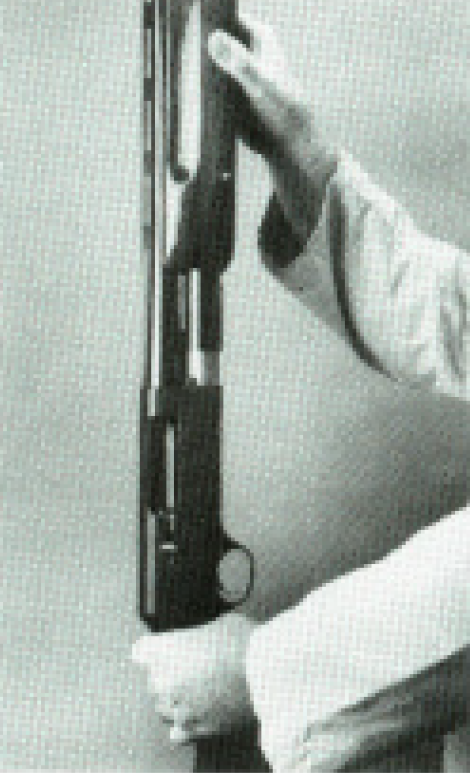
Figure 9
Figure 9
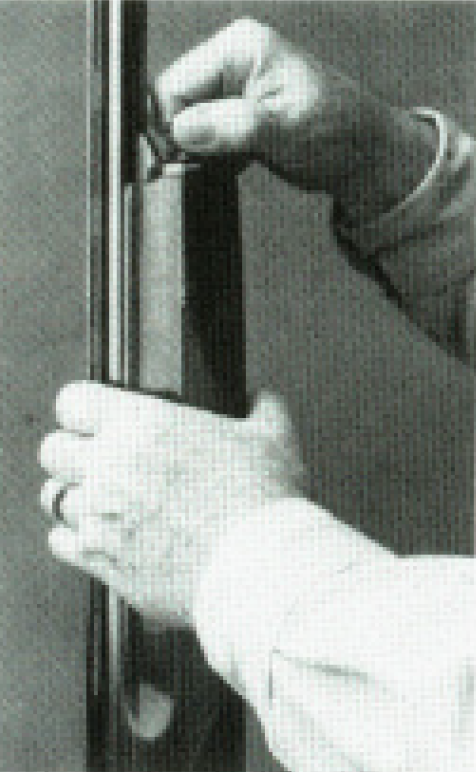
Align the forearm with the barrel and carefully slide it over the gas piston and magazine tube. CAUTION: DO NOT APPLY FORCE AS DAMAGE TO THE FOREARM COULD RESULT. ANY RESISTANCE SHOULD BE FOLLOWED BY A VISUAL CHECK FOR ALIGNMENT. (See Figure 8.)
Replace the forearm cap assembly. BE CERTAIN THE FOREARM CAP ASSEMBLY IS SCREWED COMPLETELY DOWN SO THAT THE REAR END OF THE FOREARM IS IN FIRM CONTACT WITH THE FRONT END OF THE RECEIVER, (See Figure 9.)
Close the bolt using the cartridge stop and bolt release button as shown in Figure 3. NOTE: DO NOT SLAM THE BREECH BOLT HOME BY PRESSING THE CARTRIDGE STOP AND BOLT RELEASE BUTTON AFTER THE BARREL HAS BEEN REMOVED FROM YOUR GUN. When the barrel is present on the gun, the breech bolt stops against the barrel extension. If the breech bolt is slammed home with the barrel removed, the operating handle will be driven against the front edge of the receiver’s ejection port, causing damage.
For convenience in casing and carrying the dismantled gun, return the forearm to its position on the magazine tube and screw on the forearm cap assembly. You will then have two compact units. One is the barrel; the other is the action with forearm and stock.
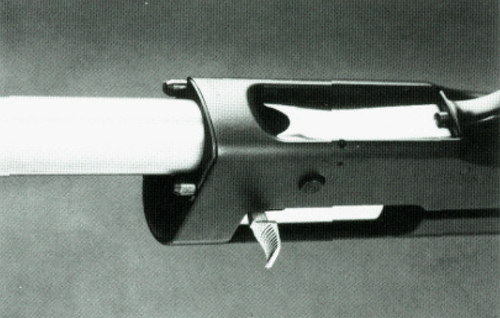
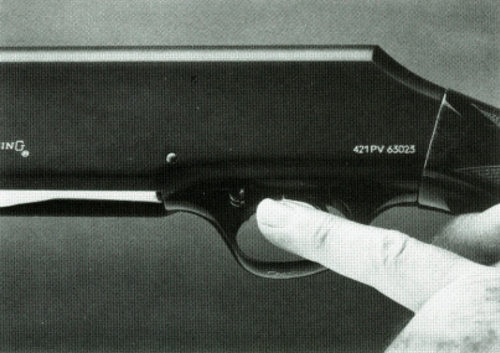
Cross-Bolt Safety
Cross-Bolt Safety
The cross-bolt “safety” is designed to block the trigger from traveling. In the “off-safe” or “fire” position a red warning band is visible on the left side of the trigger guard alerting the shooter of the gun’s ready-to-fire status. To accommodate left-handed shooters, an optional left hand “safety” can be installed by a gunsmith. If an optional left hand “safety” is installed, the red warning band will then appear on the right side of the trigger guard.
DO NOT DEPEND ON THE RED COLOR ALONE TO INDICATE YOUR GUN’S SAFETY STATUS, as time, exposure to the elements, as well as the abrasive action of cleaning agents can erase it. The “safety” is located as shown in Figure 10.
Figure 10
Figure 10
Loading Your B-80
Loading Your B-80
There are two basic methods for getting a loaded shell into the chamber of a B-80. First, the shell can be directly loaded through the ejection port. Second, a shell can be loaded manually from the magazine. Loading of the magazine is the same for both procedures.
CAUTION: AT ALL TIMES DURING THE LOADING PROCEDURE, BE SURE YOUR MUZZLE IS POINTING IN A SAFE DIRECTION AND THE SAFETY IS "ON SAFE."
DO NOT PUT A 20 GAUGE SHELL IN A 12 GAUGE GUN. Store shells of different gauges in completely separate and well-marked containers. See caution number 9 on page 6 of this booklet. Do not store shells of mixed gauges in a common container or in your pockets. LOADING THROUGH THE EJECTION PORT—
1-Pull the operating handle to the rear until the bolt locks in the open position. If the bolt will not lock in rear, press the carrier release. Visually inspect the chamber, carrier, and magazine making sure they are clear.
2-Push the “safety” from left to right or to the “on safe” position. The red band indicating that the B-80 is ready to fire should not show.
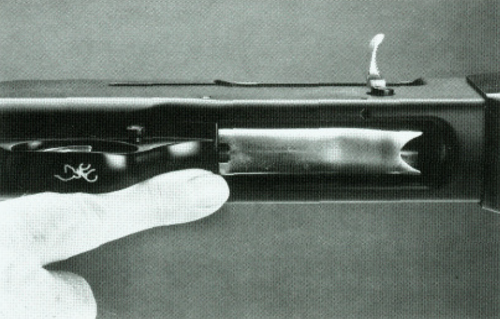
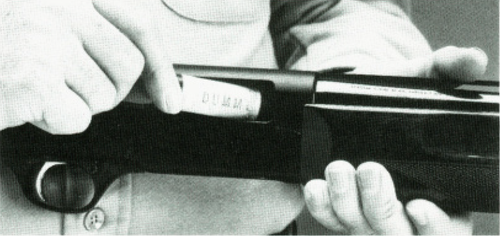
3-While pointing the muzzle in a safe direction, insert a cartridge of the proper gauge through the ejection port into the chamber and push the cartridge stop / bolt release button to close the action. Your chamber is now loaded. (See Figure 11.)
Figure 11
Figure 11
4-Insert the second cartridge through the loading port at bottom of receiver as shown in Figure 12. Note: MAKE SURE THAT THE CARTRIDGE IS PUSHED PAST THE CARTRIDGE STOP, AND THE CARRIER IS FREE TO MOVE. (See Figure 13.)
Figure 12
Figure 12
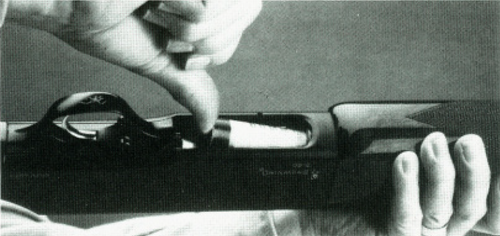
Figure 13
Figure 13
4-Insert the second cartridge through the loading port at bottom of receiver as shown in Figure 12. Note: MAKE SURE THAT THE CARTRIDGE IS PUSHED PAST THE CARTRIDGE STOP, AND THE CARRIER IS FREE TO MOVE. (See Figure 13.)
5-Repeat the above procedure until your gun is fully loaded. Your B-80 will hold three 3 inch or three 2 3/4 inch cartridges in its magazine plus one in its chamber. NOTE: A magazine plug restricting the B-80’s magazine capacity to two cartridges is installed at the factory. lnstructions for removing the magazine plug will be found on page 42.
LOADING MANUALLY FROM THE MAGAZINE-
1-Make sure the muzzle is pointed in a safe direction.
2-Open the bolt and visually inspect the chamber, carrier, and magazine making sure they are clear. NOTE: If the bolt locks open, push the cartridge stop button, making sure your fingers are clear of the ejection port.
3-Push the “safety” from left to right or to the “on safe” position. The red band indicating that the B-80 is ready to fire should not show.
4-Insert cartridge of the proper gauge through the loading port at the bottom of the receiver up into the magazine as shown in Figure 12. Make sure the cartridge is pushed past the cartridge stop and that the carrier is free to move.
5-Depress the carrier release and cycle the action by pulling the operating handle fully to the rear and releasing it. Your chamber is now loaded.
6-Repeat step four until magazine is loaded.
Browning B-80 Semi-Automatic Shotgun Schematic
Browning B-80 Semi-Automatic Shotgun Schematic
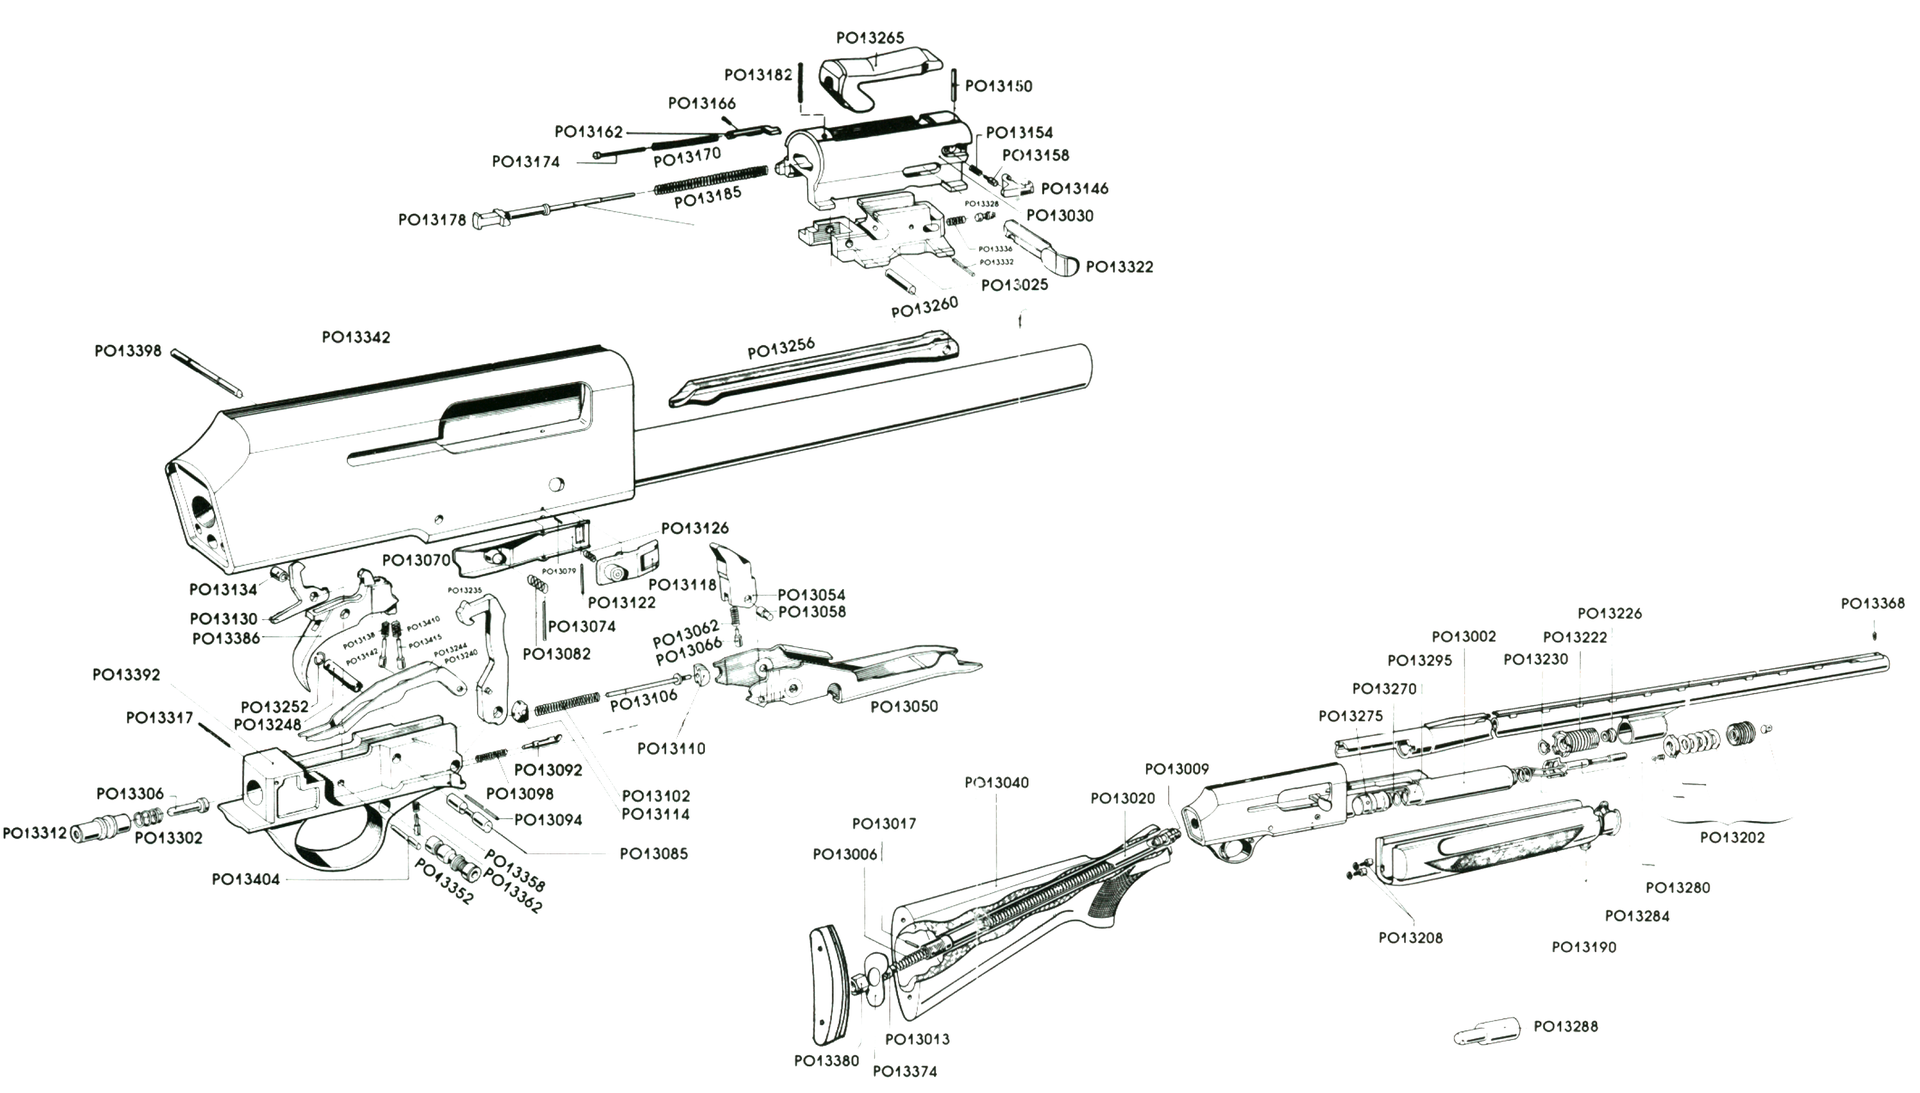
Schematic is provided for parts Identification only and should not be used as a guide to assemble guns.
IMPORTANT: When ordering parts, list part number, part name, caliber, model and serial number.
CAUTION: Browning parts are made exclusively for Browning guns and should not be used In other guns even though models may be similar. Inadequately fitted parts may be dangerous.
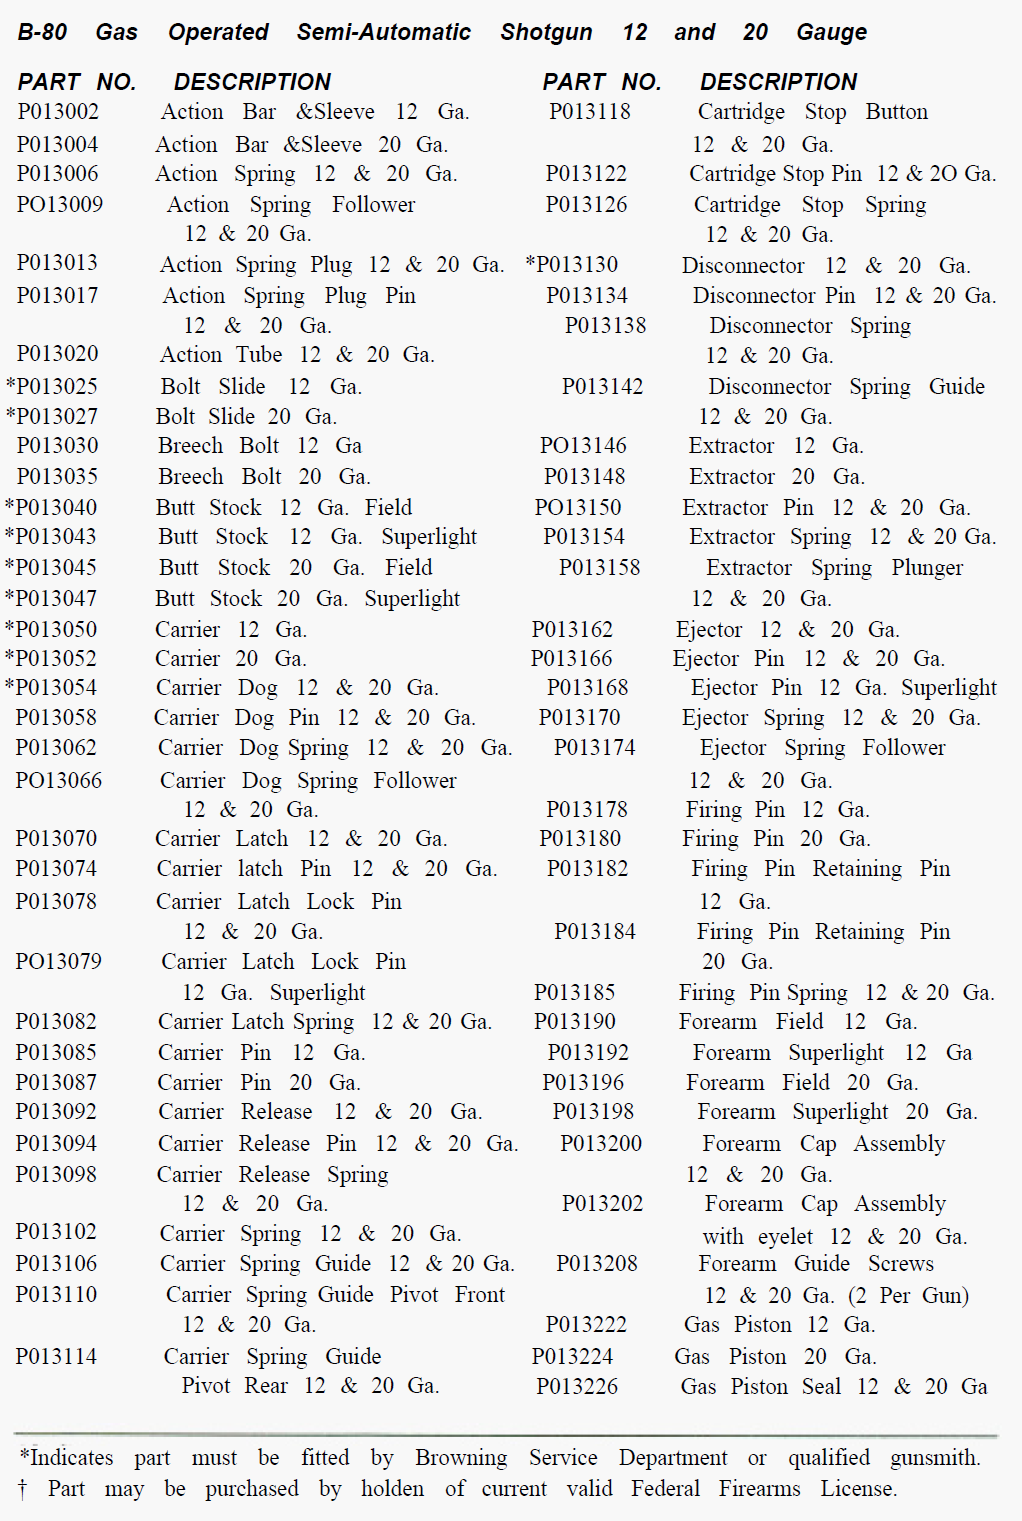
Parts List
Parts List
To Unload or Change Loads
To Unload or Change Loads
CAUTION: AT ALL TIMES DURING THE UNLOADING PROCEDURE, BE SURE YOUR MUZZLE IS POlNTlNG IN A SAFE DIRECTION AND THE SAFETY IS “ON SAFE.”
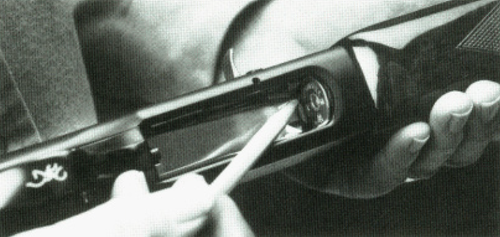
Pull the operating handle all the way to the rear and eject the chambered cartridge and lower the bolt on the empty chamber. NOTE: It is not necessary or recommended that the remaining cartridges be cycled through the action. That would necessitate depressing the carrier release after each cartridge is ejected. It is easier and safer to invert your B-80, insert your index finger into the loading port and while pushing slightly on the round in the magazine, depress the cartridge stop. (See Figure 14.) Ease each cartridge out until the magazine is empty.
Figure 14
Figure 14
VISUALLY CHECK THE MAGAZINE AND CHAMBER TO MAKE SURE THEY ARE EMPTY. Gather ejected cartridges and store separately from the gun beyond the reach of children.
To change loads in your B-80, simply eject the chambered cartridge by pulling the operating handle all the way to the rear. Insert the desired cartridge (such as a goose load) of the same gauge through the ejection port into the chamber.
CAUTION: Repeated cycling of the bolt’s operating handle alone is not assurance that the B-80 is unloaded. There still may be cartridges in the magazine. ALWAYS CONDUCT A THOROUGH VISUAL INSPECTION OF THE CHAMBER, ACTION AND MAGAZINE AFTER UNLOADING.
Cleaning Suggestions
Cleaning Suggestions
The correct procedure for cleaning your B-80 is as follows:
BE CERTAIN YOUR SHOTGUN’S MAGAZINE AND CHAMBER ARE UNLOADED AND WEAR EYE PROTECTION.
1-Dismount barrel so that it can be cleaned from the breech end.
2-Inspect bore from both ends for leading by looking through bore toward light. NOTE: Dull longitudinal streaks, usually more pronounced in the constriction area of the choke and just forward of the chamber, are caused by leading.
3-A normal amount of leading can be expected with today’s high velocity loads and improved wads but this is not serious. If leading should become heavy, it can be removed with a brass bore brush. Spray the bore or the bore brush with a good powder solvent, and scrub the bore until leading is removed. To prevent brass bristles from breaking off, the brush should be pushed completely through the bore before being withdrawn.
4-After leading has been removed, the bore should be wiped dry and then a lightly oiled patch run through it for preservation.
5-If the gun has been exposed to dust, dirt, mud or water, the principal working parts should be wiped clean and lubricated with a light film of oil. Browning Oil is recommended.
6-The magazine tube on the B-80 should be wiped clean of all dirt and grit, and then lubricated lightly with an oiled patch.
7-Reassemble the barrel and wipe all exposed metal surfaces with an oiled cloth, making sure to wipe gun clean of all finger marks.
8-The wood surfaces can also be wiped with Browning Gun Oil or they can be polished with any quality furniture wax (but not both).
Periodic Maintenance
Periodic Maintenance
Once a year, or after 1000 shots, it is advisable to soak the gas piston in solvent and scrub it with a brass-wire brush to remove accumulated deposits. The gas cylinder and barrel guide should also be thoroughly cleaned and wiped dry. Do not oil. If at any time your B-80 should fail to eject, thoroughly clean the gas system before seeking the services of a competent gunsmith.
The trigger and bolt assembly should be removed from the receiver as described on page 35, and thoroughly cleaned with nitro solvent and a toothbrush. Wipe the parts dry and lubricate with a few drops of high grade oil before reassembly.
Trigger Housing
Trigger Housing
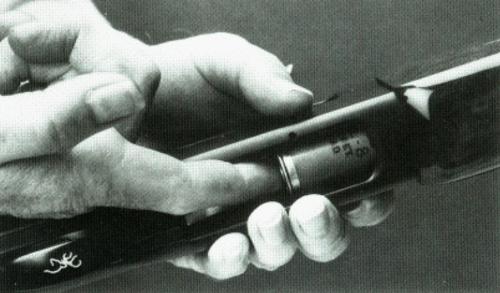
REMOVING THE TRIGGER HOUSING—
1-WHILE POINTING THE MUZZLE IN A SAFE DIRECTION, MAKE SURE THE CHAMBER AND MAGAZINE ARE EMPTY.
2-Draw bolt fully to the rear and release it by depressing the cartridge stop and bolt release button.
3-Push “safety” to the “on safe” position.
4-With a punch or dowel push the trigger housing retaining pin from either side until it can be grasped and pulled free by hand. (See Figure 15.)
Figure 15
Figure 15
CAUTION
CAUTION
At all times keep your hand and fingers away from the ejection port (breech bolt port) to avoid being struck by the breech bolt as it closes.
CHOKE MARKING
CHOKE MARKING
The choke of your barrel is indicated by a clearly defined mark stamped on the right hand side of the barrel. The code for the choke markings is as follows:
| Full | * |
| Improved Modified | *_ |
| Modified | ** |
| Improved Cylinder | **_ |
| Skeet | **$ |
| Cylinder | *** |
If your shotgun should require service or repairs we suggest you first contact a local authorized Browning Firearms Service Center. Your Browning Sporting Goods dealer can tell you the address of the Service Center nearest you or you may call or write our Consumer Information Dept. in Morgan, Utah - (801) 876-2711. Otherwise you may return your shotgun to our own repair facility for servicing. The address is:
Browning Service Department
3005 Arnold-Tenbrook Road
Arnold, Missouri 63010-4728
636-287-6800
800-322-4626
When returning your shotgun for servicing, please be sure to package it securely in a cardboard container. Send a letter to our Service Department clearly describing the trouble experienced and the repairs or alterations desired. If convenient, also enclose a copy of your letter with the gun.