

Operation and care of
Browning A-Bolt (Pre-1993) Rifle
Browning A-Bolt (Pre-1993) Rifle
We are pleased that you have chosen a Browning A-Bolt bolt action rifle.
We are pleased that you have chosen a Browning A-Bolt bolt action rifle.
The A-Bolt incorporates design concepts and features developed over years of testing and use in the field, as well as new, innovative ideas. Ideas and features that make hunting and shooting more enjoyable and safer than ever. In every sense, the A-Bolt rifle is a true Browning. It gives you the kind of quality and depend- ability you’ve come to expect from the world’s most respected gun company. It is certainly a gun you can be proud to own.
With a reasonable amount of care, your A-Bolt rifle should give you many years of dependable, enjoyable service. Please feel free to write us immediately if you have any important observations regarding its perfor- mance and operation.
Thank You.
You Are Responsible for Firearms Safety
As a gun owner, you accept a set of responsibilities of the most demanding nature. How seriously you carry out these responsibilities can be the difference between life and death. Mistakes made with guns are final and cannot be paid for with money or regret.
There is no excuse for careless or abusive handling of any firearm. At all times handle your rifle and any other firearm with intense respect for its force, power and potential danger.
PLEASE READ AND UNDERSTAND ALL OF THE CAUTIONS, THE PROPER HANDLING PROCEDURES AND INSTRUCTION OUTLINED ON THIS PAGE BEFORE USING YOUR NEW FIREARM.
PLEASE READ AND PRACTICE THE FOLLOWING CAUTIONS:
CAUTION
1 - ALWAYS KEEP THE MUZZLE OF YOUR RIFLE POINTED IN A SAFE DIRECTION even though you are certain the rifle is unloaded and '' on safe.'' Never point your rifle at anything you do not intend to shoot. Be extremely alert and aware of all persons and property within range of your ammunition.
2 - NEVER RELY TOTALLY ON YOUR RIFLE'S "SAFETY" DEVICE.
The word "safety" describes a gun's trigger block mechanism, sear block mechanism, hammer block mechanism, or firing pin block mechanism. These mechanical devices are designed to place your gun in a SAFER status. No guarantee can be made that the gun will not fire even if the "safety, is in the "on safe" position. See "Operation of the Safety" on the section below for instructions on the operation of this gun's "safety."
LIKE ANY MECHANICAL DEVICE, A "SAFETY" CAN SOMETIMES FAIL; IT CAN BE JARRED OR INADVERTENTLY MANIPULATED INTO AN UNSAFE CONDITION.
Mechanical "safeties" merely aid safe gun handling and are no excuse for pointing your rifle's muzzle in an unsafe direction.
While it is a good idea to "test" your rifle's mechanical "safeties" periodically for proper function.
NEVER TEST THE ORIENTATION OR FUNCTION OF THE SAFETY WHILE YOUR RIFLE IS LOADED OR POINTED IN AN UNSAFE DIRECTION.
Safe gun handling does not stop with your gun's mechanical "safety" devices - it starts there. Always treat this rifle with the respect due a loaded, ready-to-fire firearm.
3 - WHENEVER YOU HANDLE A FIREARM, OR HAND IT TO SOMEONE, ALWAYS OPEN THE ACTION IMMEDIATELY AND VISUALLY CHECK YOUR RIFLE'S CHAMBER FEED MECHANISM AND MAGAZINE. Make certain that it does not inadvertently contain any ammunition. Always keep the chamber empty and the hammer in the half cock position unless shooting is imminent.
4 - DO NOT TRANSPORT YOUR RIFLE LOADED, WHETHER IN A SCABBARD, GUN CASE, OR OTHER CONTAINER.
5 - HUNTING FROM ELEVATED SURFACES SUCH AS TREE STANDS, Doing so may increase the risk of handling a firearm. The following rules should always be observed by you and those you hunt with: Always make certain that the stand being used is safe and stable. Always make certain that your firearm is unloaded when it is being taken up and down from the stand. Always, make certain that your firearm is not dropped from the stand, or dropped while it is being taken up or down from the stand. Remember, a loaded firearm, may discharge when dropped, even with the safety in the "on safe" position.
6 - BEWARE OF BARREL OBSTRUCTIONS, FOR THE SAFETY OF BOTH YOUR GUN AND YOURSELF. Mud, snow, and an infinite variety of other objects may inadvertently lodge in a barrel bore. It takes only one small obstruction to cause dangerously increased pressures that can ruin (swell or rupture) the finest rifle barrels.
BEFORE CHECKING FOR A BARREL OBSTRUCTION, BE CERTAIN NO LIVE ROUND IS IN THE CHAMBER AND THAT THE MAGAZINE IS REMOVED AND FEED MECHANISMS ARE COMPLETELY EMPTY. PLACE THE "SAFETY" IN THE "ON SAFE'' POSITION
(See the unloading section below for instructions on unloading). After assuring yourself that the rifle is completely empty, again, open the bolt and remove it from the receiver (as described in “Removing the Bolt” in the section below). Look through the barrel to be sure it is clear of any obstruction. If an obstruction is seen, no matter how small it may be, clean the bore with a cleaning rod and patch as described in “Cleaning and Maintenance Suggestions” section below. Before the first firing, clean the bore with a cleaning rod and patch, and wipe away any anti-rust compounds in the action / chamber areas.
7 - ALWAYS UNLOAD YOUR RIFLE WHEN NOT IN USE. REFER TO THE SECTION OF THIS PAGE THAT EXPLAINS THE UNLOADING OF YOUR RIFLE.
As a safety precaution, it is preferable to disassemble your gun for storage. Store your gun and ammunition separately - well beyond the reach of children. Take all safeguards to ensure your rifle does not become available to untrained, inexperienced or unwelcome hands.
8 - USE THE PROPER AMMUNITION. The barrel and action of this rifle have been made with substantial safety margins over the pressures developed by established American commercial loads. Nevertheless, Browning assumes no liability for incidents which occur through the use of cartridges of nonstandard dimensions which develop pressures in excess of commercially available ammunition which has been loaded in accordance with standards established by the Sporting Arms and Ammunition Manufacturers' Institute (SAAMI)
BE ALERT TO THE SIGNS OF AMMUNITION MALFUNCTION. If you detect an off sound or light recoil when a cartridge is fired, DO NOT LOAD ANOTHER CARTRIDGE INTO THE CHAMBER. Open the action and remove all cartridges from the magazine, chamber, and action areas. With the action open, glance down the barrel to make sure that an obstruction does not remain in the barrel. If there is an obstruction, completely clear the barrel before loading and firing again. Failure to follow these instructions can cause extensive damage to your gun and possible serious injury to yourself and others.
9 - DO NOT SNAP THE FIRING PIN ON AN EMPTY CHAMBER - THE CHAMBER MAY NOT BE EMPTY! Treat every gun, with the respect due a loaded gun, even though you are certain the gun is unloaded.
10 - KEEP YOUR FINGERS AWAY FROM THE TRIGGER WHILE UNLOADING AND LOADING, UNTIL YOU ARE READY TO SHOOT.
11 - BE SURE OF YOUR TARGET AND BACKSTOP - Particularly during low light periods. Know the range of your ammunition. Never shoot at water or hard objects.
12 - ALWAYS UNLOAD YOUR RIFLE'S CHAMBER BEFORE CROSSING A FENCE, CLIMBING A TREE, JUMPING A DITCH OR NEGOTIATING OTHER OBSTACLES. Refer to "General Operating Procedures" later on this page for instructions on the unloading of your rifle. Never place your loaded rifle on or against a fence, tree, car, or other sirnilar object.
13 - WEAR EYE AND EAR PROTECTION WHEN SHOOTING. Unprotected, repeated exposure to gunfire can cause hearing damage. Wear ear protectors (shooting ear plugs or muffs) to guard against such damage. Wear shooting glasses to protect your eyes from flying particles. Allow proper distance (eye relief) between the scope and your eye when firing a scoped rifle or shotgun. Always keep a safe distance between the muzzle of your firearrn and any persons nearby, as muzzle blast, debris and ejecting shells could inflict serious injury. Also, wear eye protection when disassembling and cleaning your shotgun to prevent the possibility of springs, spring-tensioned parts, solvents or other agents from contacting your eyes.
14 - DROPPING A LOADED GUN CAN CAUSE AN ACCIDENTAL DISCHARGE even with the "safety" in the "on safe" position. Be extremely careful while hunting or during any shooting activity, to avoid dropping any firearm.
15 - IF YOUR RIFLE FAILS TO FIRE, KEEP THE MUZZLE POINTED IN A SAFE DIRECTION.
Hold this position for a minimum of 30 seconds. Carefully open the action and remove the cartridge. If the primer is indented, the cartridge should be disposed of in a way that cannot cause harm. If the primer is not indented, your firearm should be examined by a qualified gunsmith and the cause of the malfunction should be corrected before further use.
16 - BE DEFENSIVE AND ON GUARD AGAINST UNSAFE GUN HANDLING AROUND YOU AND OTHERS.
Don't be timid when it comes to gun safety. If you observe other shooters violating any of these safety precautions, politely suggest safer handling practices.
17 - BE CERTAIN YOUR RIFLE IS UNLOADED BEFORE CLEANING
Because so many gun accidents occur, when a firearm is being cleaned, special and extreme care should be taken to be sure your gun is unloaded before disassembly, cleaning and reassembly. Keep ammunition away from the cleaning location. Never test the mechanical function of any firearm with live ammunition.
18 - TEACH AND SUPERVISE FIREARMS SAFETY TO ALL MEMBERS OF YOUR FAMILY-ESPECIALLY TO CHILDREN AND NONSHOOTERS.
Closely supervise newcomers to the shooting sports. Encourage enrollment in hunting / shooting safety courses.
19 - NEVER DRINK ALCOHOLIC BEVERAGES OR TAKE ANY TYPE OF DRUGS BEFORE OR DURING SHOOTING.
Your vision and judgment could be dangerously impaired, making your gun handling unsafe to you and to others.
20 - READ AND HEED ALL WARNINGS IN THIS INSTRUCTION BOOK, ON AMMUNITION BOXES AND WITH ALL ACCESSORIES THAT YOU INSTALL ON YOUR FIREARM.
It is your responsibility to secure the most up-to-date information on the safe handling procedures of your Browning gun. Browning assumes no liability for incidents which occur when unsafe or improper gun accessories or ammunition combinations are used.
21 - PERFORM PERIODIC MAINTENANCE - AVOID UNAUTHORIZED SERVICING!
Your rifle is a mechanical device which, will not last forever, and as such, is subject to wear and requires periodic inspection, adjustment, and service. Browning firearms should be serviced by a Browning Recommended Service Center or by Browning's service facility in Arnold, Missouri. Browning cannot assume any responsibility for injuries suffered or caused by unauthorized servicing, alterations or modifications of Browning firearrns.
DO NOT, UNDER ANY CIRCUMSTANCES, ALTER THE TRIGGER, SAFETY OR PARTS OF THE FIRING MECHANISM OF THIS OR ANY OTHER FIREARM. FAILURE TO OBEY THIS WARNING MAY RESULT IN INJURY OR DEATH TO YOURSELF OR OTHERS.
BE CAREFUL!
BE CAREFUL!
Browning A-Bolt (Pre-1993)
Browning A-Bolt (Pre-1993)
Nomenclature
Nomenclature
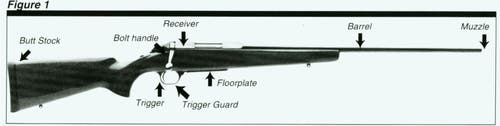
In conventional gun terminology the position and movement of gun parts are described as they occur with the gun horizontal and in normal firing position; i.e., the muzzle is forward or front; the butt stock is rearward or rear; the trigger is downward or underneath; the sights are upward or on top. For general nomenclature refer to Figure 1.
General description of the Browning A-Bolt rifle
General description of the Browning A-Bolt rifle
The A-Bolt is a bolt action operated rifle incorporating the most advanced features available today. The A-Bolt gives you a significant hunting advantage — less weight without shortening the barrel or sacrificing accuracy. Left-handed shooters also get the A-Bolt advantage in the Medallion and Stainless Stalker models. Whichever model you choose, the finely finished Medallion, hard-working Hunter, or weather-proof Stainless Stalker and Composite
Stalker, you can be sure you own a rifle that’s a cut above the others.
The A-Bolt’s short, 60° bolt throw lets you cycle the action rapidly for quick follow-up shots. Because the bolt does not swing up as high when open, scope clearance is improved. The bolt handle itself is human-engineered to fit your hand naturally.
The A-Bolt has a strong three-lug, thin-bodied bolt. Weight is reduced while maintaining the strength necessary to handle magnum calibers. Browning‘s patented cartridge depressor mechanism makes it possible to have both a thin-bodied bolt and short bolt rotation.
Other significant features include the convenient hinged floorplate with detachable box magazine, thumb-operated top tang safety and clean styling. The distinctive smooth plane top of the receiver provides a firm platform for scope mount placement.
General Operation of the A-Bolt rifle
General Operation of the A-Bolt rifle
The A-Bolt is a bolt action rifle that operates by lifting the bolt handle. drawing the bolt rearward and then sliding the bolt forward and rotating the bolt downward until it stops. This process takes a cartridge from the magazine and loads it into the chamber for firing. Operation of Left-hand models is identical. except that the bolt is located on the left side of the receiver. All operations of the A-Bolt are illustrated in this manual with a right-hand model.
CAREFULLY READ THE FOLLOWING PROCEDURES BEFORE ATTEMPTING TO ASSEMBLE OR SHOOT YOUR A-BOLT RIFLE.
Serial Number
Serial Number
The serial number can be found on the right hand side of the receiver. in front of the bolt handle.
Initial Cleaning
Initial Cleaning
BEFORE THE FIRST FIRING, CLEAN THE ANTI-RUST COMPOUND from the inside of the receiver with a clean rag and light gun oil. Browning Oil is ideal for removing this compound and for giving your new gun its first lubrication. However, any quality gun oil may be used. For an explanation of cleaning procedures see ”Care and Cleaning“ in the cleaning section below.
Operation of the Safety
Operation of the Safety
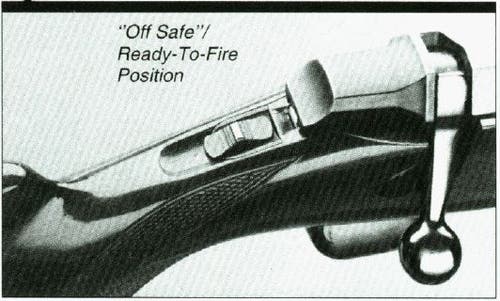
The safety is located on the top tang at the rear of the receiver. When the safety is drawn with the thumb to the rear, the gun is in the “on safe” position. This blocks the trigger and locks the bolt in the closed position. In this position an “S” will appear on the tang in front of the safety. WHENEVER A CARTRIDGE IS CHAMBERED, THE RIFLE SHOULD BE KEPT IN THE ‘‘ON SAFE” POSlTlON UNTIL YOU ARE READY TO FIRE IT. When the safety is pushed forward, the “S” will be covered and a red dot on the stock will appear indicating that the rifle is in the “off safe” position and ready to fire (See Figure 2).
Inserting and removing the bolt
Inserting and removing the bolt
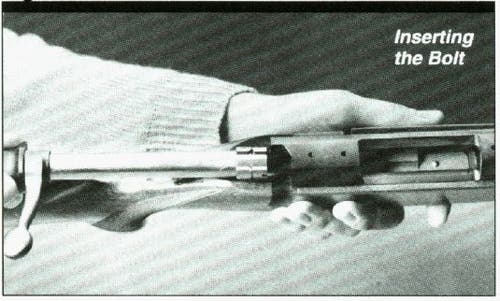
1 - INSERTING THE BOLT — The A-Bolt rifle comes packed in a foam-padded box with the bolt removed from the rifle. It is necessary to insert the bolt into the receiver. To do this, first place the safety in the “off safe“ position. Align the forward end of the bolt in the rear opening of the receiver. Be sure the cartridge depressor is also aligned with the bottom bolt lug (See Figure 3). Push the bolt completely forward and rotate the handle down to lock it (See Figure 4). It is not necessary to depress the bolt stop to insert the bolt. RETURN THE THUMB-OPERATED SAFETY TO THE “ON SAFE” POSITION. The rifle is now completely assembled and may be operated normally.
DO NOT DEPEND ON THE RED COLOR ALONE TO INDICATE YOUR GUN’S SAFETY STATUS.
Time. exposure to the elements. as well as the abrasive action of cleaning agents can erase it.

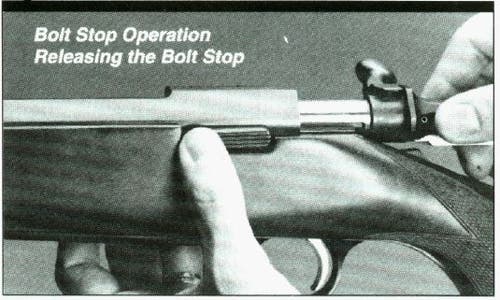
2 - REMOVING THE BOLT — FIRST, CHECK TO MAKE CERTAIN THERE ARE NO CARTRIDGES IN THE CHAMBER OR MAGAZINE. Press in on the forward end of the bolt stop and draw the bolt to the rear completely removing it from the rifle. The bolt stop is the horizontal bar on the left side of the receiver (See Figure 5).
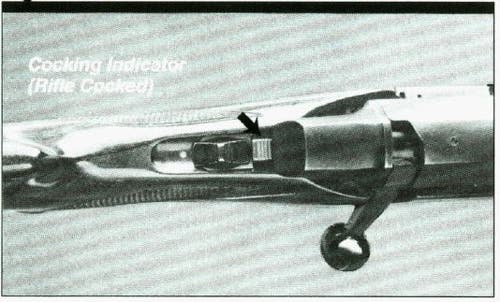
Cocking Indicator
Cocking Indicator
Below the bolt shroud and ahead of the safety is a serrated cocking indicator. The indicator is painted red. When the rifle is cocked it may be readily felt with the thumb as well as easily seen with a quick glance downward (See figure 6). When the rifle is fired, the cocking indicator retracts into the bolt shroud and cannot be seen or felt.
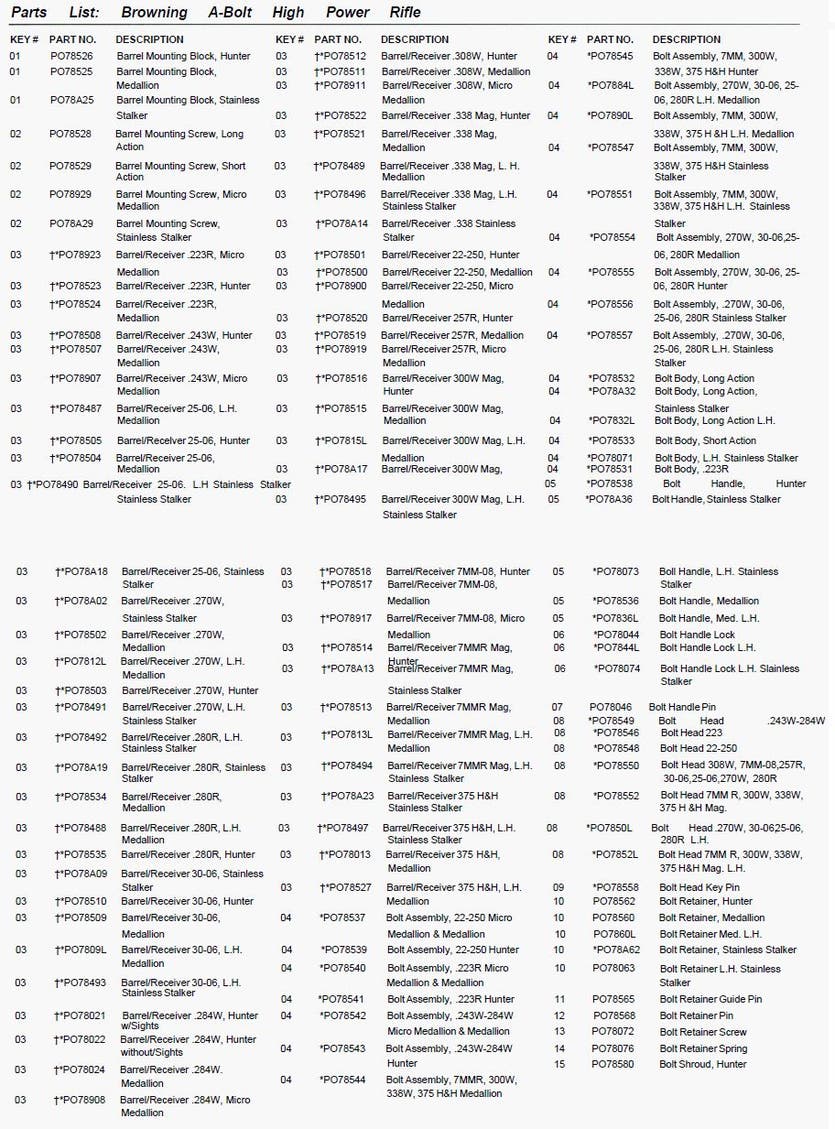
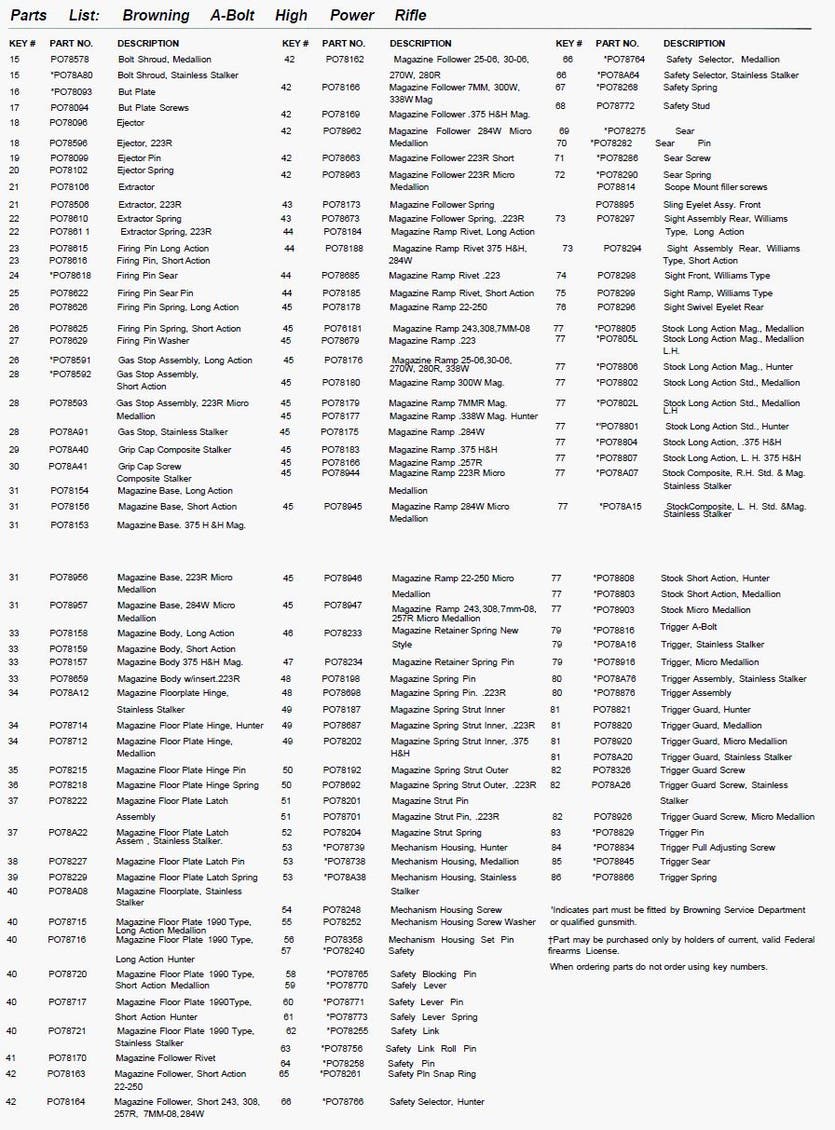
Schematic is provided for parts identification only and should not be used as a guide to assemble the rifle.
IMPORTANT: When ordering parts, list code number, part name, caliber, model and serial number. (Do not order parts using key numbers.)
CAUTION: Browning parts are made exclusively for Browning guns and should not be used in other guns even though models may be similar. Inadequately fitted parts may be dangerous.

Loading the Rifle
Loading the Rifle
The Browning A-Bolt utilizes a unique detachable box magazine with a hinged floorplate. The maga- zine on standard calibers holds four rounds. On magnum calibers, the Micro Medallion and 284 Win., the capacity is three rounds. Under certain conditions it may be possible to load an extra round into the magazine of the Micro Medallion, however, this practice may alter the function of your firearm. With an extra round in the magazine and the bolt closed. it may not be possible to latch the magazine floorplate.
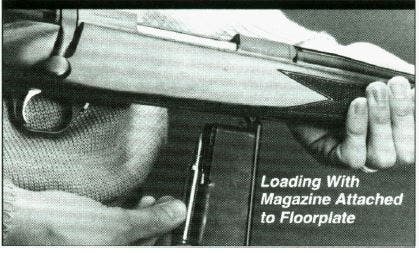
Loading with the magazine attached to the floorplate -
Hold the rifle with the barrel angled down toward the ground. The bolt may be in the open or closed position.
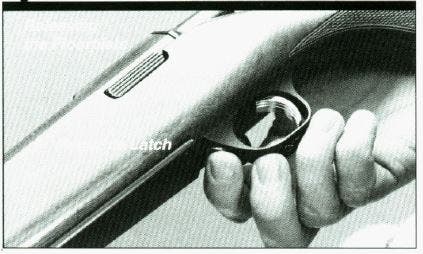
NOTE: IF THE BOLT IS IN CLOSED POSITION, BE SURE THE SAFETY IS IN THE “ON SAFE” POSITION. Hold the rifle with either hand at the forearm. Depress the magazine latch in front of the trigger guard with the index finger of your free hand and allow the hinged floorplate-magazine unit to swing downward (See Figure 7).
Lay a round on top of the follower and press down with your thumb until it is retained in the magazine. Care should be exercised in positioning each cartridge so that its base is flush with the rear of the magazine. If the nose of a cartridge protrudes beyond the front of the magazine, it could cause feeding problems or interfere with the closing of the magazine floorplate (See Figure 8).
After loading the magazine, swing the floorplate up- wards until it is retained by the magazine latch. The bolt may be cycled at any time you wish to load the chamber. Slide the thumb safety to the rear to
PLACE THE LOADED RIFLE IN “ON SAFE” STATUS. The magazine floorplate unit may be opened at any time to refill the magazine to capacity.
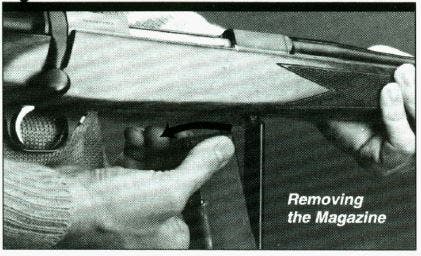
Loading with the magazine detached from the floorplate - PLACE THE RIFLE’S SAFETY IN THE “ON SAFE” POSITION. BE SURE THE MUZZLE IS POINTED IN A SAFE DIRECTION. With the magazine-floorplate unit open, the magazine may be detached by merely pulling it away from the hinged floorplate. Grasp the sides of the magazine, toward the front, then pull the magazine away from the floorplate (See Figure 9).
The rifle may be supported in its barrel down position during this procedure with the opposite hand at the forearm. Once the magazine has been detached, it may be reloaded with cartridges as described under “Loading with the magazine attached to the floorplate. ”
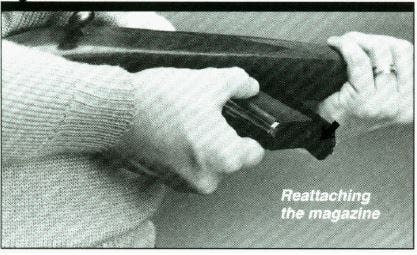
To reattach, insert the small lip on the rear face of the magazine into the matching groove in the back end of the floorplate (See Figure 10). Then snap the front of the magazine firmly into place. Extra magazines may be carried loaded for rapid replacement of an empty magazine, using this same procedure. After loading the magazine, swing it up into place until it is retained by the magazine latch.
CONVENTIONAL LOADING PROCEDURE— The A-Bolt rifle may also be loaded like most other bolt action rifles. Cartridges are inserted down into the magazine through the ejection Port. Place a cartridge on top of the follower and push it down into the magazine until it snaps in. After filling the magazine to capacity, a cartridge can be placed in the chamber by simply working the action.
LOADING TO FULL CAPACITY — If you wish to load a round into the chamber after loading the magazine, draw the bolt rearward to the fully rear-ward position. Then close the bolt chambering a round. PLACE THE SAFETY IN THE “ON SAFE” POSITION, Lower the floorplate and refill the magazine to capacity as previously described. The magazine floorplate may be opened at any time for reloading.
If you are loading through the ejection port. as explained under “Conventional Loading Procedure,” you can load to full capacity by first filling the magazine to capacity, then manually thumbing a round into the chamber, and pushing the cartridges in the magazine down while closing the bolt. IMMEDIATELY PLACE THE SAFETY IN THE “ON SAFE” POSITION.
Unloading the Rifle
WITH THE SAFETY IN THE “ON SAFE” POSITION AND THE MUZZLE POINTED IN A SAFE DIRECTION, release the magazine floorplate to its open position. Move the safety to “off safe” and draw the bolt to its rear or open position. This will extract and eject any live round that may be in the chamber. As a good safety practice, ALWAYS VISUALLY INSPECT THE CHAMBER TO BE ABSOLUTELY SURE A LIVE ROUND IS NOT PRESENT. The magazine may then be detached and either kept loaded or the cartridges may be stripped from the magazine with your thumb. To do this, push forward on the base of each round with your thumb until the cartridge clears the retaining rims. You can close the floorplate either without the magazine or with an empty magazine in place. The bolt may now be returned to the closed position.
Scope Mount -
All calibers are drilled and tapped for scope mounts. See your Browning dealer to purchase the scope mount base and rings designed for the A-Bolt.
Trigger Adjustment -
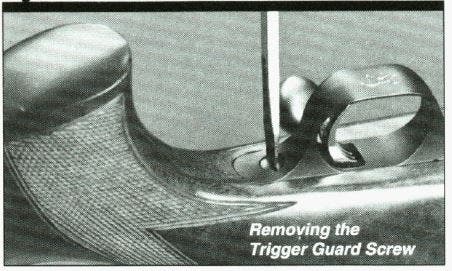
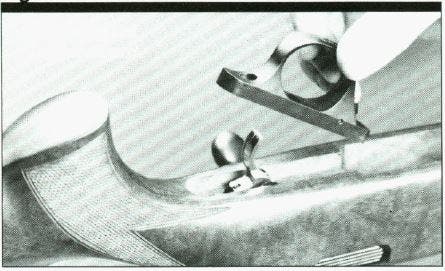
1. The A-Bolt’s trigger is preset at the factory. The trigger pull can be adjusted within a range of approximately 3 to 6 pounds. To adjust the trigger pull, first MAKE CERTAIN THAT THE RIFLE IS UNLOADED. Next lower the floorplate and carefully remove the trigger guard screw (See Figure 11). Lift the trigger guard out of the stock (See Figure 12).
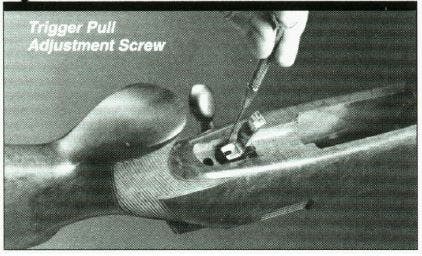
2. The trigger pull adjustment screw is located at the rear of the trigger assembly (See figure 13).
To decrease the weight of the trigger pull, turn the adjustment screw in a clockwise direction using a small screwdriver. To increase the trigger pull, turn the adjustment screw in a counter clockwise direction. NOTE: If trigger pull is increased too much, the trigger cannot be pulled. Turn the screw clockwise until the trigger can be pulled.
3. Trigger pull can be measured, with the bolt closed, using a very accurate spring scale or a commercially available set of trigger pull measuring weights. Most gunsmiths can also measure trigger pull for you.
4. When finished making the adjustment, place the trigger guard back in the stock and reinstall the trigger guard screw snugly.
Swivels -
The Browning A-Bolt Medallion is equipped with swivel studs and swivels. Other A-Bolt models are equipped with swivel studs only.
Cleaning and Maintenance
Cleaning and Maintenance
The correct procedure for cleaning your A-Bolt is as follows:
1 - BE CERTAIN THE RIFLE IS UNLOADED AND THE BOLT HAS BEEN REMOVED.
2 - USING A CLEANING ROD WITH TIP AND PATCH LARGE ENOUGH FOR SNUG FIT IN BORE, insert rod and patch in barrel from the muzzle end and run back and forth several times. Caution should be exercised to ensure that the cleaning rod or handle does not strike the crown of the muzzle, as damage to this area can adversely affect the accuracy of the rifle.
3 - INSPECT THE CHAMBER AND BORE FOR POWDER FOULING. A normal amount of powder residue can be expected and is not serious. It can usually be removed by repeating Step Number 2, using a patch saturated with a nitro solvent. If or when fouling should become heavy, it can be removed with a brass bore brush. Dip the brush in a nitro-solvent and scrub the chamber and bore until the fouling is removed. To prevent brass bristles from breaking off, the brush should be pushed completely through the bore before being withdrawn.
4 - AFTER FOULING HAS BEEN REMOVED, THE BORE SHOULD BE WIPED DRY. Then pass a slightly oiled patch run through it for preservation. A fine, light gun oil like Browning Oil is recommended.
5 - THE INTERIOR OF THE RECEIVER AND THE BOLT SHOULD PERIODICALLY BE WIPED OFF WITH A CLEAN RAG. Remove the bolt occasionally and wipe clean. Any dried oil in the receiver area should also be removed. Follow this cleaning with a very light film of oil on working parts. Do not pour large quantities of oil into the action. An excess of oil will run into the wood and cause it to soften or warp.
6 - WIPE ALL EXPOSED METAL SURFACES WITH AN OILED CLOTH, MAKING SURE TO WIPE GUN CLEAN OF ALL FINGER MARKS. Finger marks should be removed because they provide a place where moisture can accumulate. Ordinary good judgment will, of course, indicate that the metal of the gun should receive a light film of oil any time the gun has been exposed to adverse weather or handling.
7 - THE WOOD SURFACES OF YOUR A-BOLT CAN ALSO BE WIPED LIGHTLY WITH BROWNING OIL, or you can apply a quality wood or furniture polish to the stock and forearm. Using one of these methods (not both), will enhance the beauty and durability of your A-Bolt.
Disassembly
Disassembly
NEVER ATTEMPT TO TAKE YOUR A-BOLT APART FURTHER THAN EXPLAINED IN THIS MANUAL.
This is a specialized, finely fitted mechanism. You may permanently mar it by attempting to disassemble the inner mechanism assemblies. If further disassembly for service or cleaning is required. take your gun to a Browning recommended Service Center or a competent gunsmith, or send it to our Arnold, Missouri Service Facility as explained under “Service or Repair".
Cleaning the magazine
Cleaning the magazine
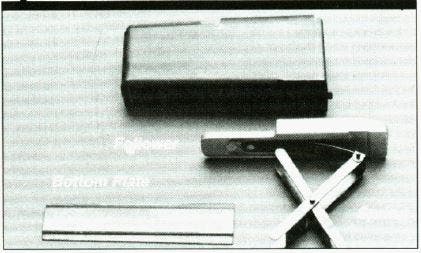
Depending on how often you shoot. it is helpful to disassemble the box magazine for cleaning. First, remove the detachable box magazine from the rifle. Slide the magazine bottom plate out to the rear. The magazine spring and follower can then be easily removed for inspection. Wipe off any dirt or residue then apply a very thin coat of oil and wipe clean again. Too much oil will only serve to collect oil and dirt. TO reassemble. reinsert the spring and fol- lower, then slide the bottom plate back into position (See Figure 14).
SERVICE OR REPAIR
SERVICE OR REPAIR
If your firearm should require service or repairs, we suggest you first contact a local recommended Browning Firearms Service Center. Contact your Browning sporting goods dealer or call our Service Department for the address of the Service Center nearest you. Otherwise, you may send your firearm directly to our own Service department. For technical questions about your firearm or service call our Service Department.
Browning Service Department
3005 Arnold Tenbrook Road
Arnold, Missouri 63010-9406
Phone: 1-800-322-4626
Canadian Customers call or write:
Browning Canada Sports Ltd. / Ltee,
5617 Chemin St-Francois
St-Laurent, Quebec H4S 1W6
Phone: (514) 333-7261
When returning your firearm for servicing, you must do the following:
- Be sure it is completely unloaded.
- Package it securely in a cardboard container.
- Enclose a letter with your firearm that clearly describes the trouble experienced and the repairs or alterations desired.
- If convenient, send a copy of the letter to us separately
- Never return ammunition with your firearm. It is against postal and most commerce regulations.
If you have any questions about this manual or about any other Browning products, call or write our Consumer Information Department:
Browning Consumer Information
Morgan, Utah 84050
Phone: (801) 876-2711
You Are Responsible For Firearms Safety
You Are Responsible For Firearms Safety
As a gun owner, you accept a set of demanding responsibilities. How seriously you take these responsibilities can be the difference between life and death. Failure to follow any of these instructions can cause extensive damage to your gun and/or possible serious injury or death to yourself and others. There is no excuse for careless or abusive handling of any firearm. At all times handle any firearm with intense respect for its power and potential danger.
PLEASE READ AND UNDERSTAND ALL OF THE CAUTIONS, PROPER HANDLING PROCEDURES AND INSTRUCTIONS OUTLINED IN THE OWNER’S MANUAL BEFORE USING YOUR NEW FIREARM.
1 - ALWAYS KEEP THE MUZZLE OF YOUR RIFLE POINTED IN A SAFE DIRECTION, even though you are certain that the rifle is unloaded. Never point any firearm at anything you do not intend to shoot. Be extremely alert and aware of all persons and property within the range of your ammunition.
2 - NEVER RELY TOTALLY ON YOUR FIREARM’S MECHANICAL “SAFETY” DEVICE. The word “safety” describes a gun’s blocking or disengaging mechanism for the trigger, sear, hammer and/or firing pin. Although mechanical devices place the rifle in a SAFER status, no guarantee can be made that the gun will not fire even if the “safety” is on the “on safe” position.
LIKE ANY MECHANICAL DEVICE, A “SAFETY” CAN SOMETIMES FAIL; IT CAN BE JARRED OR INADVERTENTLY MANIPULATED INTO AN UNSAFE CONDITION.
Mechanical “safeties” merely aid safe gun handling and are no excuse for pointing your guns muzzle in an unsafe direction. While it is a good idea to “test” your guns mechanical “safeties” periodically for proper function, NEVER TEST IT WHILE YOUR GUN IS LOADED OR POINTED IN AN UNSAFE DIRECTION.
Safe gun handling does not stop with your guns mechanical “safety” devices – it starts there. Always treat this rifle with the respect due a loaded, ready-to-fire firearm.
3 - WHENEVER YOU HANDLE A FIREARM, OR HAND IT TO SOMEONE, ALWAYS OPEN THE ACTION IMMEDIATELY, VISUALLY CHECK YOUR RIFLE'S CHAMBER, FEED MECHANISM AND MAGAZINE.
Make certain they do not inadvertently contain any ammunition. Always keep the chamber empty and "safety" in the "on safe" position unless shooting is imminent.
4 - DO NOT TRANSPORT YOUR RIFLE LOADED, WHETHER IN A SCABBARD, GUN CASE, OR OTHER CONTAINER.
5 - HUNTING FROM ELEVATED SURFACES SUCH AS TREE STANDS IS DANGEROUS, and may increase the risk of handling a firearm. The following rules should always be observed by you and those you hunt with: Always make certain that the stand being used is safe and stable. Always make certain that your firearm is unloaded when it is being taken up to and down from the stand. Always make certain that your firearm is not dropped from the stand, or dropped while it is being taken up to or down from the stand. Remember, a loaded firearm may discharge when dropped, even with the safety in the "on safe" position.
6 - BEWARE OF BARREL OBSTRUCTIONS, for the safety of both your gun and yourself. Mud, snow, and an infinite variety of other obstructions may inadvertently lodge in a barrel bore. It takes only one small obstruction to cause dangerously increased pressures that can ruin (swell or rupture) the finest rifle barrels.
BEFORE CHECKING FOR A BARREL OBSTRUCTION, BE CERTAIN NO LIVE ROUND IS IN THE CHAMBER AND THAT THE MAGAZINE IS REMOVED AND FEED MECHANISMS ARE COMPLETELY EMPTY. PLACE THE "SAFETY" IN THE "ON SAFE" POSITION.
Look through the barrel to be sure it is clear of any obstruction. If an obstruction is seen, no matter how small it may be, clean the bore with a cleaning rod and patch as described in "Cleaning and Maintenance Suggestions." Before the first firing, clean the bore with a cleaning rod and patch, and wipe away any anti-rust compound in the action / chamber areas.
7 - ALWAYS UNLOAD YOUR RIFLE WHEN NOT IN USE. REFER TO "UNLOADING THE RIFLE" FOR AN EXPLANATION OF HOW TO UNLOAD YOUR RIFLE PROPERLY.
As a safety precaution, it is preferable to disassemble your gun for storage. Store your gun and ammunition separately -- well beyond the reach of children. Take all safeguards to ensure your rifle does not become available to untrained, inexperienced or unwelcome hands.
8 - USE THE PROPER AMMUNITION.
The barrel and action of this rifle have been made with substantial safety margins over the pressures developed by established American commercial loads. Nevertheless, Browning assumes no liability for incidents which occur through the use of cartridges of nonstandard dimensions which develop pressures in excess of commercially available ammunition with standards established by the Sporting Arms and Ammunitions Manufacturers' Institute (SAAMI).
BE ALERT TO THE SIGNS OF AMMUNITION MALFUNCTION.
If you detect an off sound or light recoil when a cartridge s fired, DO NOT LOAD ANOTHER CARTRIDGE INTO THE CHAMBER. Open the action and remove all cartridges from the magazine, chamber and action areas. With the action open, glance down the barrel to make sure that an obstruction does not remain in the barrel. If there is an obstruction, completely clear the barrel before loading and firing again. Failure to follow these instructions can cause extensive damage to your gun and possible serious injury to yourself and others.
MAKE SURE OF ADEQUATE VENTILATION IN THE AREA THAT YOU DISCHARGE A FIREARM. WASH HANDS THOROUGHLY AFTER EXPOSURE TO AMMUNITION OR CLEANING A FIREARM.
Lead exposure can be obtained from discharging firearms in poorly ventilated areas, cleaning firearms or handling ammunition. Lead is a substance that has been known to cause birth defects, reproductive harm and other serious injury.
9 - DO NOT SNAP THE FIRING PIN ON AN EMPTY CHAMBER -- THE CHAMBER MAY NOT BE EMPTY!
Treat every gun with the respect due a loaded gun, even though you are certain the gun is unloaded.
10 - KEEP FINGERS AWAY FROM THE TRIGGER WHILE UNLOADING, LOADING, UNTIL YOU ARE READY TO SHOOT.
11 - BE SURE OF YOUR TARGET AND BACKSTOP.
Particularly during low light periods. Know the range of your ammunition. Never shoot at water or hard object.
12 - ALWAYS UNLOAD YOUR RIFLE'S CHAMBER BEFORE CROSSING A FENCE, CLIMBING A TREE, JUMPING A DITCH OR NEGOTIATING OTHER OBSTACLES.
Refer to "Unloading The Rifle" for instructions on the unloading of your rifle. Never place your loaded rifle on or against a fence, tree, car or other similar object.
13 - WEAR EYE AND EAR PROTECTION WHEN SHOOTING.
Unprotected, repeated exposure to gunfire can cause hearing damage. Wear ear protectors (shooting ear plugs or muffs) to guard against such damage. Wear shooting glasses to protect your eyes from flying particles. Allow proper distance (eye relief) between the scope and your eye when firing a scoped rifle or shotgun. Always keep a safe distance between the muzzle of your firearm and any persons nearby, as muzzle blast, debris and ejecting shells could inflict serious injury. Also, wear eye protection when disassembling and cleaning your shotgun to prevent the possibility of springs, spring-tensioned parts, solvent or other agents from contacting your eyes.
14 - DROPPING A LOADED GUN CAN CAUSE AN ACCIDENTAL DISCHARGE even with the "safety" in the "on safe" position. Be extremely careful while hunting or during any shooting activity, to avoid dropping any firearm.
15 - IF YOUR RIFLE FAILS TO FIRE, KEEP THE MUZZLE POINTED IN A SAFE DIRECTION. Hold this position for a minimum of 30 seconds. Carefully open the action and remove the cartridge. If the primer is indented, the cartridge should be disposed of in a way that cannot cause harm. If the primer is not indented, your firearm should be examined by a qualified gunsmith and the cause of the malfunction should be corrected before further use.
16 - BE DEFENSIVE AND ON GUARD AGAINST UNSAFE GUN HANDLING AROUND YOU AND OTHERS.
Don't be timid when it comes to gun safety. If you observe other shooters violating any of these safety precautions, politely suggest safer handling practices.
17 - BE CERTAIN YOUR RIFLE IS UNLOADED BEFORE CLEANING. Because so many gun accidents occur when a firearm is being cleaned, special and extreme care should be taken to be sure your gun is unloaded before disassembly, cleaning and reassembly. Keep ammunition away from the cleaning location. Never test the mechanical function of any firearm with live ammunition.
18 - TEACH AND SUPERVISE FIREARMS SAFETY TO ALL MEMBERS OF YOUR FAMILY --ESPECIALLY TO CHILDREN AND NONSHOOTERS.
Closely supervise newcomers to the shooting sports. Encourage enrolling in hunting/shooting safety courses.
19 - NEVER DRINK ALCOHOLIC BEVERAGES OR TAKE ANY TYPE OF DRUGS BEFORE OR DURING SHOOTING.
Your vision and judgment could be dangerously impaired, making your gun handling unsafe to you and to others.
20 - READ AND HEED ALL WARNINGS in this instruction book, on ammunition boxes and with all accessories that you install on your firearm. It is your responsibility to secure the most up-to-date information on the safe handling procedures of your Browning gun. Browning assumes no liability for incidents which occur when unsafe or improper gun accessories or ammunition combinations are used.
21 - PERIODIC MAINTENANCE -- AVOID UNAUTHORIZED SERVICING.
Your rifle is a mechanical device which will not last forever, and as such, is subject to wear and requires periodic inspection, adjustment and service. Browning firearms should be serviced by a Browning Recommended Service Center or by Browning's service facility in Arnold, Missouri. Browning cannot assume any responsibility for injuries suffered or caused by unauthorized servicing, alterations or modifications of Browning firearms.
22 - BROWNING RESERVES THE RIGHT TO REFUSE SERVICE ON FIREARMS THAT HAVE BEEN ALTERED, ADDED TO OR SUBSTANTIALLY CHANGED.
Removal of metal from barrel(s), or modification of the firing mechanism and/or operating parts may lead to Browning's refusal of service on such firearms. Browning will charge the owner parts and labor to return the firearm to original Browning specifications.
DO NOT, UNDER ANY CIRCUMSTANCES, ALTER THE TRIGGER, SAFETY OR PARTS OF THE FIRING MECHANISM OF THIS OR ANY OTHER FIREARM. FAILURE TO OBEY THIS WARNING MAY RESULT IN INJURY OR DEATH TO YOURSELF OR OTHERS.