

Operation and care of
BOSS (Ballistic Optimizing Shooting System) Owner's Manual
BOSS (Ballistic Optimizing Shooting System) Owner's Manual
These are additional instructions specific to the BOSS, installed on your new A-Bolt II or BAR Mark II rifle. You must read and understand the cautions and proper handling procedures outlined in this booklet and in the manual received with your rifle before using your new BOSS equipped rifle. If you are missing the operating manual for your rifle, we can send you a free manual on request.
CAUTION: THE THREADING ON YOUR BARREL IS FOR BROWNING BOSS COMPONENTS ONLY. DO NOT INSTALL ANY OTHER DEVICE ONTO THE BROWNING BOSS BARREL. DO NOT INSTALL THE BOSS DEVICE ON ANY RIFLE THAT IS NOT DESIGNED AND FITTED FOR THE BOSS BY BROWNING. DOING SO MAY CAUSE SERIOUS INJURY OR DEATH TO YOURSELF OR OTHERS.
The BOSS on your new A Bolt II and BAR Mark II is a revolutionary patented achievement in firearm ballistics. Never before has any device so dramatically improved the overall performance or a rifle. The Browning BOSS gives you excellent ''out-of-the-box" accuracy along with significant recoil reduction. It sets a new standard of rifle performance.
GENERAL OPERATION
The BOSS Ballistic Optimizing Shooting System allows you to fine-tune accuracy by modifying the vibrations of your rifle barrel using an adjustable weight system.
Every time a rifle is fired, barrel vibrations are set in rnotion. These vibrations occur in all directions, even back and forth along the axis of the barrel. Browning research has confirmed that barrel vibrations are the primary cause of inaccuracy. Barrel vibrations are influenced by many factors such as bullet type, bullet weight, primers, different powders and barrel configurations.

The BOSS adjusts timing of barrel vibrations so the bullet consistently leaves the rifle muzzle at the most advantageous time. Once the BOSS is adjusted to this "Sweet spot" for a given ammunition, your rifle will consistently deliver extraordinarily tight groups. With precision ammunition, BOSS equipped rifles of many calibers are capable of 100-yard, one hole groups. The smallest 3-shot group obtained during the BOSS development measured an incredible .051'' at 100 yards, using factory loaded hunting ammunition. No longer will you need to try a variety of ammunitions to obtain acceptable accuracy. With the BOSS you can tune your rifle to get the optimum accuracy for all available factory loads.
When adjusted to the "sweet spot" the BOSS will compensate for slight deviations in ammunition velocity. The BOSS will not, however, compensate for poor shooting or flyers caused by low-quality bullets and ammunition.
TO OBTAIN THE HIGHEST LEVEL OF ACCURACY FROM YOUR RIFLE IT IS RECOMMENDED THAT THE RIFLE BORE BE CLEANED EVERY 12 TO 15 ROUNDS. SEE "CLEANING THE RIFLE BORE" SECTION OF THIS BOOKLET FOR CLEANING PROCEDURES.
Muzzle Brake Feature
WARNING: THE "BOSS" INCLUDES A RECOIL REDUCING MUZZLE BRAKE WHICH PROVIDES SUBSTANTIAL INCREASED NOISE/MUZZLE BLAST. ALWAYS WEAR HEARING PROTECTION TO PREVENT HEARING LOSS OR DAMAGE.
The unique exhaust hole pattern on the BOSS provides considerable recoil reduction. Recoil reduction of the BOSS ranges from 30% to 50% depending on caliber, weight of rifle, etc.
You will experience an increase in noise and concussion (muzzle blast) when a BOSS equipped rifle is fired. Hearing protectors (shooting ear plugs or muffs) should always be worn to guard against hearing damage when shooting a BOSS-equipped rifle. Wear shooting glasses to protect your eyes from flying particles. Always keep a safe distance between the muzzle of your firearm and any persons nearby, as muzzle blast, debris and ejecting shells could inflict serious injury.
BOSS Specifications
The BOSS body length is 2 inches for all calibers. The size of the gas vent holes and hole pattern is the same for all calibers. The size of the bullet exit hole is the same for all calibers except for the 338 Win. Mag. and 375 H&H. The thread system for the 338 Win. Mag. and the 375 H&H is different from other calibers to rule out the possibility of accidentally switching components and creating an unsafe combination.
Each BOSS consists of a micro-adjustable locknut and body (See Figure 1). The body of the BOSS consists of a weight and muzzle brake. The weight and muzzle brake are affixed by LOCTITE.
The micro-adjustable locknut has a micrometer adjustment ring.
To obtain the utmost accuracy from your BOSS equipped rifle it is very important that the micro-adjustable locknut and body are always tight.
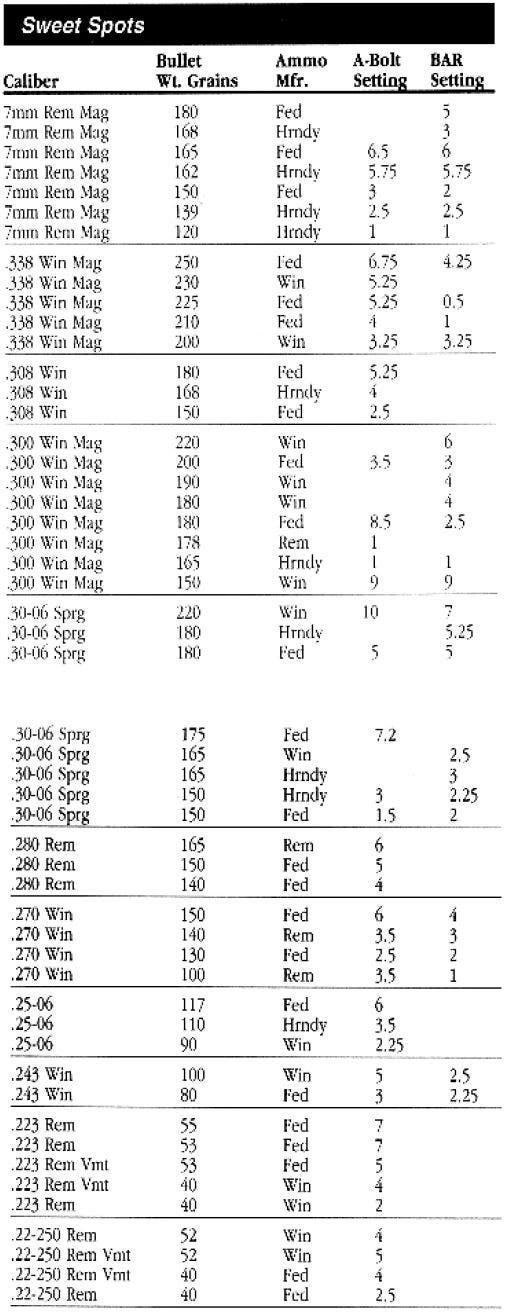
The "Sweet Spot"
Precision accuracy , from the BOSS, system is achieved by calibrating your rifle caliber and ammo with a "sweet spot" setting. The "sweet spot" chart in this manual lists average or suggested "sweet spots." These settings were determined through extensive testing by the Browning Research and Development staff. ''Sweet spots" may vary between rifles of identical specifications with a given ammunition. Even one-quarter of a turn away from the "sweet spot" can cause a group to spread as much as one inch or more. We suggest you use our listed "sweet spot" setting as a starting point in determining the exact ''sweet spot" setting for your particular rifle and make adjustments accordingly. NOTE: ANY CHANGE IN BOSS SETTING MAY SLIGHTLY ALTER YOUR RIFLE'S POINT OF IMPACT.
It's recommended you set the BOSS "sweet spot" setting before sighting in your rifle for windage and elevation. The BOSS was tested in full turn, 1/2, and 1/4 turn increments. Tighter groups may be achieved with the BOSS tested in other positions. On the chart, found lower on this page, "sweet spots" are listed by both ammunition and model. Settings not listed either do not apply or are for ammunition not yet tested.
Preliminary Adjustments
Before setting your "sweet spot," it is important that your BOSS is calibrated with 1he barrel. This will ensure that your rifle is consistent with those tested by Browning Research and Development when BOSS "sweet spots" were determined.
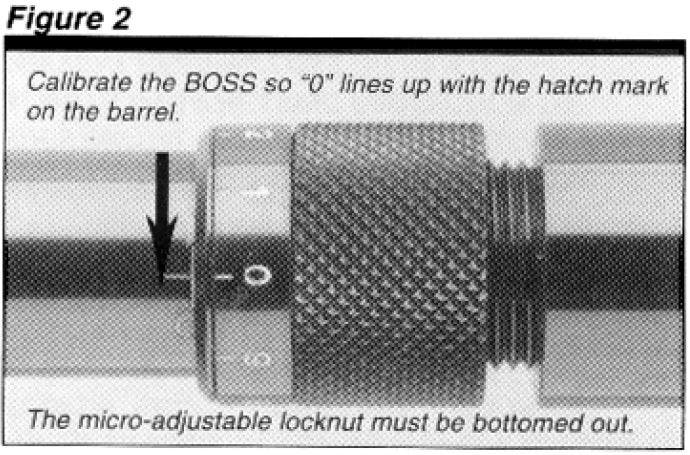
To find out if your BOSS needs to be calibrated, loosen the micro-adjustable locknut and turn it until it bottoms out on the threads of the BOSS or will not loosen any further. If your BOSS is calibrated, the "I" on the micrometer adjustment ring will line up with the longitudinal hatch mark on the barrel (See Figure 2).
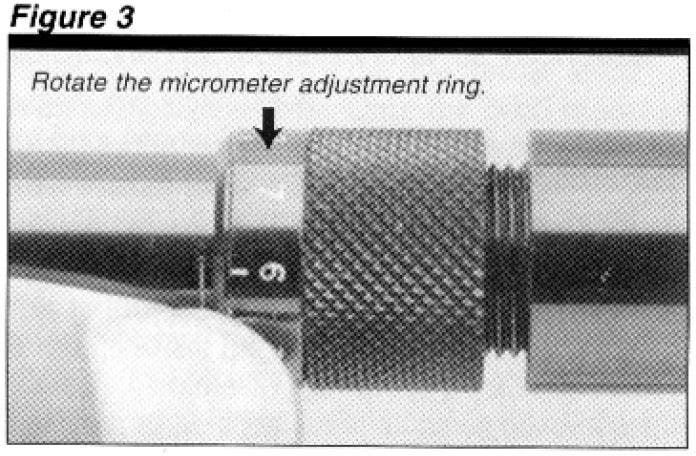
If the "0" isn't aligned with the longitudinal hatch mark, you will need to calibrate your BOSS. Move the micrometer adjustment ring on the bottom of the micro-adjustable locknut so that the "0" is aligned, with the longitudinal hatch mark. To adjust the micrometer adjustment ring, insert your finger nail or a small pointed object in the split of the ring and rotate the ring (See Figure .3).
Setting your Rifle to the "Sweet Spot"
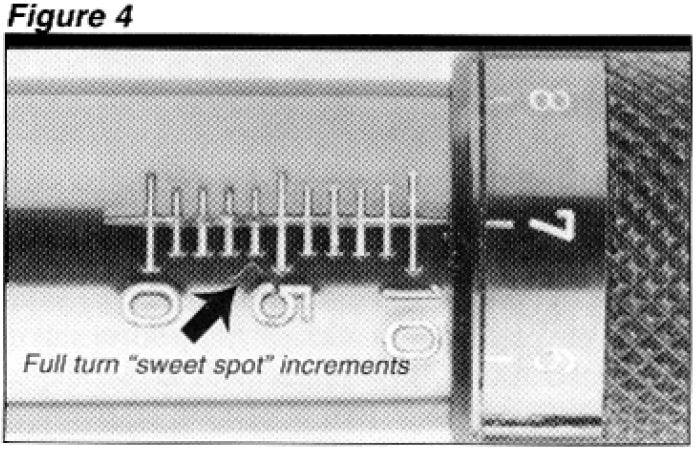
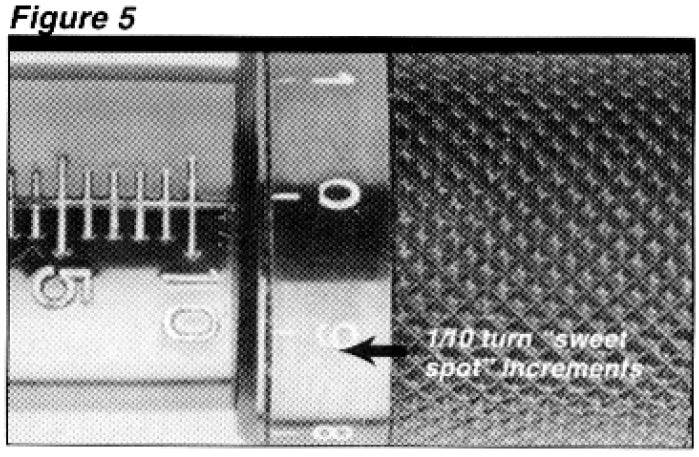
Full turn "sweet spot" settings or graduations are numbered 1 - 10 and inscribed on the barrel of your rifle (See figure 4). Smaller, 1/10 turn increments are inscribed on the micrometer adjustment ring (See Figure 5). To set the "sweet spot" the microadjustable locknut is turned either clockwise or counterclockwise until it is aligned with the desired "sweet spot" number inscribed on your rifle's barrel. One full revolution of the microadjustable locknut indicates one full change in setting or one index mark on the barrel. 1/10 turn increments are set by rotating the microadjustable locknut until the desired setting lines up with the hatch mark on the barrel.
IMPORTANT: When adjusting the "Sweet spot" make sure you grip the knurled surface of the locknut. The knurled portion of the micro-adjustable locknut and micrometer adjustment ring must rotate together to ensure a precise "sweet spot" setting and retainment of proper calibration.
CAUTION: WHEN SETTING THE "SWEET SPOT" ON YOUR RIFLE MAKE CERTAIN YOUR RIFLE IS FULLY UNLOADED AND THAT THE RIFLE'S SAFETY IS IN THE "ON SAFE" POSITION AND YOUR RIFLE IS POINTED IN A SAFE DIRECTION.
EXAMPLE 1:
1. Suppose you have a 270 caliber A-Bolt II rifle and are sighting in with 150 grain cartridges. Referring to the "sweet spot" chart you will find the average "sweet spot" is 6.0 for a 270 A- Bolt II with 150 grain ammo.
2. After having made sure your BOSS is calibrated properly on the barrel, rotate the micro-adjustable locknut counter-clockwise six full revolutions. The edge of the micrometer adjustment ring should line up or rest on the marking for 6 on the barrel of the rifle.
NOTE: It is not necessary to calibrate your BOSS on the barrel with each change in the "Sweet spot" setting. However, you should check the BOSS periodically to ensure proper alignment.
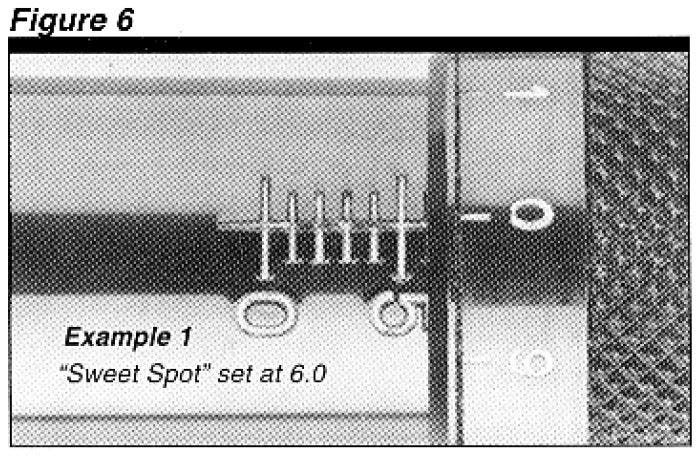
3. Since the "sweet spot" is listed at 6.0, the 0 inscribed on the micrometer adjustment ring should line up with the hatch, mark or longitudinal line on the barrel (See Figure 6).
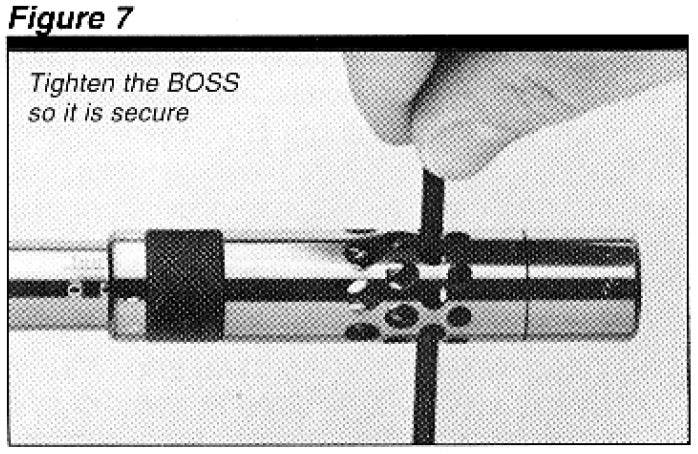
4. Tighten the body of the BOSS so it is secure against the micro-adjustable locknut. Use the special wrench supplied with your rifle. Insert the wrench through one end of an exhaust hole and out through another. It is recommended to insert the wrench through the smallest set of holes possible. Turn clockwise until the body and micro-adjustable locknut are tight (See Figure 7).
CAUTION: REMOVE THE WRENCH FROM THE BOSS EXHAUST HOLES BEFORE FIRING YOUR RIFLE. FAILURE TO DO SO CAN CAUSE INJURY TO YOURSELF OR OTHERS.
EXAMPLE 2
1. Suppose you have a 300 Win. Mag. BAR Mark II rifle with Federal 180-grain cartridges. Referring to the "sweet spot" chart you will find the average "sweet spot" is 2.5.
2. Calibrate your BOSS and rotate the micro-adjustable locknut counterclockwise until the edge of the micrometer adjustment ring lines up or rests on the marking for 2 on the barrel.
3. Since the ''sweet spot" is listed as 2.5, the 5 inscribed on the micrometer adjustment ring should line up with the hatch mark or vertical line on the barrel (See Figure 8).

4. Using the special wrench, tighten the body of the BOSS so it is secure against the locknut. Your BOSS system is now, calibrated for Federal 180 grain ammo using a 300 Win. Mag. BAR Mark II.
More Precise Adjustments
If you desire to further experiment and possibly obtain even tighter groupings, turn the microadjustable locknut 1/4 of a turn clockwise, and fire your rifle at your target. If groups open up, turn the micro-adjustable locknut counterclockwise and sight-in at different 1/4 turns until you are satisfied with your groupings. Again, "sweet spots" may vary between rifles of identical specifications with a given ammunition. As in any sighting-in process, the best results are obtained through trial and error. You may need to retune the BOSS should you decide to shoot different brands, lots, and types of ammunition.
CAUTION: WHEN ADJUSTING THE SWEET SPOT NEVER SET THE BOSS BEYOND THE 10 SETTING.
With the BOSS set beyond 10, the BOSS could become loose, misaligned or fall off when firing the rifle. This could result in serious injury to yourself or others.
IMPORTANT: Each time you set the "sweet spot", the body of the BOSS must be eight against the micro-adjustable locknut. Failure to keep the components tightly locked will adversely affect the accuracy.
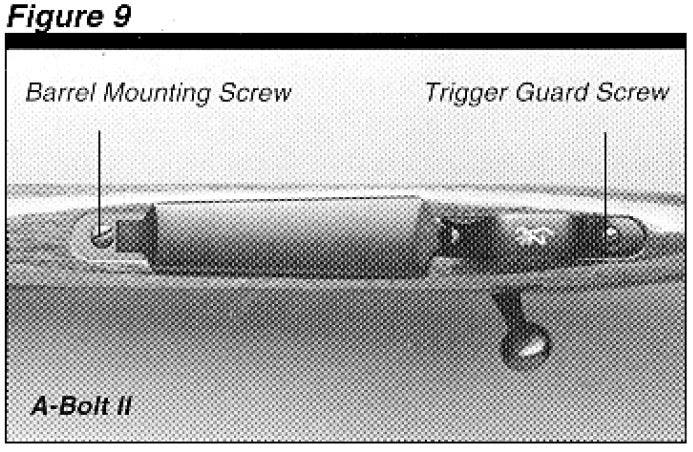
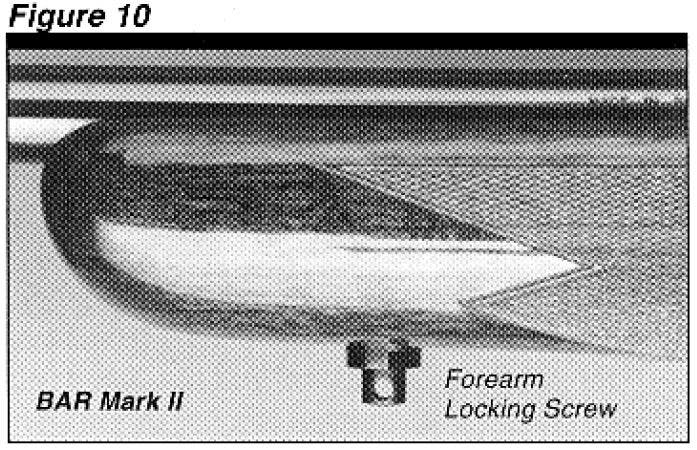
NOTE: The barrel mounting screw and trigger guard screw on the A-Bolt rifle should also be fully tightened (See Figure 9). If the barrel mounting screw and trigger guard screw are loose on your A-Boll 11, tighten the barrel mounting screw before tightening the trigger guard screw. On the BAR Mark ll, the forearm locking screw should be kept fully tightened (See Figure 10) to obtain and retain the best possible accuracy from your rifle.
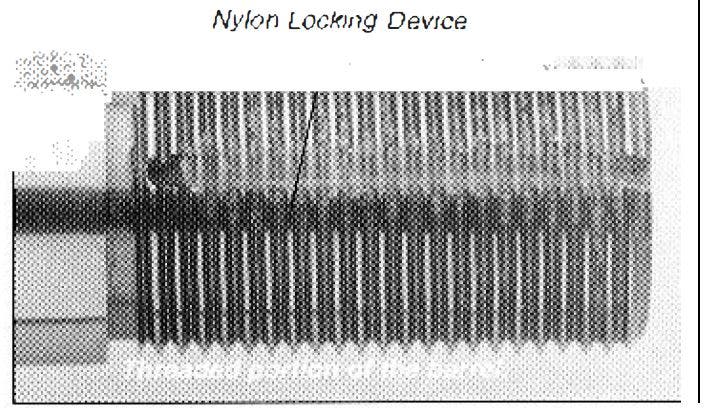
Nylon Locking Device
A strip of nylon in the threaded portion of the barrel helps keep the "sweet spot" positioned. This locking device keeps the components tight to the barrel, which is essential to optimum accuracy (See Figure 11). The nylon may become worn with prolonged use and may require replacement. Replacement nylon locks are available from the Browning Parts Department in Arnold, Missouri.
Figure 11
Figure 11
Care of your BOSS equipped rifle.
The BOSS is a precision instrument. IN ORDER FOR THE BOSS TO OPERATE EFFECTIVELY IT IS VERY IMPORTANT YOUR RIFLE REMAINS IN THE SAME CONDITION IT WAS PURCHASED. IT IS ABSOLUTELY NECESSARY FOR YOUR RIFLE'S BARREL TO REMAIN FREE-FLOATING AND THE ACTION PROPERLY BEDDED.
This holds true for either the A-Bolt II or BAR Mark II. To check for adequate clearance, it is recommended that a piece of paper, folded once, be able to pass between the barrel and stock without any interference. If the barrel is not. free-floating. take your rifle to a competent gunsmith or send it to the Browning Service Facility in Arnold, Missouri. Special rubber bedding in the barrel mounting screw area and magazine welll area of your BOSS equipped A-Bolt II rifle is installed at the factory and aids greatly in improving accuracy. (Rubber bedding is not needed for the BAR Mark II). If you have any modifications done to your stock, make sure the rubber bedding has not been altered. If the rubber bedding on your rifle has been modified send your rifle to the Browning Service Facility in Arnold, Missouri.
Cleaning the Rifle Bore
To maintain utmost accuracy from your BOSS equipped rifle, or any rifle, extensive testing has proven that the rifle bore must be cleaned every 12 to 15 rounds.
CAUTION: BEFORE CLEANING YOUR RIFLE MAKE CERTAIN YOUR RIFLE IS FULLY UNLOADED, THE MAGAZINE IS REMOVED, THE SAFETY IS IN THE "ON SAFE" POSITION AND YOUR RIFLE IS POINTED IN A SAFE DIRECTION.
We highly recommend that your rifle be cleaned with the BOSS installed on your barrel. On the A-Bolt II, remove the bolt and clean from the breech end.
The BAR Mark II, by design, must be cleaned from the muzzle. Use extra care in cleaning to avoid damaging the muzzle crown. Modern cartridge jackets are made mainly of copper and zinc. These metals glide easier and increase barrel life, however, residues from copper and zinc also stick to the barrel and require more frequent cleaning. As top bench rest shooters have known for decades, copper solvent is the key to cleaning a barrel for optimum accuracy. The recommended cleaning procedure is as follows:
1. Clean the Bore with a good powder solvent to remove all traces of powder residue. Performing this step before the application of a copper solvent will prevent the bore from refouling with copper so readily.
2. Swab the bore with a good copper solvent using the manufacturer's recommended procedure. After neutralizing the solvent, generally with oil, it is important to swab the bore dry. Swabbing the bore dry will reduce copper buildup.
NOTE: DO NOT USE SOLVENTS OF DIFFERENT MANUFACTURERS CONCURRENTLY. A CHEMICAL REACTION MAY RESULT THAT WILL CORRODE EVEN STAINLESS STEEL BARRELS. IT IS IMPORTANT TO FOLLOW THE MANUFACTURERS RECOMMENDATIONS EXACTLY.
3. If absolutely necessary, the BOSS may be removed to facilitate cleaning your rifle.
IN CLEANING THE BAR MARK II WITH THE BOSS REMOVED, THE PLASTIC CAP (CROWN AND ACCURACY PRESERVER), PROVIDED WITH THE BAR MARK II, SHOULD ALWAYS BE USED TO PRESERVE THE MUZZLE'S CROWN.
NOTE: WHEN CLEANING THE BAR MARK II ALWAYS MAKE SURE THE CAP USED MATCHES THE CALIBER OF THE RIFLE BEING CLEANED. THE CALIBER IS MARKED ON THE END OF THE CAP.
Clean the BOSS by unscrewing the body and micro-adjustable locknut from the rifle. with the components disassembled, wipe each component with oil. Browning Oil is excellent for this application. Lightly oil all threads and make sure the exhaust holes are free of obstructions.
REMEMBER TO REMOVE THE PLASTIC CAP WHEN REASSEMBLING THE BOSS ON THE BAR MARK II.
4. Reassemble your BOSS by screwing on the micro-adjustable locknut and then the BOSS body. After taking apart the BOSS it will be necessary to reset the "sweet spot".
MAKE CERTAIN ALL CLEANING PATCHES ARE REMOVED FROM THE BARREL AND EXHAUST HOLES IN THE BODY OF THE BOSS BEFORE FIRING YOUR RIFLE.
5. When firing for extreme accuracy, after cleaning the bore it is recommended that fouling shots be fired before firing for accuracy. Additionally, it is recommended the rifle be allowed to cool even three rounds.
A-Bolt II BOSS Parts Listing
A-Bolt II BOSS Parts Listing
Caliber
22-250 Rem. Hunting
22-250 Rem. Varmint
223 Rem. Hunting
223 Rem. Varmint
243 Win.
25-06 Rem.
270 Win.
7mm-08 Rem.
280 Rem.
308 Win.
30-06 Sprg.
7mm Rem. Mag.
300 Win. Mag.
338 Win. Mag.
Locknut
X
E
X
E
X
A
A
X
A
Y
Z
C
C
D
Body
F
K
F
K
F
F
F
F
F
G
G
G
G
H
Weight
M
V
M
V
M
M
M
M
M
N
P
N
R
T
BAR Mark II BOSS Parts Listing
BAR Mark II BOSS Parts Listing
Caliber
243 Win.
270 Win.
308 Win.
30-06 Sprg.
7mm Rem. Mag.
300 Win. Mag.
338 Win. Mag.
Locknut
B
B
C
C
W
W
D
Body
F
F
G
G
G
G
H
Weight
M
M
N
P
N
R
T
When ordering parts, please list the part name and letter designation, caliber, the model and serial number.
Premium-grade ammunition of the same load requires a different sweet spot setting than standard-grade ammunition.
Only commercially available hunting ammunition complying to Sporting Arms and Ammunition Manufacturers' Institute (SAAMI) specifications was used throughout the testing of the BOSS. It is unknown what group sizes may be possible with the BOSS using match-grade ammunition.
Service and Repair
Service and Repair
lf your firearm should require service or repairs, we suggest you first contact a local recommended Browning Firearms Service Center. Contact your Browning sporting goods dealer or call our Service Department for the address of the Service Center nearest you. Otherwise, you may send your firearm directly to our own Service Department. For technical questions about your firearm or service call our Service Department.
Browning Service Department
3005 Arnold Tenbrook Road
Arnold, Missouri 63010-9406
Phone: 1-800-322-4626
Canadian Customers call or write:
Browning Canada Sports Ltd. / Ltee,
5617 Chemin St-Francois
St-Laurent, Quebec H4S 1W6
Phone: (514) 333-7261
When returning your firearm for servicing, you must do the following:
A. Be sure it is completely unloaded.
B. Package it securely in a cardboard container.
C. Enclose a letter with your firearm that clearly describes the trouble experienced and the repairs or alterations desired.
D. If convenient, send a copy of the letter to us separately.
E. Never return ammunition with your firearm. It is against postal and most commerce regulations.
If you have any questions about this manual or about any other Browning products, call or write our Consumer Information Department:
Browning Consumer Information
Morgan, Utah 84050
Phone: (801) 876-2711